Birkenhead Woodside
Posted
Full Member
A layout in progress, slow progress...
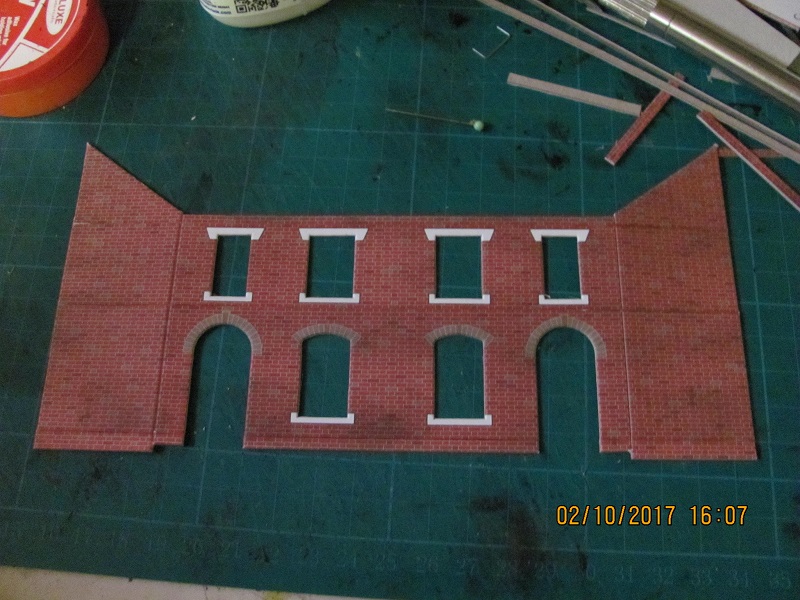
Thanks Max and Marty – yes,I think the weathering does improve the look of the Metcalfe kits, one day I’ll get around to weathering all the other stuff (Hooton) I’d built before I started experimenting with weathering… you’ve guessed it – it’s on a list. Thinking back to my early years in the ’Pool our yard wasn’t that big….Now, more progress to report. I continued with the back walls, not always making a particularly good job of it.
Yes, not exactly square…
The narrow backs being that bit longer means that the back wall needs an extra section, but plenty of spare available. Once on to the original gable end version the walls fit exactly as they should. Originally I had intended to reduce the depth of the original gable end houses by removing the shed and taking off a couple of rows of flags, with the houses well back, I’ve left it – so I could have included the shed… but these houses were already a bit smart with a gable end, so I didn’t include the shed… a bigger yard now, which needed an extra section of dividing wall. All quite straightforward, and soon it was complete.
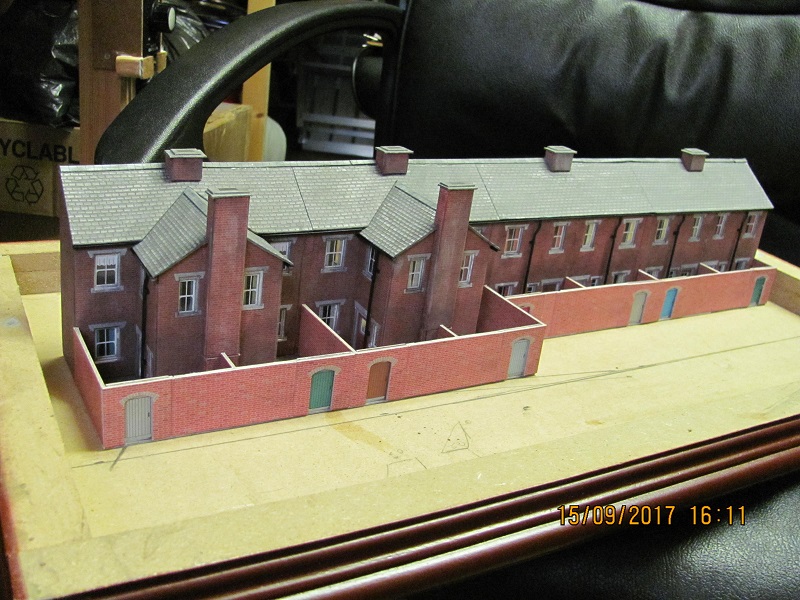
In position, starting to take shape … Next task is to weather the back walls, better to do it before the capping is fitted.
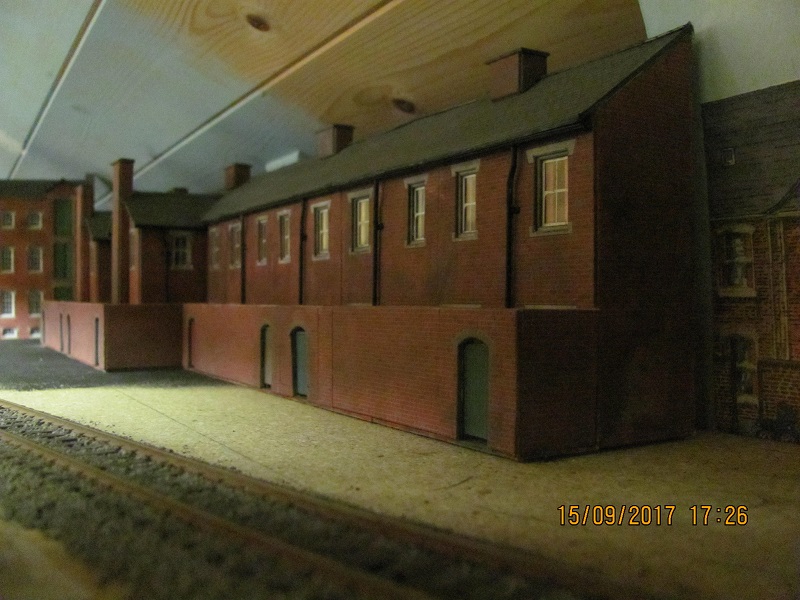
I’ve included this pic, showing the walls weathered, simply because it includes a section of ballasted track… makes a change!
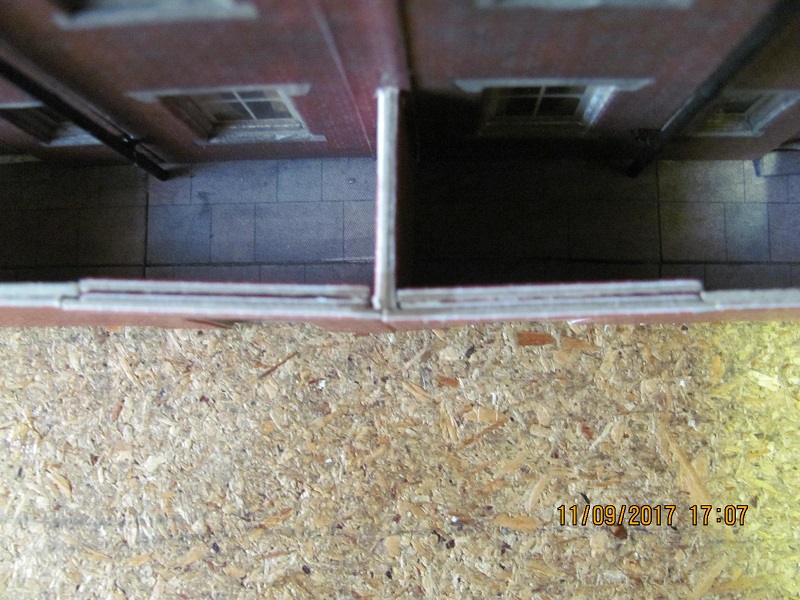
Now the capping for the back walls. Personally I think the capping as supplied is a tad too wide. I think I know why they chose this width, the back door sections are in fact almost four thicknesses of card, so to get a decent overhang it needs wider capping…. But as the majority of the back walls are just two thicknesses of card, it gives too much overhang, I think. So, before starting I trimmed all the capping back to about 3.5 mm. (I’m getting the hang of this metric stuff).
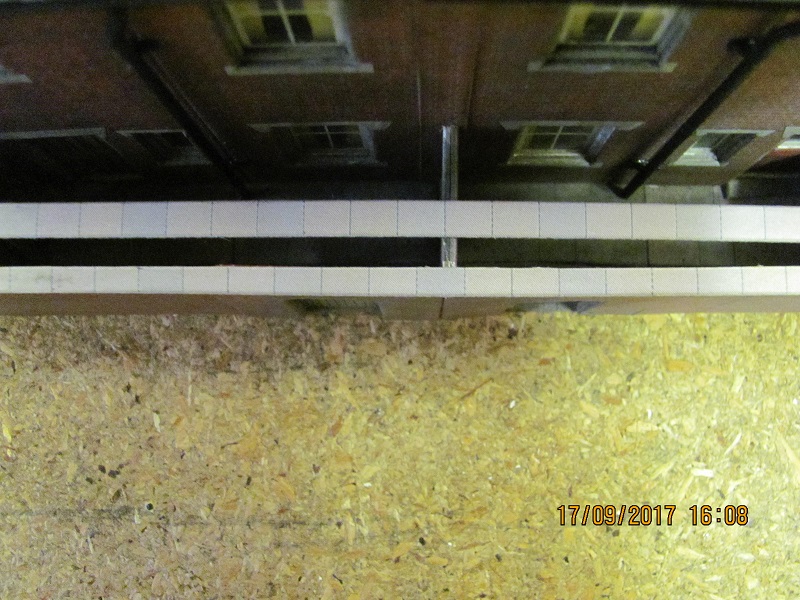
You can see what I mean with the original capping and the two card section of wall. Anyway even at this reduced width it covered that very iffy bit of wall shown in the earlier pic. Then it was just a case of weathering the capping, extending the sky beyond the houses and adding the standard matt black to the floor and part way up the purlin.
Not time for the chimneys yet, they will be fitted after the lighting has been done. With the black on the purlin, in the gap between the houses and the small factory it is now not clear as to where the baseboard ends and the purlin starts – so I’ll probably try these reduced height terrace fronts mounted some way up the purlin. With two terrace fronts kits, I’ve plenty to play with.
But that will come later, as I understand the natives in Birkenhead and Hooton are getting a bit fed up with the lack of any train service… so there will be a slight delay in the construction of the terraced fronts, while I get the natives back on side.
The 0-4-2T is still in the box, must do something about that.
So, more in a bit….
Keith
Do I have a plan? Na, if I did I'd spend most of my time trying to remember where I put it.

Posted

Inactive Member
I like the space behind the down pipes. :cool:
Max
Port Elderley
Port Elderley
Posted

Full Member
Mike
Pig Hill Yard - a small Inglenook shunting layout for my boys, in 00.
Pig Hill Yard - a small Inglenook shunting layout for my boys, in 00.
Posted
Full Member
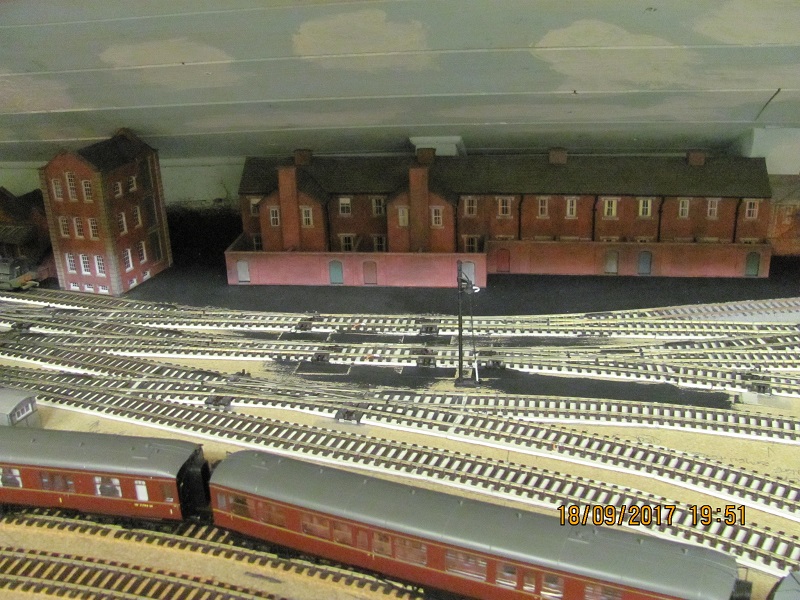
Yes, Mike, totally agree, an urban railway scene isn’t complete without a row of terraced houses, with added weathering. I’d like to carry on with more, rather than the backscene, but I’d lose two roads in the marshalling yard – and that’s not on.
Now, the Fat Controller and the natives are happy - the trains are running again! ….and the morning rush is almost upon us…. and storage space is already getting scarce… Things should be OK mind, I’ve run this timetable before – just the last couple of extra freights to sort out, then it should be plain sailing.
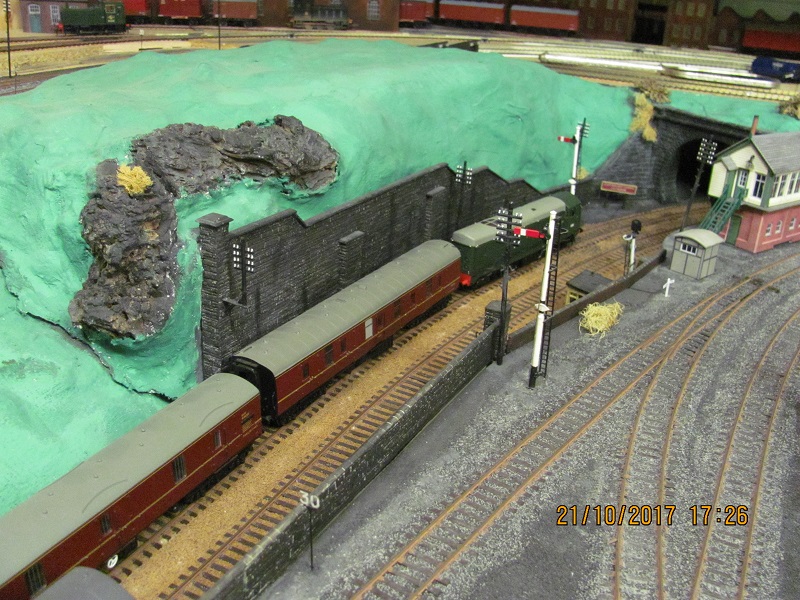
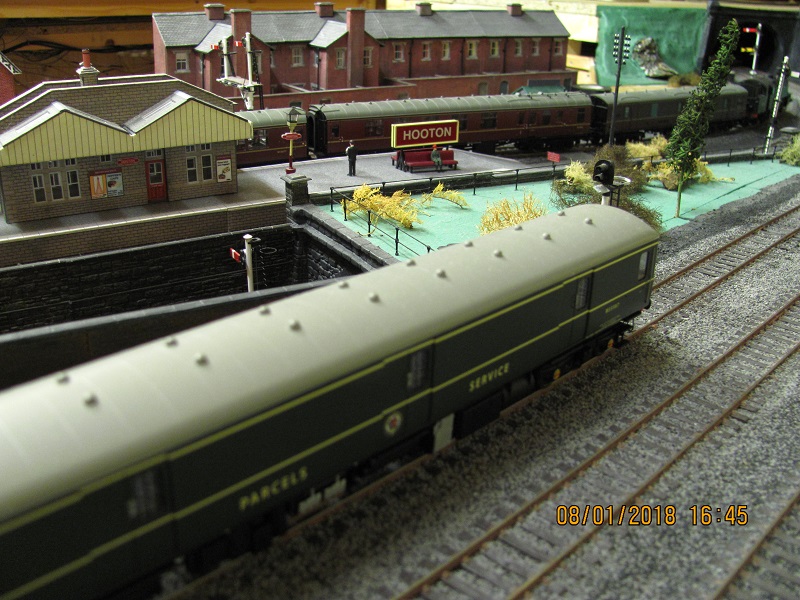
One of the locos that doesn’t appear very often, the 28XX, with a freight off the Cambrian line, is held at Hooton while the London sleeper (due Woodside 7.57 – quite late for a Sleeper) gets the road away from Fiddle Yard approach. This is also one of the few passenger services which does not stop at Hooton.
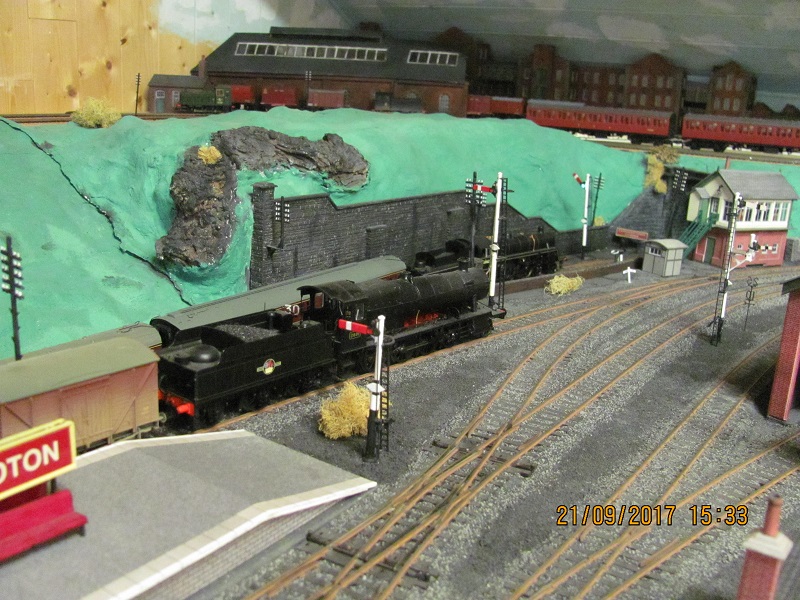
With the Sleeper safely stored under Woodside to wait for it’s run through Hooton (7.38), the freight gets the road from Hooton. Really should get some crew in the open cab engines at least, I'll put it on my list… The distant is still on, this means that the fat controller has to proceed with extreme caution as there is already a train in the loop – the Sleeper. When the chosen storage loop is clear, the distant is also off, and then the fat controller can leave a train to stop automatically, by the two double breaks and switches described earlier in this thread (page 3, post 51).
Yes, building the terraces was interesting, and with the perspective thingy for the front terrace that too will be interesting, but for now the Fat Controller is just having fun! The terrace fronts will have to wait until the next couple of hours of the timetable have been completed – that’s the morning rush hour over… depending on how it goes…. more on the front terrace soon-ish…. hopefully before Christmas!!
Keith
Do I have a plan? Na, if I did I'd spend most of my time trying to remember where I put it.
Posted
Full Member
The Lightweights finally got away from Woodside with the 7.45 service to Hooton. This roster has to be a two car DMU – at some point during the rush hour, the fact that it is just two coaches (no engine) is vital in the loops under Woodside! Must get all the plumbing fitted at the ends of the Lightweights mind – looks a bit bare now. No need for couplings – the only thing it could couple up with is another set of Lightweights, and I’ve only got one. Lovely model, captures the lines of the Lightweight perfectly…. Whether they ever got to Woodside, well, perhaps just for a trial period? – they were just across the Mersey – so plausible, just.

Life at Hooton is a bit more interesting just now, the Sleeper has just (7.40) run through heading for Woodside, following that the next train was the Ivatt with the 7.42 train for Helsby (7.20 ex Birkenhead)…

…. Five minutes behind that is the relief train from Woodside (7.25) with the Standard 3 tank, which terminates at Hooton, 7.47, here arriving in platform 3.

The tank will run around the stock (just two coaches again, storage limits) to form the 8.00 service back to Rock Ferry (or in my case the coach sidings at Woodside). Birkenhead had a couple of the Ivatts and three of the Standard 3 tanks for a couple of years around ’59 and ’60, so although I’m running the 1961 timetable, that’s near enough for me. But before 8.00 is the 7.53 from Helsby to Woodside and the second Paddington bound train of the day at 7.58. So once the Standard 3 tank is away, the fat controller usually needs a lie down….
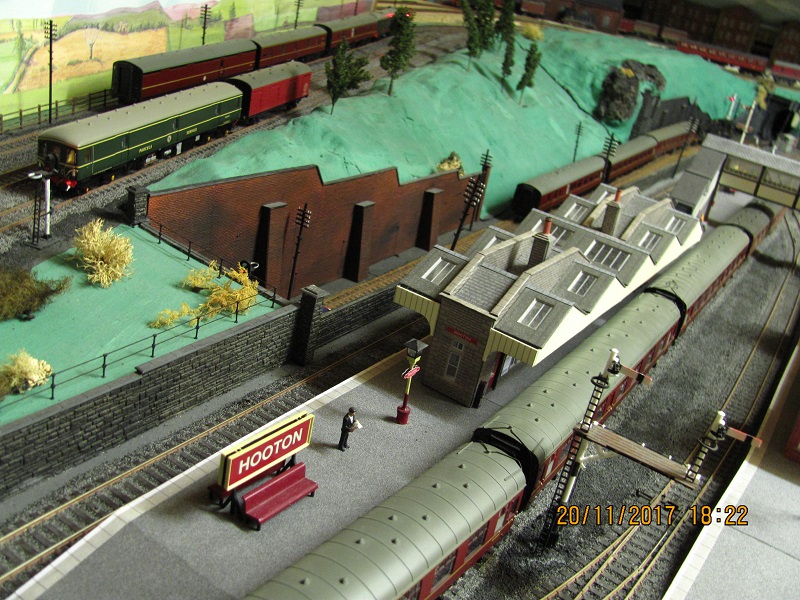
When I first laid the track at Hooton, the original idea was for an island platform layout, the loop was just for freight and the goods shed. I wasn’t too sure about where to locate the station building if it was just an island, and so in the end I decided on the three platform set-up. Never thought to check the timetable I was intending to run, or considered the possibility of services starting or terminating at Hooton…. that would have been planning…. Anyway, it all turned out OK in the end.
Now, that gap between the terraced houses and the small factory is starting to annoy me, so I’m going to have a go at this perspective lark, then I can get back to the trains. So, sooner rather than the expected much later, the house builders are back…
To reduce the height of the fronts, I’ve taken out three sections of two bricks and then reassembled the bits to give a new front section. Originally I’d thought about removing sections including the windows, to maintain the right proportions.. but the thought of having to cut the windows as well, meant that idea remained an idea.
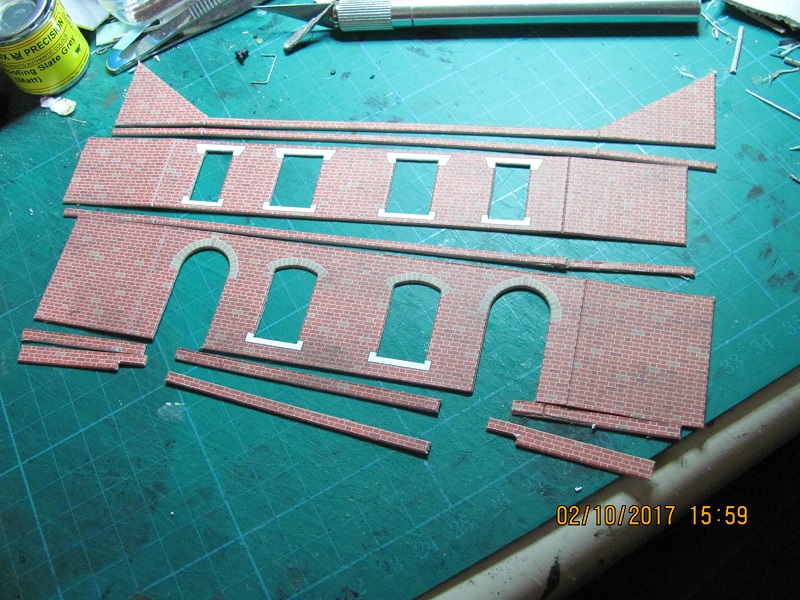
This is now a bit fragile, so before I could start trying to fit the fronts in place I decided to at least attach the base and add the windows and strengtheners, to give me something solid to play with. With the lower set of bricks removed, this will affect the doorways – as they include a fanlight above the door, by removing that the door itself remains untouched.
The fronts are to be fixed hard up against the flat section of the purlin, about quarter of an inch above baseboard level, which in theory may give some sort of perspective effect. So, I measured up a template – and then set about hacking the completed front. Note, all the bits removed are still on the workbench, I never throw anything I’ve cut off, until the job is finally completed… just in case.


This, of course, didn’t fit…. ’cos I’d measured the template incorrectly, but after much muttering and remeasuring…. and regluing, all those bits I’d cut off incorrectly… I ended up with something which did fit. The rebuilt ends are a bit of a mess, but will be covered by other ends which will be cut correctly first time.

A reduced roof was added, and as this will be hard up against the loft roof, I’m still thinking about the chimney stacks and how to fit them, given that the top of the roof is hard up against the loft roof.
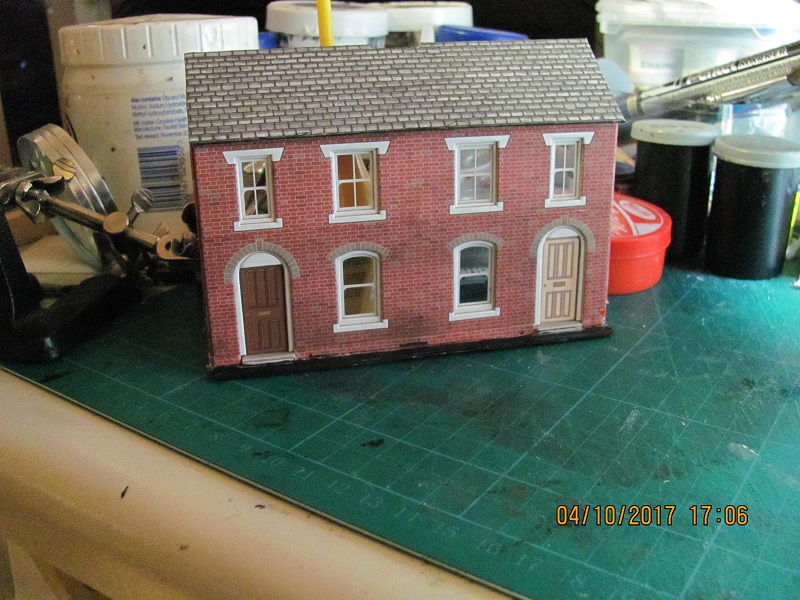
Putting the front alongside the backs shows the reduced height

..and holding the front, roughly where it will be fitted, and with the floor and purlin all matt black, I think there will be some sort of perspective effect… when viewed from afar, at least enough to make it worth building the remaining fronts.
Each additional front will be slightly different, given that the purlin is only a roughly squared-off tree trunk, and not a particularly straight tree in the first place….
More soon-ish, of course.
Keith
Do I have a plan? Na, if I did I'd spend most of my time trying to remember where I put it.
Posted
Inactive Member
It makes interesting reading. :cool:
Max
Port Elderley
Port Elderley
Posted

Site staff
Ed
Posted
Full Member
I’ve been busy (hence the delay in replying), when I’ve had the chance, trying to finish the remaining fronts – the second and third appeared with no problems – I had to modify the back for the third and fourth to match the changing contours of the purlin, but the fourth…. All was well, apparently, until I tried to fit the lower floor window frame…. and it fitted perfectly….except it wasn’t supposed to, not without removing part of it to account for the reduced height. Takes a while these days for the penny to drop… there was a join in the fronts low down – as there should be – but what I’d omitted to do was to remove the rows of bricks, I’d just stuck the thing back together! I seem to recall at the time commenting to myself on what a good match that bottom join was!!! Hey ho.
Now during all this Metcalfing I’ve become accustomed to returning a half constructed model to the component parts… not easy when you use Roket card glue. So I set about rectifying my minor error, and after some time in a darkened room and some fairly strong language, the fourth house, of the correct height, was finished. It was now time to address the problem I’d been conveniently ignoring – how to fix the fronts in the required position, half an inch above the baseboard and hard up against the purlin/loft roof. The fall-back solution, just glue it to the purlin and roof – but I’m hoping to put some lights in the bedrooms, so I need to be able to get at the back when bulbs fail. The idea is that a building effectively behind the baseboard and lit should give more depth…. well, something like that. Also fixing anything to the purlin could be problematic, that purlin is an oak tree, been there since this “new†part of the house was built long ago, so it’s going to be rock hard for screwing in any small screws. Eventually, I had an idea…. So I’ve drawn one of my engineering drawing quality plans to illustrate it…
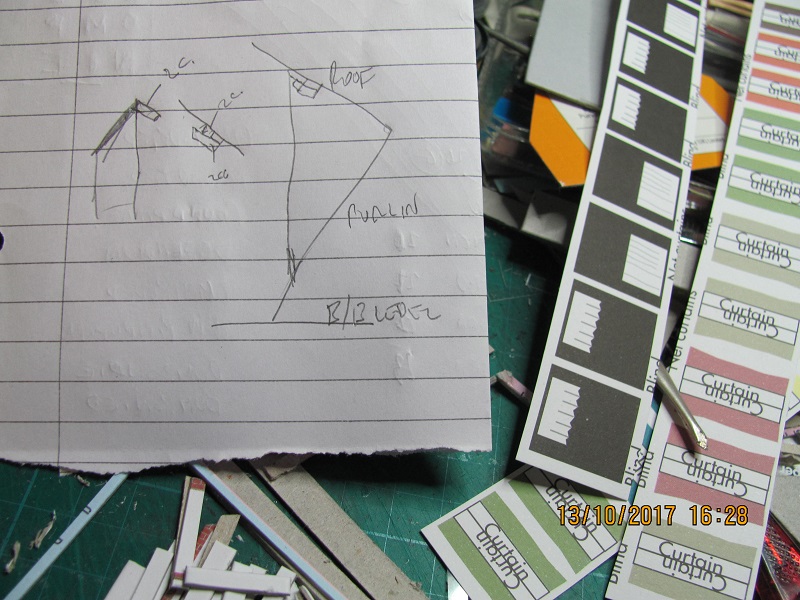
OK, perhaps not quite engineering drawing quality, but you get the idea. Basically a section on the top of the house roof, parallel to the loft roof, will slot into a groove created on the loft roof. Hopefully just two sections about 3†wide, split into two by the centre piece, on houses 1 and 4 should be sufficient – I’m gluing all four houses together first, once I’m convinced they do fit as intended. It won't be supporting the whole weight of the fronts as they will be effectively standing on the purlin. And that will be it done, apart from the lights and the chimney stacks (still thinking about the stacks) and the weathering, so perhaps that should read "half done". At the moment you can see I’m in curtains mode, originally I wasn’t keen on the curtain idea, but I have to admit now that it does improve the look.
More soon-ish, if the idea works, if it doesn’t, I may be a while…. and the trains may start running first…
Keith
Do I have a plan? Na, if I did I'd spend most of my time trying to remember where I put it.
Posted
Full Member
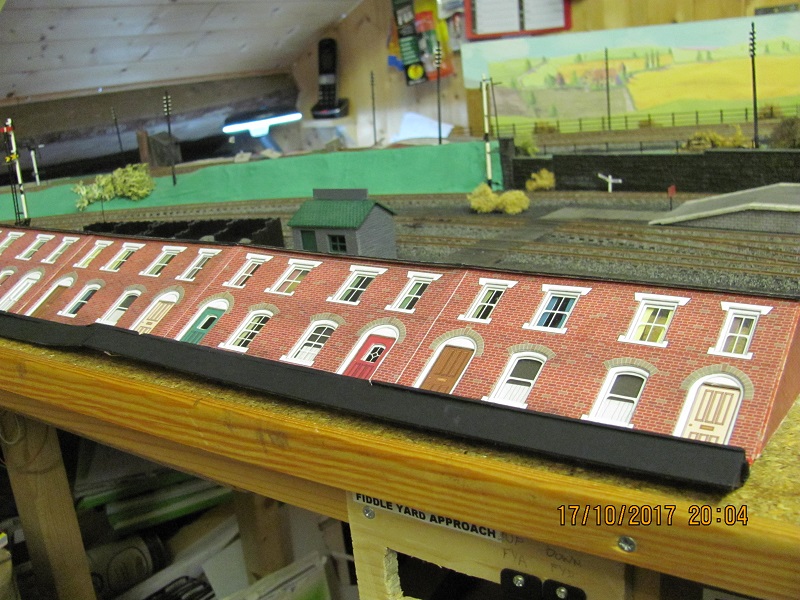
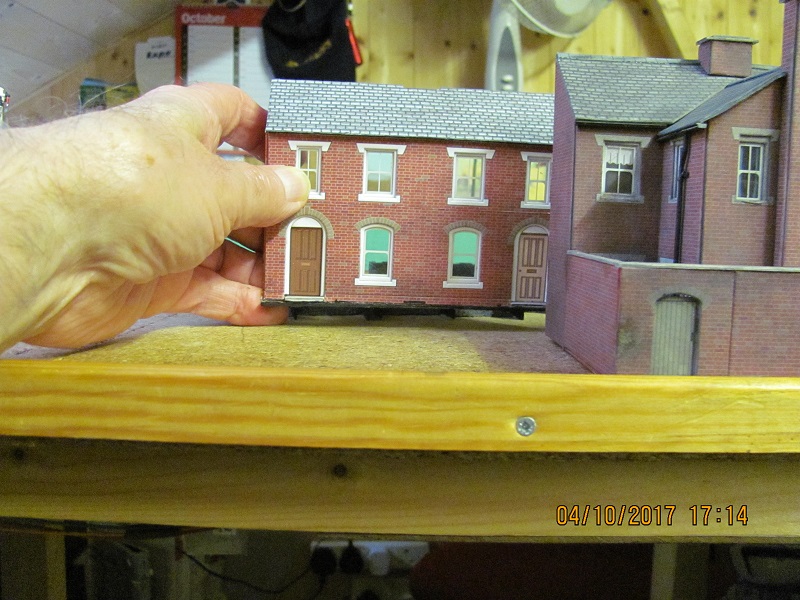
Then, a first look at the fronts in place – and I think this perspective lark does work, sort of, with the fronts appearing much further back from the small factory than they actually are – there again, I’m bound to say that…..

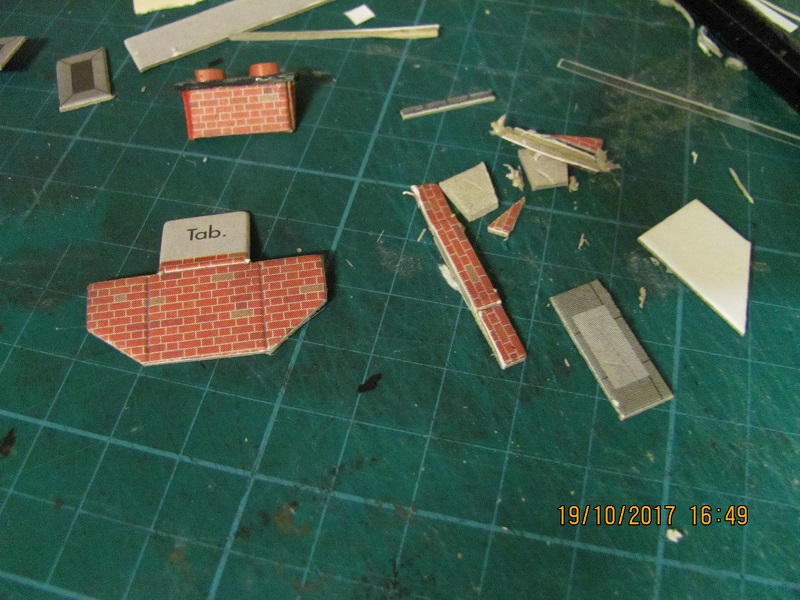
To get the chimneys to fit was something of a challenge with the front roof almost touching the top of the loft roof. Initially I thought of mounting the chimneys lower down the roof, but with a reduced roof already, it didn’t look right. So I set about making something which would fit, and be at the top of the roof, sort of triangular chimney. Fair bit of cutting, but eventually something I could use…
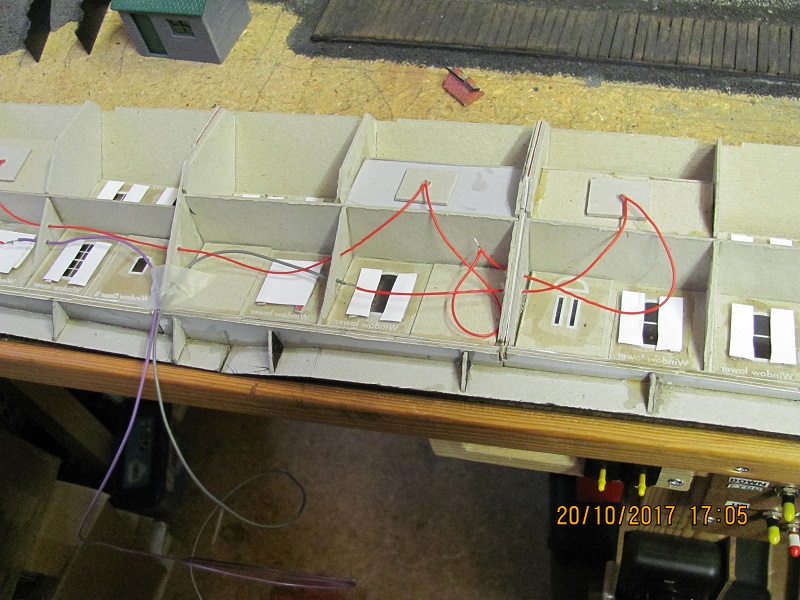
I decided to light four sets of bedrooms – no space for the ground floor courtesy of the purlin, usual method (health and safety folk who don’t like gow bulbs in cardboard models should look away now) in this case four 3V gow in series. As there is no back to the fronts, if that makes sense, I’ve fed the wires through the side panels, so I’ve been able to leave the joints uncovered – makes it easier to find the duff bulb when one of the bulbs fail and no chance of any shorts.
The chimneys fitted, looked better than expected, and will do for me.

Usual weathering, and all terraces now finished…. Well, apart from the lighting for the backs.

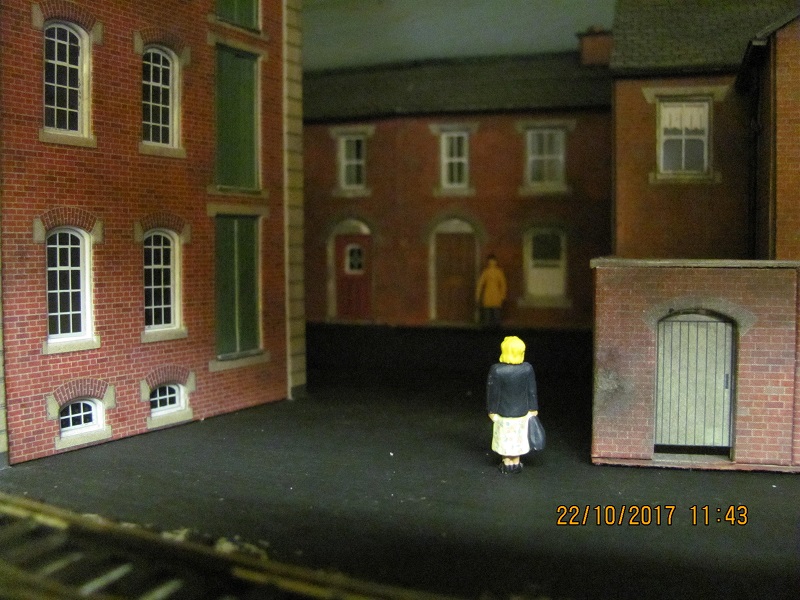
Finally, and I don’t think this is my idea –probably read it somewhere… on the forum perhaps, but I’ve put an HO scale figure on the pavement of the fronts, and a OO scale figure next to the backs. I reckon it does improve the perspective effect. The figures have now returned to platform 1 at Woodside – their rightful place. More suitable bodies will be added later, when the fencing/gates are done. My point and click camera is working at just about the limit of it’s capabilities….
Not too sure about the overall look now – there isn’t much space between the last of the fronts and the small factory, but by my standards it’ll do. The look between the small factory and the marshalling yard will improve when I complete the boundary walls, fences and gates… but that will have to wait a while now.
Just a thought…. I now know why I hadn’t finished the ballasting at the Yard Junction – had I done it earlier it would be a mess by now with all the stretching across the tracks…. so I’d better hang on now ’til I’ve done the lighting and finished off the fencing etc. I’ll use any excuse!!
Finally, finally, one train omitted from the rush hour before 8 at Hooton, the morning parcels from the WCML at Crewe behind the EE type 1, due through Hooton at 7.51. The first five of these spent some time at Crewe South in their early years, not sure when they moved down to London… but a tenuous link which is just about plausible!
So, there we are… the lights for the backs and small factory will also have to wait a while, particularly now that I’ve linked them to the ballasting… the Fat Controller needs to run the railway for a while… it’s what he’s there for! …. and there’s that 0-4-2T, yes, still in the box – must do something about that, probably a quick flashback to 1956 sometime soon-ish.
Keith
Do I have a plan? Na, if I did I'd spend most of my time trying to remember where I put it.
Posted
Full Member
However, thinking back to the days with my Ilford Sportsman and a light meter – I thought about reducing the aperture/increasing exposure time… which I thought I couldn’t do with this camera, however it does have a Landscape setting, so I tried that and it resulted in a much slower shutter – and I think it is better, with more of the picture in focus. If it isn’t let me know. As an example, this is the 8.00 return service to Rock Ferry, behind the Standard 4 tank, waiting in Platform 3 – the far starter signals are still in some sort of focus – so I’ll be using this setting in future.

However, further investigation with my camera… turns out it does have a manual setting too…. so I can set aperture/shutter…. I’ve only had it 8 years – everything takes time…. and with the full manual still available on the Canon website, now downloaded, I’ve another job added to one of my lists which may, eventually, (no promises) see a big improvement in the quality of the photos I produce.
In the meantime, just reached the one occasion when the three platform layout of Hooton cannot cope. The TC Barmouth has just arrived in Hooton (8.05) platform 2, just like the London train before it, it has to stop with the back coach clear of the slip, so that a Helsby train (two car DMU) can arrive into 3 at 8.07, departing at 8.08. But the Barmouth train does not leave until 8.09 – a minute later. So currently I just let the Helsby train depart 2 minutes late. As an alternative, the Barmouth could reverse to clear the exit from 3 once the Helsby train has arrived, allowing access for the parcels van to the platform and for the Helsby to depart on time. There’s some logic to this –as the Barmouth train waits for four minutes (the standard wait is two minutes) – so I’m assuming that was to allow for loading of parcels. Not sure such a manoeuvre ever occurred anywhere on BR metals – but if anybody has seen something similar – please let me know. OK, I know it’s only an odd couple of minutes – but that’s just me, I would like to follow the timetable to the letter!
One more photo with the new setting (more in the Gallery) – just to show how busy things are just now.
It is 8.06, the Barmouth train in 2, with the Helsby train due in 3, emerging up the bank from the fiddle yard is a Stanier tank on a Chester – Birkenhead service due Hooton at 8.08 in 1, same time as the Helsby train is due to depart. On the run up to Woodside, the EE type 1 with the morning WCML parcels waits in the goods loop for access to platform 5 – just vacated by the DPU on the local parcels (which doesn’t appear in Hooton until 9.05, as it calls at all intermediate stations) and is waiting for it’s slot in the loops under Woodside. At Woodside the next departure is the 8.10 to Stanlow, so the DPU has to be on the move soon….
It continues like this for over another hour… then the fat controller finally gets a well deserved break (not so sure about well deserved, the FC hasn’t done much lately) – probably around Easter at this rate….. and despite linking it to the ballasting I’m thinking that the fencing around the terrace backs and small factory – and all the lighting – really should be finished sooner rather than later…. Perhaps make that Easter 2019….!
Keith
Do I have a plan? Na, if I did I'd spend most of my time trying to remember where I put it.
Posted

Full Member
Staying on the thread Kevin.
Posted

Full Member
Always interesting to read the exploits with your layout - it's certainly coming along nicely - and getting time to run the trains. In my house, that could be a novelty!
Interesting to note your exploits with your camera and trying to get more of the scene in focus - always a problem when taking a close-up on a small subject such as in our hobby. I just don't really bother with all that, shutter speed/aperture - far too much faffing around for my liking! And as much as I like dabbling with computers and software…..is it really that necessary to get everything in focus? Personally, I think not.
I generally tend to use my smartphone for the photos, mostly 'cos is easier to use and produces a good sharp picture (where it's in focus!). My main problem is when the photos get uploaded to this site - will they be correctly orientated or sideways? Even after they've been put through the editing processes on the laptop (Win.10) to crop and resize them and save them back, I've no guarantee they'll upload correctly, even though they display on screen in Explorer correctly.
Anyway, enough of my issues. As I say, it's good to see Hooton with some traffic. Keep up the good work Keith.
Dave
Posted
Full Member
First my apologies for the delay in responding – been a bit under the weather of late, and our first Christmas since we moved here without Fflo (Fflyff is now in total charge) was understandably a quiet affair.
Thanks Kevin for the positive comments – quite right, no windfarms on Woodside! You’re not alone, I constantly forget where I have left something …. even going as far as buying a replacement when I get desperate. Favourite trick now is to march purposefully into a room, including the loft, and then wonder why exactly I am there, used to happen once a week – now on occasions it can be several times each day, I think it’s known in the trade as senility. I’m currently using the Winter ’61 timetable …. and as I recall ’63 was the first real snow we had had in Liverpool for many a long year – so I’m OK as is. In any case I have yet to have a go at modelling the green stuff, making do with green undercoat for now – I’ve got my static grass starter kit, it’s in a box under the layout, one day soon-ish I’ll have a go, but the white stuff is just a step too far.
Thanks Dave, as to me playing about with the camera, many, many moons ago I used to be quite into photography and with a mate of mine, we set up a darkroom at his house and used to produce all our own photos, so at some point I will get the hang of this manual mode – but as ever it will take time. I’ve been trying this landscape mode for some of the night shots, but it really needs a tripod for the seriously slow shutter speeds, but seems fine for daylight – so for now I too can continue in point-and-click mode. As to the focus lark, I just wish I could match what other folk produce, but I fear the dreaded computer raising it’s head, so I’m glad you’re not bothered – at least that’s two of us! I’ve mentioned before that back in the day I was a real live nerd, more of a geek if truth be told, but that all ended when we decided to head off to Mull to try something different, and I’ve no desire to rekindle my computing career now.
As for smartphones, don’t possess one – mainly cos we ain’t got a mobile signal here… last year British Gas (we don’t have gas here but they are our electricity suppliers – I really do have trouble with the logic in that statement) insisted visiting us to fit a smart meter…. they have ways of boosting the signal, I was assured…. engineer duly arrived, couldn’t find anything to boost…. took a photograph of his box of tricks showing no signal…. and left. At least we do have fibre broadband now, recently upgraded by BT to 76Mbs – which is luvly.
As to your photos problems, I have always used Firefox for uploading photos to the Forum, after editing them to size with W10, and I’ve had no problems, give it a go.
Anyway, a little progress on the layout to report in the next post.
Keith
Do I have a plan? Na, if I did I'd spend most of my time trying to remember where I put it.
Posted
Full Member
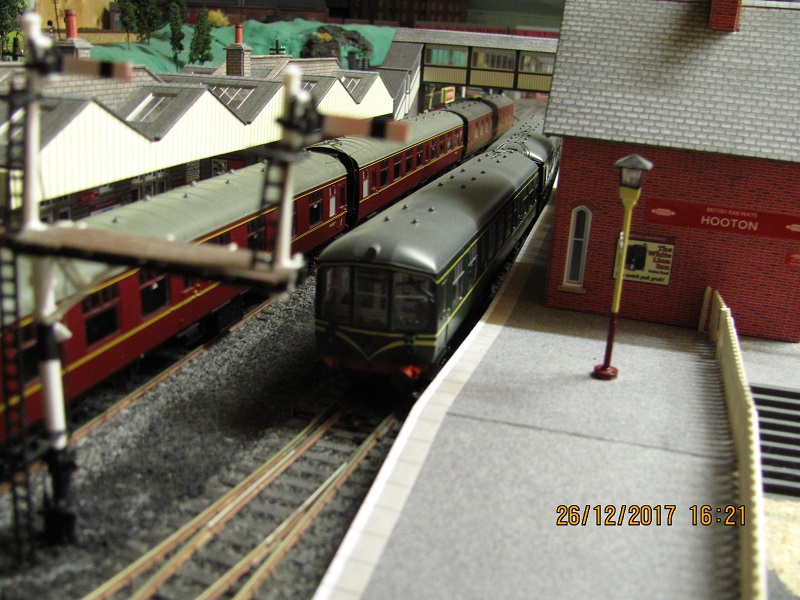
But first, the final movement on the layout before the timetable stopped was the arrival in Hooton of the 8.08 train for Helsby. This particular roster has to be a two car DMU – works throughout the day between Woodside and Helsby – as at some point it has to share a storage loop under Woodside with a Paddington train…. just enough room for a DMU. The photo could be entitled “the sign of things to comeâ€â€¦ or “move over, I’m the new kid on the blockâ€.
The lighting would again be the usual grain of wheat bulbs, mixture of 3, 6 and 12V, in series as necessary for the 12V supply. As ever my wiring is to the highest standard, well it works, and that’s the main thing. These are the terrace backs.

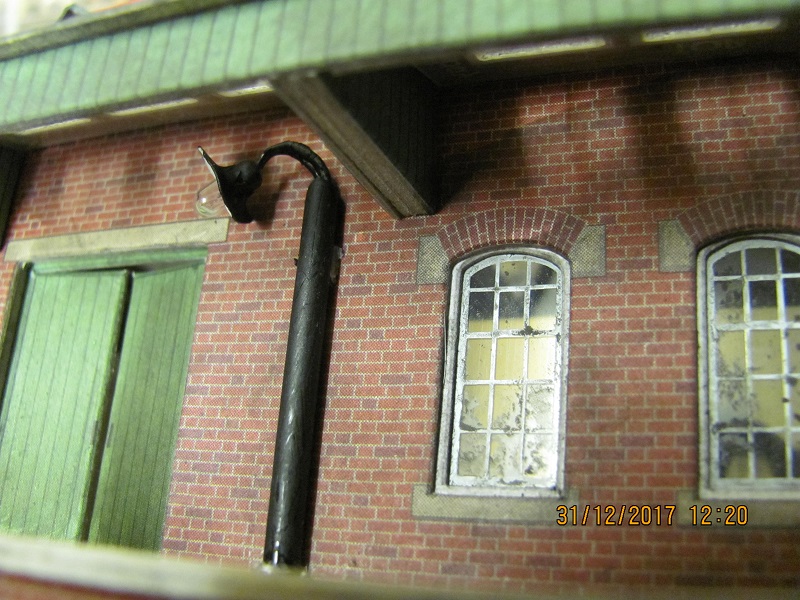
For the platform of the small factory I couldn’t use the same arrangement as I did for the bridges between the main factory buildings – too difficult to remove for bulb replacement because of the depth of the canopy/building. So I tried putting lamps fed via a pipe on the wall on the platform, which takes the wires straight down to baseboard level for easy replacement – as ever the lights are a bit oversize, which doesn’t help (I’ve ordered some grain of rice bulbs now), and the overall thing is pretty duff – but given where they are on the layout, you can’t actually see the lamps, just a pipe on the wall…. It’ll do.
It took quite a while to complete all the wiring to connect the supply to the various buildings, but finally it is finished. One other point, while I was wiring up the terrace backs they were perched on a bit of free baseboard at Hooton… coming in to the loft one day I noticed this view of the layout…..
Hooton looks so much better with a background to it – so I’ll be Metcalfing again in the not too distant future, more terraces to order. Hooton is the only section of the layout which can be viewed from both sides, if you see what I mean, something I’d not really considered before.
Anyway with everything wired up – it doesn’t look too bad. As mentioned in the last post, a bit difficult to get a photo, but in daylight this is the view towards the goods shed.

… and one almost successful shot of the whole of the lit section at night.
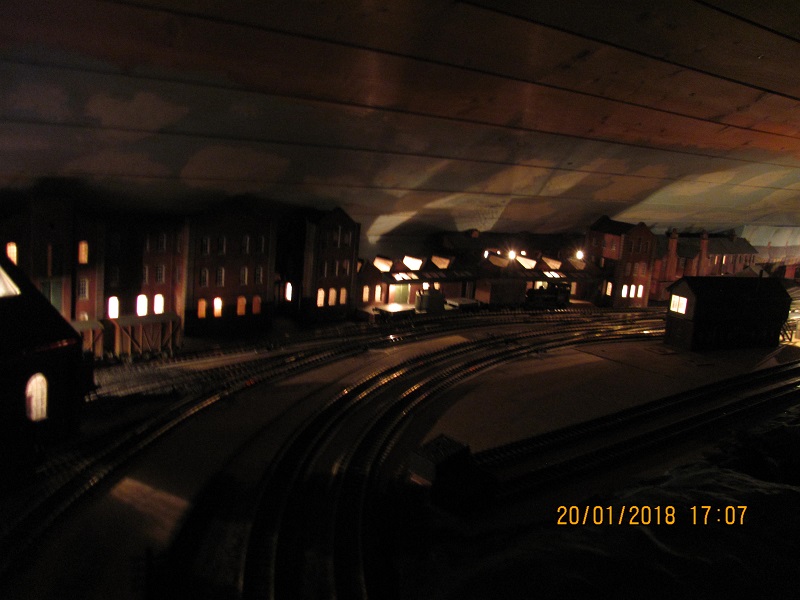
Possibly a lot of faffing about and not much to show for it, but I do like to have some lighting in all the buildings. Incidentally the Metcalf curtains do show well in the lit windows, so I’m definitely a fan of them now.
Now it is the fencing, and then those terraces at Hooton, and then I can get the trains running again, not necessarily in that order.
…. and yes, I know, there’s all that ballasting still to do…. fear not, I’ll come up with some plausible excuse.
Grain of rice bulbs arrived – they are a better size, so will be the choice for future external lights and will replace existing gow bulbs as and when.
More soon-ish.
Keith
Do I have a plan? Na, if I did I'd spend most of my time trying to remember where I put it.
Posted
Inactive Member
You're getting some real atmosphere with that lighting.
Max
Port Elderley
Port Elderley
Posted
Full Member
Well done, Keith.
Dave
Posted
Full Member
The theory goes, well my theory goes …. If I have a model railway it should be possible to operate it at all times, including after dark – after all, the real thing manages to carry on when the sun goes down, so why not? Other photos already show that Woodside and Hooton stations lighting is almost complete – apart from the goods/coal yards at Hooton and the coach sidings at Woodside. As is 6C shed, roundhouse, coal and most of the yard. Marshalling yard at Birkenhead again is almost complete, just a couple of lights outside the goods shed… and the adjacent oil depot (which is still on one of my lists). Obviously all the low level sections are done – otherwise I'd be in trouble all the time. I don’t think I’ve taken any night pics at 6C yet, that will be easily rectified.
I’m quite keen on trying these lighting units for the coaches that are available now, also on one of my lists – I think there are some which are battery (button cell) driven which would do for me. That would certainly add something to a night shot at a station, or a train running down the mainline. Anyone with any info/experience of them please let me know. I couldn’t fit all the coaches, there are over 60 on the layout just now so costs would be….a bit on the high side, but it would be nice to have a couple of sets done.
Next job is to make a couple of my standard lamps using these newly acquired grain of rice bulbs. I want an outside light at either end of the goods shed at Hooton, and while it is off the layout, get it weathered… then there’s those new additional terraces at Hooton, finishing the coal yard…. oh eck, I'm making another list here!!…. and then I’m going to get back to running trains for a bit, I fancy that might happen a bit earlier, and the list will join all the other lists - wherever they are.
Keith
Do I have a plan? Na, if I did I'd spend most of my time trying to remember where I put it.
Posted

Full Member
Rather than purchase off the shelf coach lighting which, as you rightly say, would get a tad expensive for 60 coaches, how about making your own?
I know that you can get strips of mini SMD LEDs super cheap on-line, we purchased a 5m string for under AUS $20 for our camper. The strings can be separated easily into suitable length and a button battery holder from an electronics shop (Maplins?) can be soldered to them. Our string had adhesive backing too. Add a resister to control the brightness level.
I reckon once you have the first one sorted the rest could just be churned out like sausages.
Oh, and go the static grass applicator on that cutting, it’s amazingly easy and you’ll wonder why it took you so long to give it a go.
My modelling is on the back burner at the moment due to modifications to my sail canoe for summer sailing so I’m living my modelling through you guys.
All the best.
Posted
Full Member
Many thanks for the info – I fear that I’m not quite as familiar with all this modern stuff as you think I am – to date the only experience I have with LEDs are a couple of my off-the-shelf colour light signals which are LED and the five LEDs I used on platform 5 at Woodside – found them a half decent imitation of gas lights. That involved use of one of those what I refer to as “a sausage thingy†on the positive side I think (a resistor –I’m getting the hang of this), other than that I’ve stuck to gow bulbs, and very recently I’ve advanced to grain of rice bulbs (more of that as soon as I’ve finished the goods shed). My expertise, if it can be described as that, was all gathered in the early ’60s – satisfied my requirements then, and so far is good enough for me now. I must have some Luddite genes.
I’ve found the CR2032 battery holder/battery on the Maplins site, but I’m struggling to find the strips of LEDs. I’ve also been thinking more about this – I’ll need some form of switch so I can switch them off during daylight hours and when in the sidings – which may need removing the roof each time. Possible solution would be to mount the battery under the coach – but that may well show. Other thoughts, possibly link sets of coaches, driven off one battery?
During my searching around, came across the Train-Tech offering, this has a motion sensor so the lights are on once the coach moves, and go out a few minutes after the coach stops. That is quite clever as it does away with need for a switch, but means that late on in Woodside, when stock is shunted into the correct platform, the lights will probably be out before the train departs, so not perfect, and as expected not cheap. The strips of lights they use are almost certainly the type you refer to, but there’s no sign of any mention of spares or longer strips on their site.
Needs more thought – but with a birthday due soon (that’s one of the advantages of being old – the birthdays seem to come around much quicker than they used to – anniversaries too, just had our 47th – oh eck, make that seriously old!). I may just get a couple of the Train-Tech kits and get them fitted – just to see if it is going to be worth the effort. I could get four, split one set, put half in each brake (always run five coach sets with a brake on each end for the Paddington trains (that’s one or two light on the original, but it’s a space problem))…. but then the switch comes into play for the half without the sensor. Definitely needs more thought.
I am determined to get on with the static grass soon-ish – would help bring Woodside nearer the standard of the majority of the layouts on the forum. Of course it is so long since I bought the starter kit it will take me a while to find it.
A Sail Canoe – that’s a new one on me, never heard of that…. I tend to avoid the water – doesn’t agree with me, or more correctly I don’t agree with it. Best of luck with your mods, I’ll do my best to keep you in modelling mode.
Enjoy the sailing.
Keith
Do I have a plan? Na, if I did I'd spend most of my time trying to remember where I put it.
Posted
Full Member
If you're still looking for strips of LED lights for your coaching stock (and for other lighting situations) - and you're into Ebay buying - I saw one site listing various colours (cool white, warm white, yellow/amber, red, green, blue) in strips of 3, 6 or 9 small LEDs which can be fed straight from either 9 or 12 volts DC. Put in a search for "model scenery LED light strips" - the 3528 mentioned in the body of the site page is the physical size of the LEDs, 5050s, on some sites, are slightly larger. The brightness of the LEDs can be varied by adding an extra resistor or lowering the applied voltage - very effective and they should last forever and run without generating any heat and take very minimal current.
You could even use the DCC track power (so long as you don't have too many lights on at once!) - assuming you run with DCC; not so effective if you use DC only as the power is only there when the train runs. You might be able to find some way of taking the power from the track on one of the wheel-sets via a small rectifier/smoothing circuit (and a resistor) to the LED strip fitted inside each coach. To be honest, I've no idea of the "how to" on this, but I've seen articles on the web giving details of it all.
I use nothing else other than LEDs for lighting. Not in coaching stock - not yet anyway. The day may come when I've nowt else to fill my time once the new layout is complete.
Dave
P.S. keep up the good work!
1 guest and 0 members have just viewed this.