Birkenhead Woodside
Posted
Full Member
A layout in progress, slow progress...
Well I did say soon -ish… our Welsh bit on S4C went OK -ish, pity they chose the coldest week in April for many a long year, to have us stood at a wind farm construction site! and then more delays down to a week of dizzy spells… bit alarming, but all's well again now. Right, for the doors section I had to remove the second door, and then add the brick surround, reduced by the same amount - taken out at the next floor so that the joins aren't all on the same line :
The three storey door section can now be built
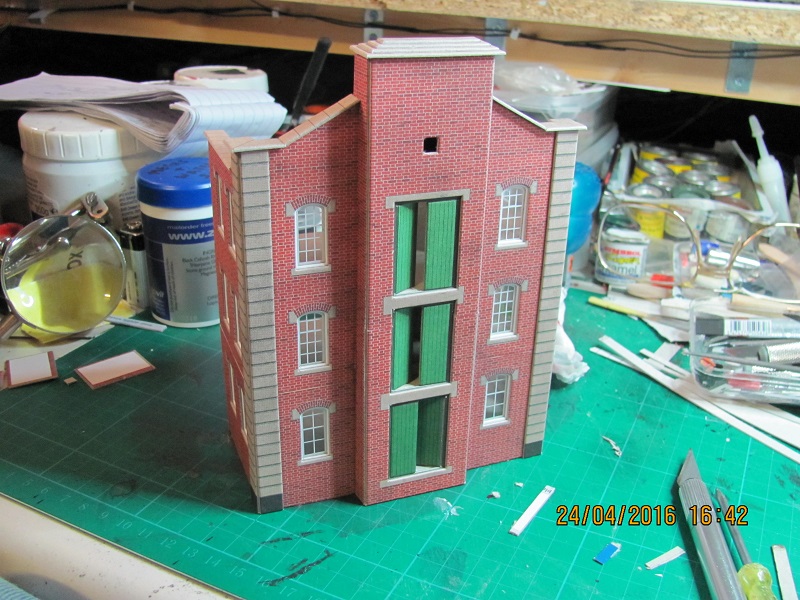
… again the joins should be less obvious once weathered. Now it is time to fit the botched section to the original completed warehouse:

… you may have noticed the deliberate mistake… I'd stuck a half width brick section - as on the right hand edge - but of course the left hand edge is straight, not a corner, so removing the half section took some of the suface with it - not a problem, with the full width brick section which I should have used, covering my mistake. I decided to put the bridge between the original model and the new extension, partly to cover up the botched section, and also as the bridge is angled because of the extended side wall it makes it a bit more awkward (weird logic in operation here!). That means ends cut at an angle, and the overall length reduced which means more cutting :
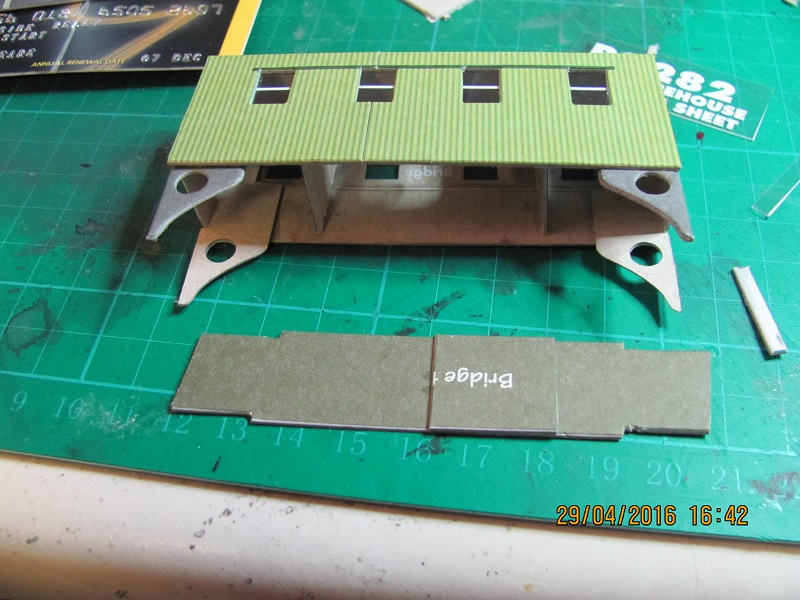
…another error here, I was going to reduce the bridge length at the window - when I realised it would be better to trim either end… so the first cut shows…. thank goodness for weathering…
Now, attach the three storey door section to the original with the modified bridge
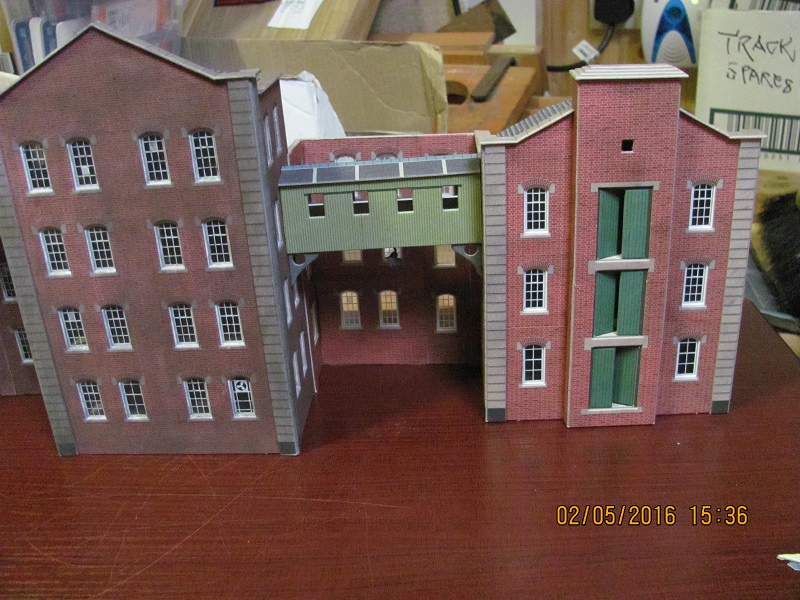
… I did check that the three storey section fits under the loft roof OK - the photo does show how the weathering improves the appearance, well I think it does.
Just remains now to make the rest of the three storey sections, and glue it all together. Incidentally, I've decided to light various floors of the new warehouse, rather than lighting all floors, so on the botched section I'm lighting just the ground floor - (there's also one of my standard lights under the bridge) - with a sort of 'light box' arrangement.
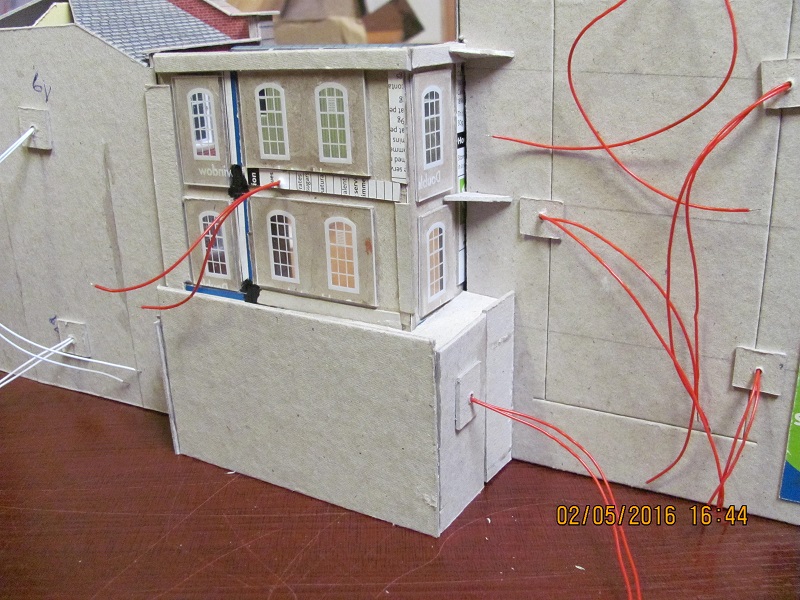
.. also as I've been clearing out my gow stocks, there are 3V, 6V, 12V used , in groups in series, which should produce different lighting levels on different floors…. I think…
The whole thing now glued together and weathered :
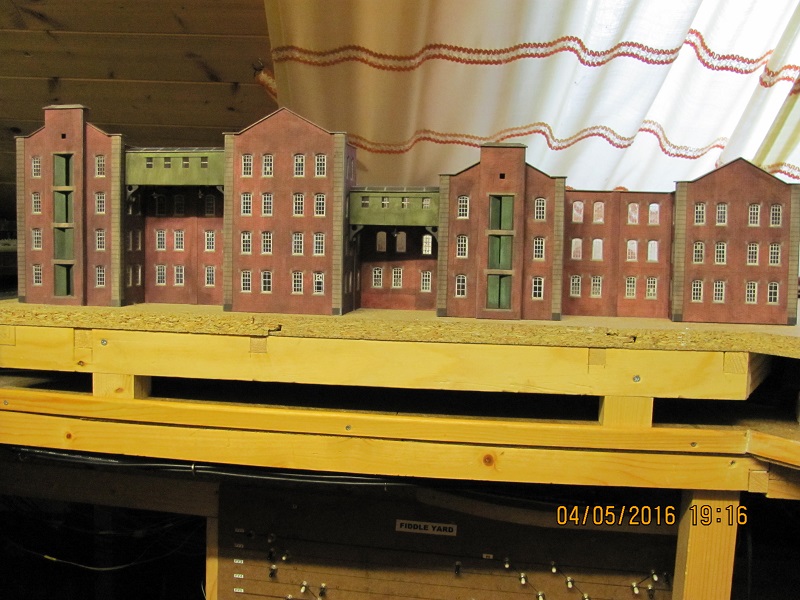
… a total length of a tad over 31" - not bad for an outlay of less than £30!
Incidentally, if you look at the completed thing from above :

… and check it against that "plan" I drew, there is a remarkable similarity… me, with a plan, ….sometimes I amaze myself!!!
Finally, in position
Must get around to painting some sky on the loft roof - that will improve the look no end. Lights not connected yet, that'll have to wait. As will the next phase to include the small factory and platform, which should give me an "industrial" backscene to the layout, up to the marshalling yard. It is time I got on with running the timetable after such a long lay off… new loco on the way - Hattons, along with other dealers, have some excellent Hornby bargains just now… chance to replace my tender drive 2P, and get some more goods vehicles.
…there again I'm in Metcalfe mood just now…. watch this space….
Keith
Do I have a plan? Na, if I did I'd spend most of my time trying to remember where I put it.

Posted

Inactive Member
Max
Port Elderley
Port Elderley
Posted

Full Member
Staying on the thread Kevin.
Posted

Legacy Member
:thumbs;-):cool:
Owen
web-cam 2.2.74.174:8081
if the lights are off no cam
if the lights are off no cam
Posted

Full Member
I totally relate to all those measurement issues…..I thought I was the only guy who did that

Posted

Full Member
Dave
Posted
Full Member
Many thanks for all the positive comments… much appreciated, made me think that perhaps I should carry on in Mertcalfe mode just a bit longer… so I went off under the layout in search of that Small Factory kit I'd bought a while back…eventually found it, well it and another one! Perhaps I should explain… my grey cell has these ideas.. and so I buy the bits needed for that idea… and then promptly move on to the next idea…. which after a period of time can be an idea I've had before… which is obviously what's happened here. Anyway, I'm going to get on with it now before I forget about it again and then buy another kit in a couple of years from now. With two kits I reckon I can build one as is, the other will probably become a semi-low relief affair linked by the platforms - with part of the combined platform having road access - from a main gate entrance adjacent to the warehouse I've just finished… we'll see how things progress…. probably end up completely different….
Note to Metcalfe - it would be quite handy if they gave the overall dimensions of the completed model on the back of the 'box' - I always end up getting everything out, then measuring the important parts, so I can cut out cardboard templates to check on how it will fit on the layout… just a thought.
It may however take a while… something about a garden fence which needs renewing… which I'll probably have to do (before the runner bean plants get planted apparently)…. but that should (-ish) then give me a few weeks to get on with the important things… plus we'll have to wait for stuff to be delivered first… so once again - watch this space.
Oh yes, Kevin, expert I am not… more like an enthusiastic bodger just carrying on from where he left off in the early 70s!… OK, when it comes to organised chaos… I'm pretty much an expert at that…
Keith
Do I have a plan? Na, if I did I'd spend most of my time trying to remember where I put it.
Posted

Site staff
http://www.metcalfemodels.com/00-h0-warehouse
Click on More Views & Dimension
Ed
PS realise it's a bit late for this particular kit.
 Last edit: by Ed
Posted
Full Member
Many thanks for that - never thought of checking the website, I'll check all future jobs involving Metcalfe kits - still can't see why they don't put the info on the packaging.. or at least a reference to the website… or include it on the instruction sheets…. Still, I'm a happy bunny now, thanks again.
Keith
PS to my last post… the bodger can't even get his dates correct…. for early 70s please read early 60s… by the early 70s my interest had switched to thrashing an Imp Sport on the Club Rally scene…. those were the days!!
Do I have a plan? Na, if I did I'd spend most of my time trying to remember where I put it.
Posted
Full Member
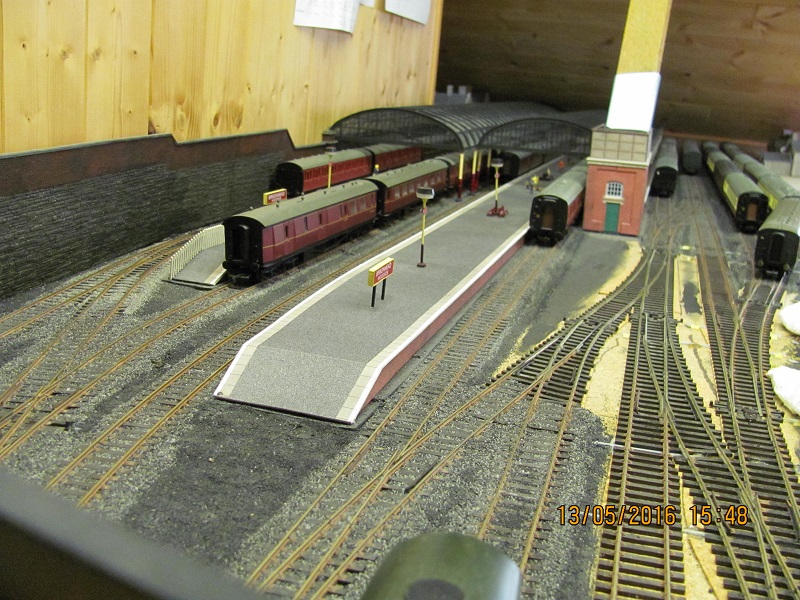
L to R : platform 1, three suburban coaches for the 6.25 to Helsby - behind them is the DMU set which start work on the Helsby run later; platform 2, three Centenary coaches (only 'cos I like them) form the first train of the day the 5.55 to Chester (I reckon that was the workers' train, hence the grotty coaches) behind them another three coaches (spare); platform 3, another three coaches for the 6.42 to Chester; platform 4, 5 coaches for the first Paddington train of the day at 6.30; platform 5 - the first parcels train of the day (5.05) bound for the GW main line - usually a Hall or 2800 would take this but the Metrovik (in the foreground) which brought in the previous evening working (on a test run from Crewe - I have a vivid imagination) and has spent the night at the station will take it back to Chester; in the adjacent siding, the two suburban coaches will form the first train of the day, the 5.12 from Rock Ferry to Helsby - I've mentioned that before I think. It is quite handy from a storage point of view that the first arrival at Woodside isn't until the 6.48 from Helsby (the return working of the Rock Ferry train) - so I can store all the stock in the station at the start of the day.
… and yes, I will get around to that ballasting soon…. ish.
So, trains will be running any day now… but I'm still in Metcalfe mode too, so I'm starting one of the small factory kits, which will be built as is - and will stand roughly where I've put the templates - measurements off the website, thanks again Ed…
The other kit will be to the left of this, and will probably need, in part, to be low relief… I get the feeling I'm repeating myself again… senility definitely making an appearance, you have to make allowances!
I've also been painting some sort of sky behind the warehouse, don't look too close… because of the location, done left handed with an old long handled radiator brush… but a bit of an improvement, I think, on the wood panels of the roof.
I decided to wire up the warehouse lights, just to see how it looks…
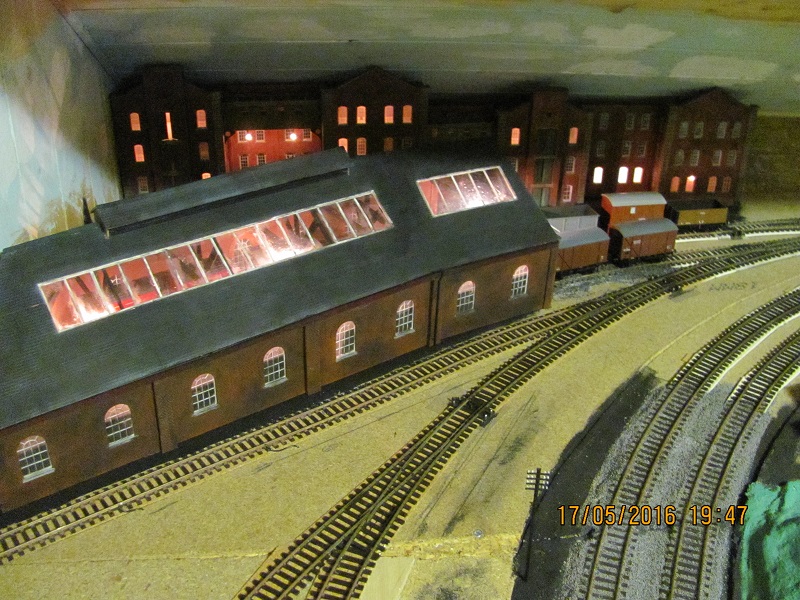
.. I think the idea of lighting odd floors and using different levels of brightness has sort of worked… other views in the Gallery.
..and with the other lights out :
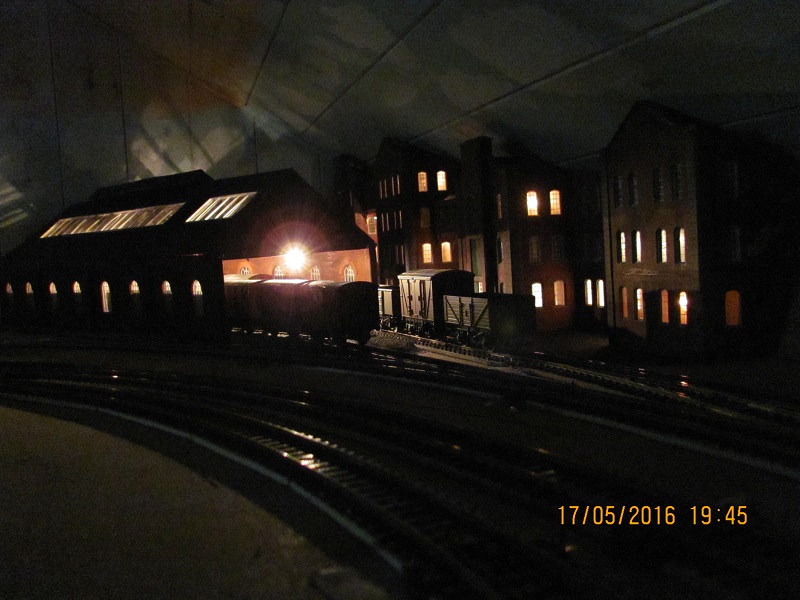
… hope you're not too disappointed Dave…. that second floor nearest the camera is actually a reflection off the goods shed - there ain't any lights on the second floor. More sky to do, and get these small factories built and then hopefully it will look better…. I may even get some ballasting done!…there I go, repeating myself again…
There is also the small matter of getting some trains running… although the impending arrival of some new garden fencing (not OO gauge unfortunately) may well hold up proceedings for a while… unless of course the weather is bad… but it never is when you need it to be!!!
That'll do for now.
Keith
Do I have a plan? Na, if I did I'd spend most of my time trying to remember where I put it.
Posted
Full Member
I like the lighting effects - not too much, not too little. I think you've got the balance about right.
Keep up the good work….. and don't forget to run some trains. Maybe I'll find time to clear the tracks of rubbish here and run some myself (running trains is on one of my To Do lists!).
Dave
Posted

Legacy Member
Been having a good read and I must say it's all coming along very nicely…I like it…
Thanks for the mention in Post#80 and I've a question about your 'griming down' if you don't mind… you said, "The trick with the watery emulsion is to apply it very carefully, too much and you end up with curved walls when it dries out." Could you be a little more specific for me please?… especially the 'apply it very carefully, too much and you end up with curved walls when it dries out'
I'm thinking of doing a bit of griming down myself but don't want to mess it all up having spent a fair amount of time putting all my Metcalfe buildings together… really don't want any curved walls…..
Mike
Praise is an excellent fillip for waning ambition.
Praise is an excellent fillip for waning ambition.
Posted
Full Member
Apologies for the delay in replying, we've been a bit preoccupied with Fflyff - the other half of our demon duo - she has had a spell of scratching her eyes recently, been on antiseptic and corneal repair drops for four weeks now… and this weekend seemed hellbent on doing it again. Monday, a new day, and, as ever a different cat, so we can now get on with our lives for a change… Thanks again for the positive comments.
We're singing from the same hymn sheet Dave - my memories of early 60s lighting on the railways/industrial sites - apart from mainline stations and the new super marshalling yards - was that it was minimal at best, so I'm not going overboard with the lighting. The H&S folk of today would have had a field day and probably closed most engine sheds, goods sheds and yards, and all but the biggest stations on the grounds of inadequate/unsafe lighting.
Mike, I hadn't thought about weathering before, on my last layout (finished in 1963)… dear oh eck - that's 53 years ago… I really do wish I hadn't mentioned that now!!…. there was no weathering. But, reading the mags on my restart I could see there was a point to it all - and so intially I tried it on the retaining walls at Woodside - Wills panels - plastic. I think I used what they call 'dry brushing' - with a 1/2" flat artists brush I just dipped the end of the bristles in the black emulsion and proceeded to spread it quickly over the walls - seemed to work OK. Didn't bother with card kits at first 'cos I reckoned the pressure I was putting on the brush would probably damage the surface of the card. Eventually I decided to try it with a very thin emulsion solution… just put a brushful of emulsion in a small tub, add water until I had something resembling muddy water. Just dipping the ends of a brush in this didn't work, needed to load the brush (not too much) - and then as before just spread it quickly over the surface, this time though, no pressure on the brush. Always go over some patches a second/third time to get the slight differences in overall colour. The sensible thing would have been to try it on some offcuts from a Metcalfe kit, but this is me, so I tried it out on the roundhouse I'd bodged from two Metcalfe two road engine shed kits. It seemed to work, but I noticed the following day that on one roof section, where I had been a bit too generous with the 'paint', it had dried with a slight curve. Thinking about it afterwards, I always do my thinking afterwards, when card gets properly wet it does curl a bit as it dries - hence the warning about not applying too much - particularly any exposed edges. I'd try it on some Metcalfe offcuts first, that allows you to see if the 'colour' is right, or if it needs more paint/water. Once you're happy with the colour, then try it on a wall which is mostly obscured by other buildings, before starting on something important. The other thing - be fairly quick in spreading the 'paint', speed is recommended, and don't put too much on any corners - the open fold will absorb whatever you put on it which might start the curving process, and don't worry about windows, just go over everything in one go, anything on the window will just dry - giving you dirty windows, and will give the 'paintwork' a few darker patches. The overall effect gives me what I wanted. That first warehouse, built as the standard low relief, took less than five minutes. Once it is fully dry, you can always go over any bits you're not happy about, or give it another go if the whole thing needs to be darker. Once you've settled on what you see as 'right', it does seem to be easy to reproduce it on another model. Always remember, if I can do it, it can't be difficult… If you have any other questions, please ask away.
Keith
Do I have a plan? Na, if I did I'd spend most of my time trying to remember where I put it.
Posted
Full Member
I'd like to run the 2P on the Helsby service, (don't think they ever reached 6C, but this modellers' licence does come in handy) but with no turning facilities at Helsby…. even though there is in the fiddle yard, it would have to work back tender first… which is OK -ish, but that will mean leaving that awful coupling on the front… can I fit an NEM socket on the front bogie which will at least give it a smaller coupling?… or does anyone do a small tesion lock which is screw fitted?
Keith
Do I have a plan? Na, if I did I'd spend most of my time trying to remember where I put it.
Posted
Legacy Member
I'll give it a go… probably round the back of one of the buildings see how I get on… not today though… I'm erecting Midland style fencing along the back of Quernaby Station… as it's forecast to be a hot(ish) day, I might break out into a sweat or something what with all the heavy lifting involved… there again… maybe not…..
Mike
Praise is an excellent fillip for waning ambition.
Praise is an excellent fillip for waning ambition.
Posted
Full Member
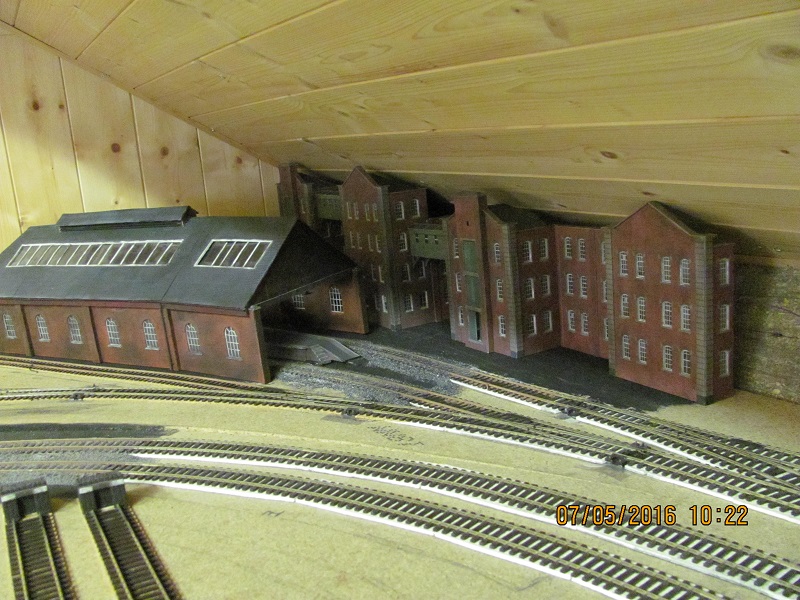
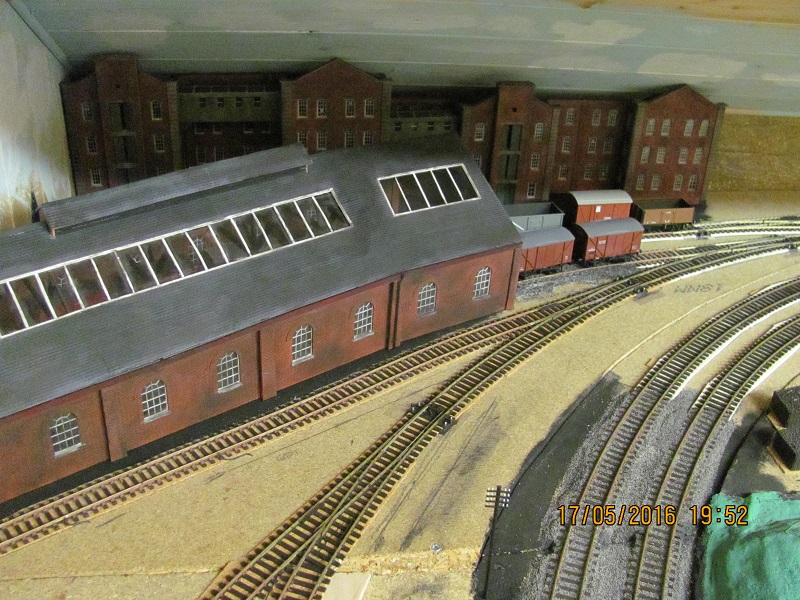
Back to the job in hand - I've made up the first of the small factory kits, and amazingly it fits exactly between the baseboard, the purlin and the roof - anyone would think I'd planned this….
The three storey section is quite close to the tracks, but the design forces this with the loading platform … and I really must get on with that ballasting…. but it would be nice to get some trains running too…
I've not fitted the staircase as yet… having second thoughts about the position now, and the second kit…. so no plan, as ever. There is a gap of around 17" between the current position and the warehouses, so I'm still thinking about a low refief version, and a main entrance to the site… I'll start building the second kit… and see what happens… I'll eventually decide on something!
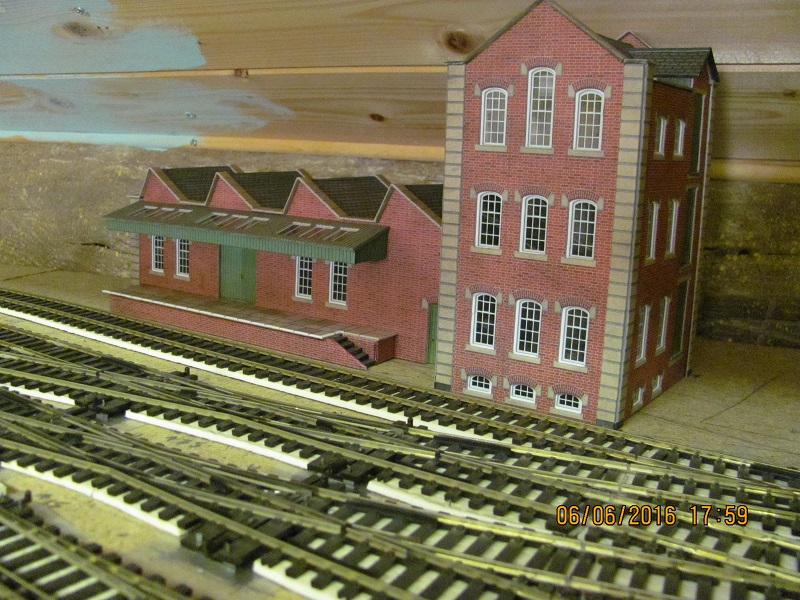
Incidentally on my rant about dimensions of Metcalfe kits I did, eventually, notice that on both the warehouse kits and the factory kits they do show the dimensions on the packaging - for both kits, on one it is on the back, the later ones (I think) it is on the front, so presumably in time all Metcalfe kits will be like this…. and on the subject of the small factory, I did notice that the window "frames" and the windows do not follow precisely the brick arch above the frame - they do on the warehouse - which is unusual for Metcalfe.

.. so my usual method of lining up the lefthand side of the window/frame didn't quite work this time. I'm a big fan of Roket glue, but unless you notice such things instantly, there's no changing it later! Still once weathered, and where it is on the layout, it won't matter. Also building the three storey section, it isn't as solid as usual - mainly due to the floors I think, the instructions imply that the floors are on the thicker grey card sheets (as the warehouse), but they are in fact on the printed, thinner, sheets. Once complete it is fine.
So, one kit built, not sure about the position now, or exactly what to do with the second kit - but I'll start building it anyway… any suggestions greatfully received.
Like I said at the start… little progress.
Keith
Do I have a plan? Na, if I did I'd spend most of my time trying to remember where I put it.
Posted
Inactive Member
Don't worry about not having a plan. I've just realised that I have to add 300 mm to my gauntlet tracks. Dunno where I'm going to put the shipwright's building now. :oops:
Max
Port Elderley
Port Elderley
Posted
Legacy Member
Go through the usual procedure of cutting out all the window squares then, have all the ones for whichever wall you're doing at the ready - outside surface face up… and the wall section - again outside surface face up… doing them one window at a time lay one window square on the bench or other flat surface and put a minute dab of Roket in each corner of the square… pick up the wall section, hold it above the window square and gradually lower the wall section down onto the square… it helps if you guide it down whilst looking through the aperture into which the window is being fitted… you can clearly see the printed window frame and the outside wall aperture to get it in the correct position… its suprising how accurate it can be… I hold the wall fractionally above the square… double checking alignment… before finally allowing them to come together… quick press and job done…
I find doing it this way you don't have to fiddle about with little bits of plastic squares, holding them with tweezers, having Roket running down the squares trying to position them on the backs of walls whilst looking at the front of the building for alignment purposes or getting your fingers covered in glue… laying windows down onto the backs of buildings doesn't allow you to check position properly and, if it's wrong, you're almost snookered with Roket… doing it my way it also doesn't matter if you've got chunky, un-nimble fingers like me… all you're holding is a nice chunky wall… nothing else…
It's also very quick you'll wonder why you ever did it another way… I did the large warehouse (PO282) which is full of windows (over 50) in a little over fifteen minutes (the longest job was cutting them out) and… they're almost all perfectly positioned…
Last edit: by 16A
Mike
Praise is an excellent fillip for waning ambition.
Praise is an excellent fillip for waning ambition.
Posted
Full Member
Apologies for the delay in replying - been busy with the cats and windfarms - the usual excuses.
Max, I never worry, if I thought for one minute I actually had a plan…. that would keep me awake at night, 'cos I wouldn't know what to do with it. Now, 300mm…. is that what I call a foot? - I can visualise 12 inches, but these metric thingies just don't do it for me… despite my computing background I fancy there's a bit of Luddite in my DNA!!
Mike, many thanks for the windows technique - I'll give it a go with the second Small Factory kit, which I'm about to start. Still not sure about the final layout of the two small factories, but I've done enough thinking now, time to get on with it…. I usually decide what I'm doing just after the Roket glue has set solid… but I'll get there in the end… just don't know what the end is yet.
Keith
Do I have a plan? Na, if I did I'd spend most of my time trying to remember where I put it.
Posted
Full Member
Like you, I have an age-old background with '1's and '0's. Perhaps that's why I like dabbling in the electronics for the railway.
Anyway, Keith, time to pack the laptop away for now and think about some 'Z's instead.
Cheers
Dave
1 guest and 0 members have just viewed this.