A Final Curtain Call for Westown-Heathfield
Posted

Full Member
GWR OO Gauge - 1930's rural Somerset - Winter 1937
Little "C" is a bit of a genius! The bunting is superb, and so evenly cut, and the idea of moving figures around is great…. she has the modeller's eye for detail and a story!Michael

Posted

Full Member
Staying on the thread Kevin.
Posted

Full Member
A problem entirely of my own making has been to post (innocently I claim) some scenes from W-H over in the WC&PR Topic which stimulated inquiries about the back-scene construction.
To bring the topic back to its rightful place, these two photos show the embankment / back scene construction with the scene installed afterwards, hand painted to blend in with the bank. One photo is taken from each end of the layout.
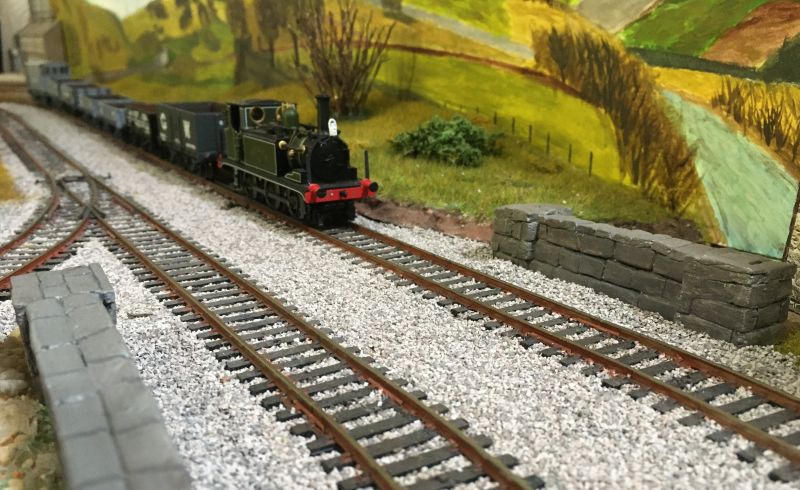
Note that the Heathfield river runs down the valley away from the viewer.
Taken from the bottom of Frog lane farm this is the same scene.
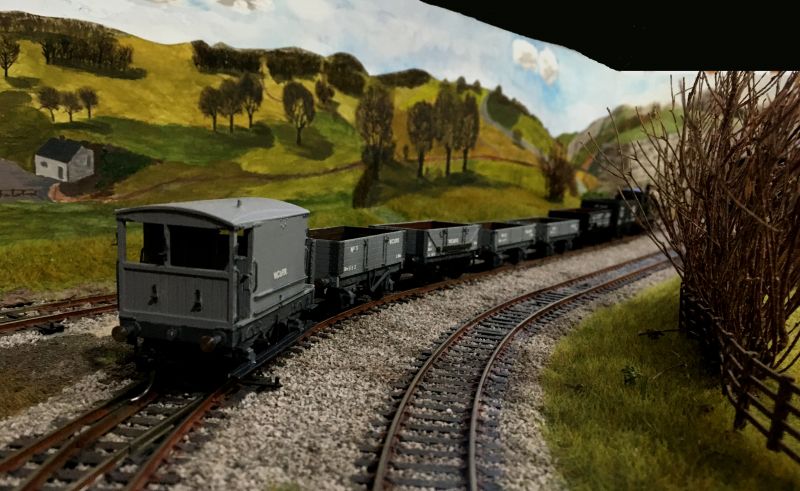
The river and surrounding valley hills now appear as if viewed at a different angle but still give a sense of depth which was a pleasing outcome.
Posted
Full Member
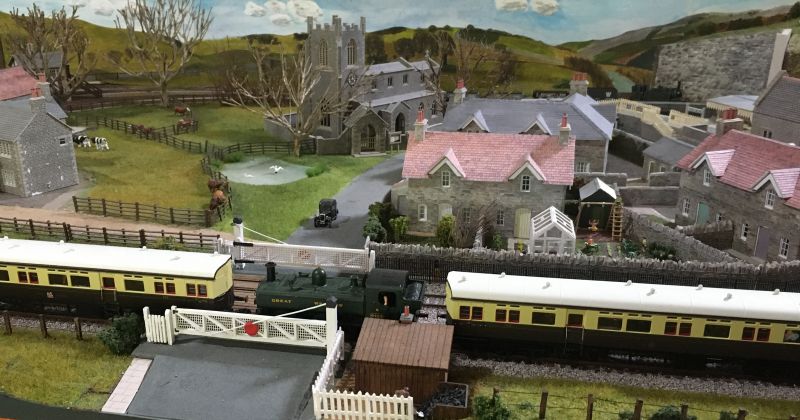
This is perhaps the best angle to view of the back-scene which young C helped me to prepare. The only problem I have with shots like these is the reminders I get of all the pending "little" jobs I should finish off
 .
. 
 Last edit: by Colin W
Posted

Full Member
I am close to heresy now…If John Ahern had had the facility, would he still have been struggling with Much Madder days before his demise.
Keep at it,
ATB
Douglas
Last edit: by Chubber
'You may share the labours of the great, but you will not share the spoil…' Aesop's Fables
"Beer is proof that God loves us and wants us to be happy" - Benjamin Franklin
In the land of the slap-dash and implausible, mediocrity is king
"Beer is proof that God loves us and wants us to be happy" - Benjamin Franklin
In the land of the slap-dash and implausible, mediocrity is king
Posted
Full Member
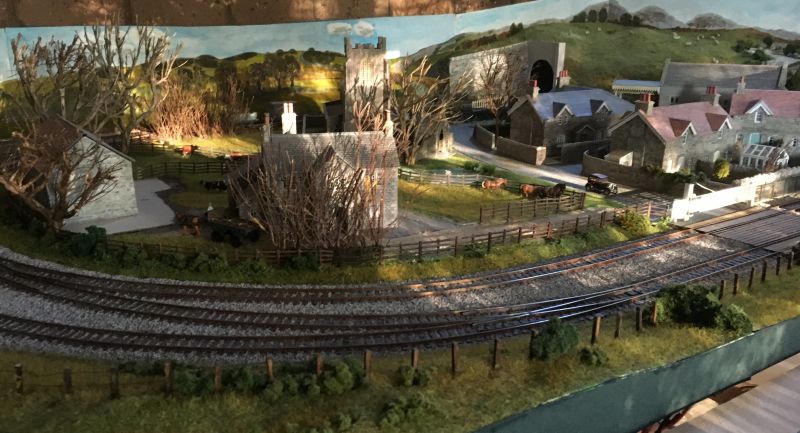
It's a scene which I've captured in various different lighting conditions, the best seem to be natural as the sun filters into the room from a very low angle.
Posted
Full Member
Staying on the thread Kevin.
Posted
Full Member
After quite a while with just some "pretty" rural pics posted here and various other goings on at the WC&PR, my attention was brought back to Westown by the sudden unplanned arrival of our Perth family. First time in 15 months thanks to interstate restrictions here in Oz.
The youngster wanted to run a few trains on Westown-Heathfield and first up were the WC&PR #4 + Goods which happened to be about those parts and the King which is a perennial favourite with young and old!.
6011 has had the odd run over the shutdowns but time has taken its toll and clearly not all was well with the pickups even after a thorough clean of all wheels and wipers. Ketley Hall was brought in as backup and provided solid service over the 3 days.
The loco was fine after a clean but the tender wipers clearly had never been installed correctly so buildup and poor contact needed attention. Getting the Keeper plate undone was a challenge and one that I could find no reference to in "the literature".
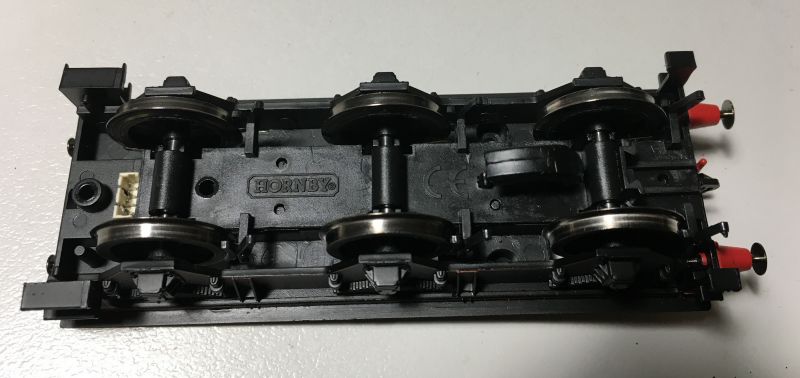
For anyone attempting work on the tender, stage 1 is in the Hornby Docs, simply two screws removed from beneath, holes are seen here between centre and right axles. This gives access up top, sufficient for most needs including adding in DCC / Sound.
To remove the keeper plate there were two obvious screws, one to right of left axle, the other tiny one under the NEM pocket. At this point it's worth noting that care is needed as nearly every screw used (except pairs) is of unique size / thread so keep them separate and noted!
The plate remained firmly in place on the right side, it appeared that the plastic lugs might have had CA applied. Freeing these it was still immovable until I discovered the 3rd screw, cleverly concealed and nearly invisible under the water scoop. Good old Hornby, why make things easy? Once freed the plate comes away easily and the wipers were tensioned to give good contact.
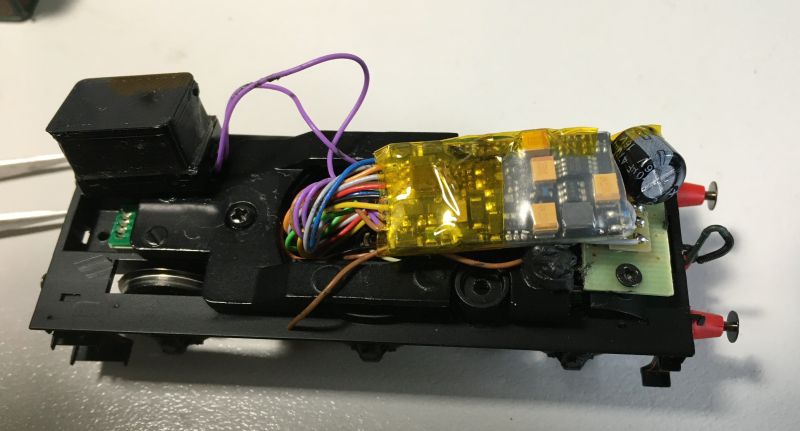
Finally this is the topside view with the Sound DCC and speaker back in place. A recess is required in the tender tank to permit the speaker to sit well forward. Best installed with the coal load removed (it slides out backwards if raised from beneath).
Last edit: by Colin W
Posted
Full Member
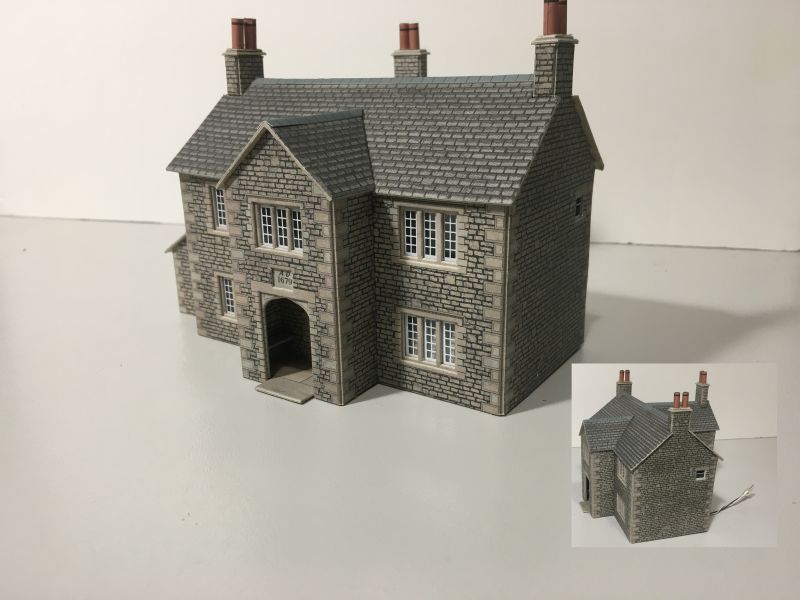
This Metcalfe Kit was an early build of mine when first getting back into modelling, assembled as per the standard layout as supplied. In a big picture sense it fits very nicely as made on W-H even if it has its limitations compared to Scalescenes or resin structures. Now the time has come for modest upgrades, due in part to changes in the overall Farm setting which meant removing the side lean-to outhouse.
Removing this glued on lean-to produced inevitable damage to the printed veneer of the Manor wall leaving bright white patches. I'm planning a trellis which will partly mask the worst areas but wanted first to reduce the damage level. Most important was the hole I'd punched thru the side wall to make the lights wiring easier.
The simple solution was to reapply a brick veneer having cut out damaged sections down to the brown support layer of the card.
Never throw away a completed Metcalfe kit is my motto, bits and bobs from the printed sheets may come in handy later and so it was. I scraped up just enough bits of 2 brick course sections to turn them into replacement veneer. Smaller damage was spot painted. Again the old kit was useful providing sample brickwork for colour matching.
Not perfect but fit for purpose and a big improvement over the stark white areas where the printed veneer had been stripped away.
Posted
Full Member
Staying on the thread Kevin.
Posted
Full Member
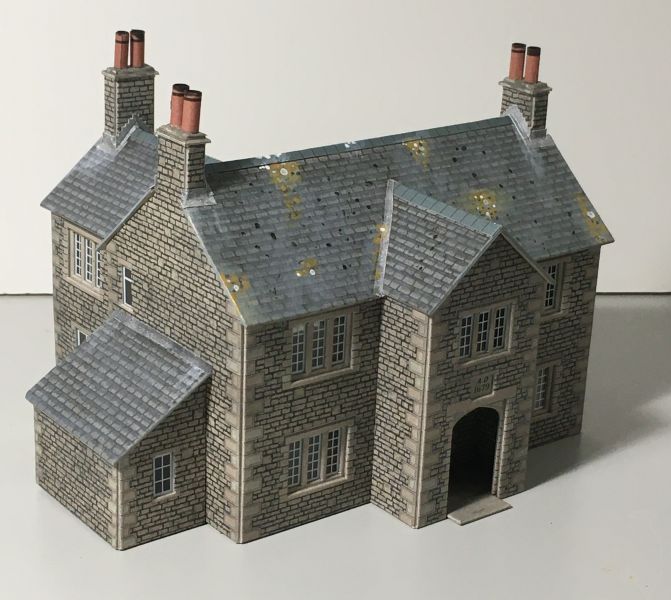
The Frog Lane Manor Farmhouse escaped my close scrutiny for a long time but once started I soon realised that one glaring omission from Metcalfe Kits is any sort of roof / Chimney Flashing. This was easily rectified with a suitable Scalescenes download (TX 00B) and despite being small and fiddly, they are as the instructions predict, easy to put together. The end result gives the whole building a lift.
Next to some roof detailing:
- essential first step with Metcalfe Kits, a good coat of matt acrylic varnish before adding any washes. Otherwise the fragile printed top layer will quickly deteriorate.
- Some suitable spotting of Yellow Ochre, white and very dark green to represent lichen and moss blobs on the roof #.
- These are then given localised thin washes of yellow ochre and then pale grey to tone down the colours.
- Some white wash for seeping corrosion from flashing and seams and
- A final thin uneven grey wash to a suitably dull aged finish
:hmm
# I found a wooden toothpick dipped into bulk paint best for this. Pointy end for very fine spots, other end for bigger ones, then a dry paintbrush to remove the centre of bigger blobs to leave the appearance of a typical lichen ring.

Last edit: by Colin W
Posted

Full Member
Posted

Full Member
That's a fabulous job on the roof, it's really lifted the appearance of the building to another level.Are you going to add bargeboards and guttering?For me, that would be the absolute cherry on top!!Great work!
:pathead
Cheers,John.B.:thumbs
Posted
Full Member
Thanks David,Like the difference the flashing makes - thanks for the description. Trouble is where do you stop. I watch the live builds on Scale Model Scenery on a Wednesday and they have recently shown new laser cut roof tile strips in various stages of weathering, sure these would look good too but…. I'll checkout Scalescenes TX 00B though.
If I was starting over with the kit build, I'd have used the standard printable Scalescenes Tiling sheets during construction. Their slate tiles (TX18a_OO) which I like very much were used on a scratch built townhouse I've not written up on here yet but you can see the Pantiles sheet (TX17a_OO) as used on two Cottages (Post #7) and the Barn (Post #71). The layered structure they give to the roof adds significantly to the look and would aid with the detailing, providing natural boundaries to tile lines.
For sure they are a far less expensive solution than laser cuts and have the benefit you can adjust shades, contrast, etc. before printing. IMO they are one of modelling's great value purchases.
Once the Manor Farm roof was heavily weathered I'm not sure I'd see a large improvement with layered tiles.
Posted
Full Member
Thanks JohnColin,
That's a fabulous job on the roof, it's really lifted the appearance of the building to another level.Are you going to add bargeboards and guttering?For me, that would be the absolute cherry on top!!Great work!
:pathead
Cheers,John.B.:thumbs
I'm trusting Metcalfe's research, viz. that the original building design did not have bargeboards as their kits do include them when appropriate.
I'm imagining that a building completed in AD1679 predated the general use of guttering and down-pipes and as this particular house is a Grade II Listed Building, one of the finest examples in the Quantocks, it is being maintained accordingly to its heritage
:It's a no no
Posted

Full Member
You say it's pretty standard stuff. Not if you haven't done these things before so I've certainly learnt something today. :thumbs
'Petermac
Posted

Full Member
[user=201]georgejacksongenius[/user] wrote:Thanks JohnColin,
That's a fabulous job on the roof, it's really lifted the appearance of the building to another level.Are you going to add bargeboards and guttering?For me, that would be the absolute cherry on top!!Great work!
:pathead
Cheers,John.B.:thumbs
I'm trusting Metcalfe's research, viz. that the original building design did not have bargeboards as their kits do include them when appropriate.
I'm imagining that a building completed in AD1679 predated the general use of guttering and down-pipes and as this particular house is a Grade II Listed Building, one of the finest examples in the Quantocks, it is being maintained accordingly to its heritage
:It's a no no
Hi Colin
Your last para is worthy of our late mutual friend John Flann. He was brilliant at creating believable background legends for his models. Glad to see you doing the same.
I do like the flashing…great improvement
Best Wishes
Last edit: by spurno
Posted
Full Member
Thanks John, very kind.
Hi Colin
Your last para is worthy of our late mutual friend John Flann. He was brilliant at creating believable background legends for his models. Glad to see you doing the same.
I do like the flashing…great improvement
Best Wishes
Unfortunately that's where any parallel with JF must end as my highly compressed setting imposes far to many compromises for my liking; for now I must just make do.
The back story which I have created to explain my highly truncated Frog Lane farm setting was outlined in Posts #70 and #51. Farmer Hardwick's Property was rudely bisected by the late 19C addition of a GWR overflow route and the majority of his working buildings lie the other side of the tracks. What we see are just the original buildings, the Old Barn (also 17C), now little used and Manor house, while the majority of his newer farm buildings were relocated further to the South West on the main part of the farm property.
Heathfield village is likewise interrupted by the same railways lines, something the local children find far more enjoyable than do the adults!
Last edit: by Colin W
Posted
Full Member
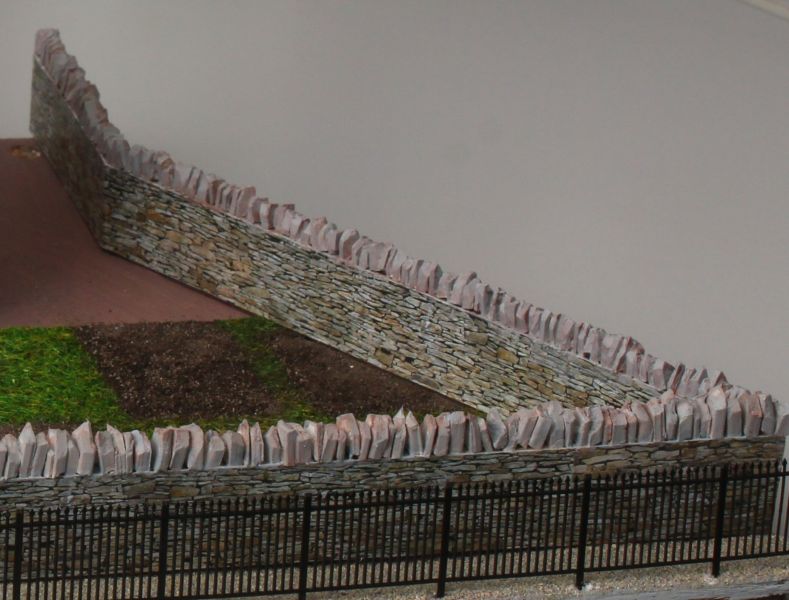
For the mostly straight sections of village wall I used a similar process for the substrate as with card kits, a solid core of stiff card layered together from 1mm thick strips to give a 3 or 4mm thickness. Applying Scalescenes dry stone wall prints and an acrylic matt varnish completed the sides. The tops were finished using DAS air dried clay stones, hand painted when in situ. These can be seen in just about every Heathfield view and are (IMO) highly effective under all but the very closest viewing even without surface texture.
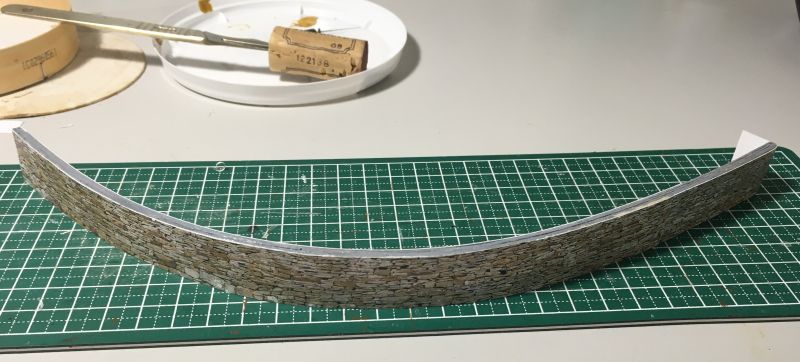
For the wall around the Manor Farmhouse I needed a strongly curved wall and so turned to creating a better core structure.
These little packages will be known to all lovers of French cheeses, some excellent ones make the long journey here and despite the constraints we face on unpasteurised imports are surprisingly fine smelling and delightfully runny (with apologies to John Otto Cleese who didn't mind how runny!) . Simply unstapling, wetting and pressing flat you get fine strips of 1mm thick wood (poplar). Laminating four strips together a layer at a time permits fitting to your required positioning and shape however tight. (clearly a 20 x 320mm strip will go round to 360 degrees so very versatile).

My completed farm wall substrate is shown at top. Attaching the wall feature paper is straightforward with PVA. An added advantage of using wood over card is that the wall end can be carefully whittled down to a curved end shape which then makes curving the stone paper around the end very easy and realistic. Carving thru card can be less easy to control. Here the papers are attached with loose end left for the next section of wall to be butted on.
Last edit: by Colin W
Posted
Full Member

What is even better about this method is that I get to eat 2 whole boxes of Camembert "Rustique" for every wall.
I'm going to model the whole of the Yorkshire Dales……. :Happy
Joking aside, those hesder stones look excellent. Are they really just Das clay ?
'Petermac
1 guest and 0 members have just viewed this.