A Final Curtain Call for Westown-Heathfield
Posted

Full Member
GWR OO Gauge - 1930's rural Somerset - Winter 1937
Hi ColinThats an extremely neat finish :thumbs
I have never added wipers to locos but have added them to a number of tenders. I use a similar method to you with brass strip and springy brass wire soldered on for wipers. I have to say yours are a lot neater than mine though!
I have always had problems fixing the strip to the base of the tender…….generally I use supeglue but it aint great…..on one I had to retrofix with blutac. :oops: As it happens I was adding pickups to a loco when you started the 48xx project so I tried the hot melt solution suggested by your mentor……it could well be my incompetence but it was not very successful …..a bit of collateral damage to the tender and the join was hardly permanent so it was back to the super glue.
I like the idea of the micro screws though and will try it on the next project…..thanks for the tip
Cheers
John

Posted

Full Member
The trouble with any typical glue is that soldering heat is rapidly transmitted the short distances involved on these small locos and will cause the join to fail.Hi Colin
Thats an extremely neat finish :thumbs
I have never added wipers to locos but have added them to a number of tenders. I use a similar method to you with brass strip and springy brass wire soldered on for wipers. I have to say yours are a lot neater than mine though!
I have always had problems fixing the strip to the base of the tender…….generally I use supeglue but it aint great…..on one I had to retrofix with blutac. :oops: As it happens I was adding pickups to a loco when you started the 48xx project so I tried the hot melt solution suggested by your mentor……it could well be my incompetence but it was not very successful …..a bit of collateral damage to the tender and the join was hardly permanent so it was back to the super glue.
I like the idea of the micro screws though and will try it on the next project…..thanks for the tip
Cheers
John
Hot melting the strip into the keeper plate should work in principle, but I was never bold enough to risk that much damage. It probably works best with tiny metal strips which will get hot enough to embed but these have their own issues. I favoured using a long single strip to simplify the connections.
Finally, I used 0.33mm Phosphor Bronze wire for the pickups rather than Brass. Either will do but PB is springier I've been told.
Colin
Posted

Full Member
I use copper clad (as used for sleepers), solder P/B wipers on after bending to shape, and then fix with CA. Saves heat getting to the CA, which can generate HCN gas.The keeper plate and copper clad need to be oil free and suitably keyed. With care an insulating gap can be made down the middle of the copper clad. copper clad is also easiest to drill and tap. I just noticed you have bends in the wire more suitable for tread rather than inside rim contact.
Nigel
©Nigel C. Phillips
Posted
Full Member
Hi Nigel,Hi Colin,
…. I just noticed you have bends in the wire more suitable for tread rather than inside rim contact.
Nigel
I'm following the recommendations of Tony Wright and they seem to work well. What is your solution for rim contact wires?
Colin
Posted
Full Member
Multiangled. In words flat then up from the copper clad, out towards the wheel rim, then almost flat to the inner rim. Dry fit, end filed flat to the rim, base filed flat to the copper clad, rim flat polished using #1000 emery. Make allowance for maximum lateral play of the wheels as well as any vertical from springing. Keep as flat as possible. As near to the axle, not high. This minimizes unwanted catching on fingers, jumpers, etc. One double ended and one single ended for an 0-6-0. No hard and fast on wire diameter, 10 or 15 thou' is nice and springy. Easier to tin the copper clad and P/B wire, then solder in position with a touch of flux. When in place they should act as lateral springs centering the wheels to the chassis. You can simply use curved wire bent almost flat to the rim at the ends. I seem to remember covering this in a post several years ago. Last time I used it was on the wipers for the On30 turntable wheels flat, up slightly, out, flat). You can if course use P/B strip, but that needs soldering to the copper clad at 90°. Putting a 90°bend in really messes up the springing unless this done as close to the solder end as possible.
I hope the above helps. Use what works for you. Tony's method wasn't right for me.
Nigel
©Nigel C. Phillips
Posted
Full Member
always happy to experiment, I'll give your suggestion a try on my test-bed loco.
Performance with the edge wipers is nearing its limit on my standard track, good steady running at slowest speed step. Reliability remains to be seen with further use, I didn't get the method directly from Tony Wright but from an experienced kit builder applying it to an 0-4-0that was more relevant to my situation. His experience was very favourable so we'll see how it goes with more use.
Compared to the Hornby with traction tyres, it feels like I'm in a different world already

Colin
Posted
Full Member
The locals turn out to view Class 48xx #4869 which has returned to Auto car service after a major boiler overhaul and fitting of new driver tyres at Tawntown.
There was much excitement as the youngsters' favourite loco ran the morning schedule after what seemed like a long absence.
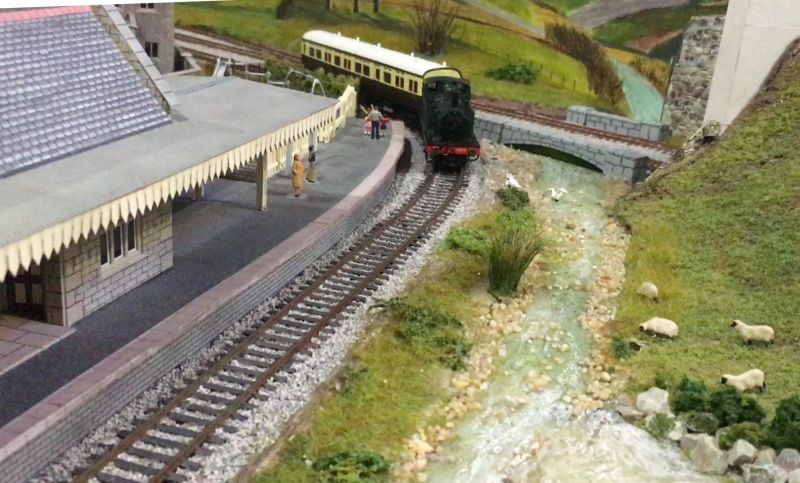
one intrepid buff managed to capture all the action. It's been very windy on the Quantocks which explains the shaky hand held action among other things.
[yt]2nNujIruqYk[/yt]
Colin
 Last edit: by Colin W
Posted
Full Member
Cheers
John
Posted

Full Member
The scenery is extremely "Quantocky" - hats off to you Sir !! :pathead Do you hail from that part of Blighty ? If not, then you must have some excellent photographs to work from. :thumbs
'Petermac
Posted
Full Member
thank you for your kind words.
John,
I had reached the point of thinking I might never have a smooth running 48xx after all the disappointments I've described, so it feels good to have that resolved. I won't be sad if I never see another traction tyre loco run on my layouts :cool:
With some effort the 2008 Hornby proved to be a "sweet spot" once the dreaded TT issue was banished to the "forgettery". Now the Airfix is reassembled minus its wheel flanges perhaps I should have a ritual tyre burning?
Peter.
I come from further NE in Somerset (the real Westown; see my intro posts) but the Taunton-Minehead line was a favourite holiday day trip for our family and a few years ago we made a return pilgrimage to the WSR which helped refresh the momory. There are also excellent annual videos of WSR Gala running sessions that are a great resource. Backscenes on W-H are all hand painted which I prefer and has the bonus that the youngsters provide lots of artistic help these days.
Colin
Last edit: by Colin W
Posted
Full Member
When my children were just that - many moons ago, we had a relative with similar aged children who lived in Nether Stowey at the time so we often spent some holiday time there. Naturally the Quantocks were a favourite - I well remember picking wild bilberries in howling gales and driving drizzle ……………………………….. :roll:
'Petermac
Posted
Full Member
Nearly all my wagon stock is now refitted to Kadees couplers, thanks to them having NEM pockets where I use the excellent plug in #19s and now I've moved on to the locos.
Bachmann, even Oxford Rail and new tooling Hornbys use NEM pockets so all those have been easy but it leaves me with 2 problem locos where I'd welcome advice from anyone who's traveled this path. I don't want have a situation where I always need an interface wagon with Kadee one end Mk2 the other, I feel that will restrict me too much and is sure to annoy. Once you've got used to the ease of KeDees the old Mark2 types (and older) are a right royal PITA.
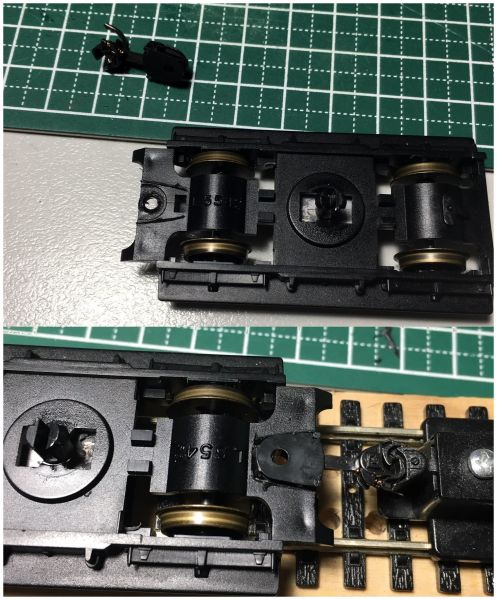
The problem I face is the total lack of somewhere to fit a NEM socket or Kadee gearbox within the body frame as this photo shows.

On the two problem locos in question 4869 here and 2779 (shown previously) the proprietary coupling either plugs in between keeper plate and chassis (4869) or just mounts into a very thin recess in the keeper plate and screwed into the chassis metal. In both cases essential chassis metal extends right back (and forward) to the buffer beam and I'm extremely reluctant to go gouging a recess big enough to take a small Kadee gearbox.
The chassis / keeper plate positioning means any gearbox screwed on from beneath sits far too low.
Given tight curves on W-H I'm not looking to better the coupling distance that I have with Mk2s and would be happy to replicate this with Kadees. Expressed as buffer to midpoint separation at closest contact this is 7mm for the 48xx and 4mm for 2779, purely due to the former having a longer version of Mk2 type - all that was available to replace the terrible Mark 1 it came with!
My current plan for these two locos is to use Kadee #34 mini Gearboxes with short arm, mounted on a small plate that extends off the bottom of the chassis. This will give me 6.5mm to midpoint so fine for 4869 and a 2.5mm deterioration with 2779. A quick test with the longer #31 suggests this will give a good mounting height.
Before I send off an order for all the parts I'll appreciate any thoughts and input.
Last edit: by Colin W
Posted
Full Member
You have to go outside the box - literally. Screw just goes through the shank hole of the coupler. Whisker shanks are thinner than regular, and you may have to use an underset one rather than a centerset, as well as shims. You can also use a plastic or brass sleeve inside the shank hole to minimise movement and allow rotation. for a surface mount setting use a box but with a longer screw (if you can match the thread. If not tap for a new one). This may involve using an overset coupler. KD shank holes are sized for 2/56 bolts. You can get these in plastic, brass or steel, regular or self-tapping. Kadee sell a drill and tap set for this.
Do your measurements to see whether you need under- or overset shanks.
Depending on your track radius you can even have the shank locked in a central position. Use shims either side to limit lateral movement of the whiskers if you want lateral shank movement.
Done all of the above. Most tender systems used a similar shank bolt system at the locomotive end.
Nigel
©Nigel C. Phillips
Posted
Full Member
Posted
Full Member
Swapping over the couplings on my modern Hornby stock was simple but to run them with 30+year old Hornby Clerestory stock was another matter. The GWR used to run a very diverse mix of coaching stock in the 1930s and that was one aspect I wanted to capture on W-H.
I thought it would be a daunting task given the original huge "D" Hornby coupling which was riveted to the bogie front. Whipping that off things looked more promising, unfortunately the bogie height precluded have a new mounted coupling either above or below so a cut and insert job seemed to be the best option. I went for the very compact #31 gearbox as this required less structural incursion into the bogie. It went well and came up spot on for height and positioning, shown here on the Kadee height gauge.
Posted

Site staff

Ron
NCE DCC ; 00 scale UK outline.
NCE DCC ; 00 scale UK outline.
Posted
Full Member
but those #31 small gearboxes are fiddly little beggars to assemble.
Colin
Posted
Full Member
You've done a neat job - did you set the height by trial and error - there's nothing there to actually glue against ?
'Petermac
Posted
Site staff
agreed that is why I prefer whisker couplings and the new boxThx Sol,
but those #31 small gearboxes are fiddly little beggars to assemble.
Colin
https://www.kadee.com/ho-scale-couplers-c-274_276_284/233-ho-scale-30series-gearboxes-lids-p-325.htm

Last edit: by spurno
Ron
NCE DCC ; 00 scale UK outline.
NCE DCC ; 00 scale UK outline.
Posted
Full Member
Clerestory coach bogies and KDs - you might want to use a nut, bolt and washers as well, rather than just reply on glue to keep the gearbox in place. Some of the plastic used on those old bogies doesn't take solvent-based glues that well.
I'm with Ron on whisker couplers.
Nigel
©Nigel C. Phillips
1 guest and 0 members have just viewed this.