A Final Curtain Call for Westown-Heathfield
Posted

Full Member
GWR OO Gauge - 1930's rural Somerset - Winter 1937
ColinIs there room on your train list for something from the Engineering Dept? Ballast, flats, etc wagons make a train thats easy on the eye and adds a bit of shunting fun. Plenty of GWR PW vehicles around including the Parkside and Coopercraft kits.
Barry
Shed dweller, Softie Southerner and Meglomaniac

Posted

Full Member
I am looking forward to seeing how you get on with Parkside kit. I have always fancied making a Beetle for Granby
I missed your initial playground posts. Thoroughly enjoyed catching up…..it was a charming story…..must be very satisfying for your grandchildren to be so involved in your layout
Best wishes
John
Posted

Full Member
Colin
Is there room on your train list for something from the Engineering Dept? Ballast, flats, etc wagons make a train thats easy on the eye and adds a bit of shunting fun. Plenty of GWR PW vehicles around including the Parkside and Coopercraft kits.
Barry
Hi Barry,
Great idea. I've been having a look around and now have a better source for some additional kits with each of the suggestions that you made on my shopping list. Accessing Cooper Craft kits is a problem these days; from all reports the company appears to be totally dysfunctional but between Parkside (Peco) and Cambrian there are still lots of interesting items available.
I've spent a fair amount of time on research to sort out getting the correct livery colours and decals. The big order went in today.
Colin
Posted
Full Member
This was a good kit to choose as a first build because there are two separate resources with helpful tips. In addition to Phil's Blog, the ever useful GWR.org.uk describes a build and highlights a few issues that I can totally agree with in hindsight.
Assembly was fairly straightforward with the available help, tricky bits are the ladder and footsteps, each of which are extremely fragile. I broke all 4 footsteps before I'd got a primer coat on. As the original footstep bar appears to be a piece of 3/4 -1in (18-25mm) steel rod, at 76:1 this is tiny and not scalable in anything synthetic weaker than kevlar, Answer is DIY, I've some useful metal to replace the plastic risers.
Next to colour. The consensus (of which Dapol is the outlier) is that GWR grey is very dark. With some effort I got about the right "lightness" or saturation with a Vallejo Black Grey. I think that the faint underlying bluish tint is more representative of lamp / carbon black than is the Bachmann GWR Grey (which has a greenish tint).
While sorting this out and giving my Beetle a nice grey first coat my attention turned to decals. Parkside have a dedicated water-slide set (formerly via Modelmaster) that is being supplied in new kits just now. Mine predated that change so I need to buy; but why are they Yellow I asked myself?
From this simple question I was introduced to the arcane world of GWR NPCCS wagons, all of which have anything but grey paint in my period. The Beetle was unique in having brown sides and black ends, in line with the coaching stock they were often paired with. http://www.gwr.org.uk has lots on this topic for those interested!
So a suitable brown was found and applied, this is where I'm up to..….
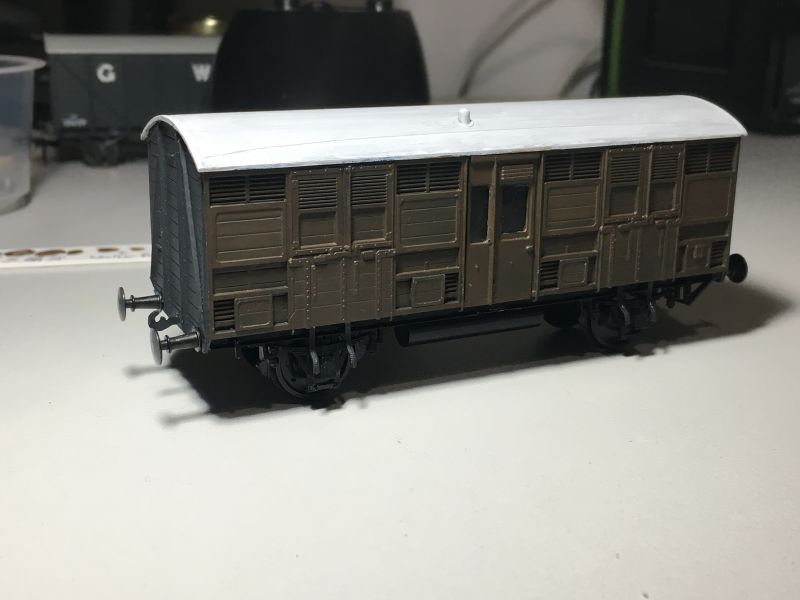
Roof is just primed at this stage, and yes the buffers are misaligned, they're just pressed home at the moment.
Colin
 Last edit: by Colin W
Posted
Full Member
The Beetle certainly looks good.
I've just had a look on eBay for Coopercraft but the offerings seem limited to a few Mink kits and some already-built stuff. I remember they used to do about 30 different kits! Luckily the Parkside range is still going strong and they are decent kits to make
Barry
Shed dweller, Softie Southerner and Meglomaniac
Posted
Full Member
After a period of “radio silenceâ€, all can now be revealed. Activities on Westown have been suspended temporarily for a trip West to Perth and our family there. Some 2700km by air or further than London - Istanbul it’s not a trip we can do that often. So, we’re here for 2 weekends. Weather better than Melbourne’s in late winter, Perth is a most enjoyable place to visit if you can.
On arriving, a number of jobs were lined up for me, a mango tree in need of TLC, various other tasks around the house and, oh yes, “just†build a railway layout for grandson J who had had lost his former setting after renovations of his bedroom / retreat.
Going back to my point # 3 from my blog intro, viz.
"I wanted to engage my 6 grandchildren in the building and operations as much as possible. I’d done this with my 3 children 30 years ago and it was a most rewarding shared experience that I wanted to repeat."
this was an enjoyable prospect for me but a lot to fit in the available time.
Day 1 we agreed on a suitable track plan to suit a 9-year-old / his friends, interesting but not too demanding for operation. The plan was refined and fitted into the available space with the aid of Anyrail then baseboards designed. The location takes up 75% of the study which must still be usable for its original purpose.
Day 2 We headed to Bunnings having selected the required timbers online. We’d chosen untreated structural pine, straight enough when carefully selected but forgetting that in WA all structural timber must be treated. Only 1.1m untreated lengths were available here so with a quick check back to the plans we made do with that.
Day 3 / 4 assembly. Now its ready for the plywood top timber, recycled from mark 1.
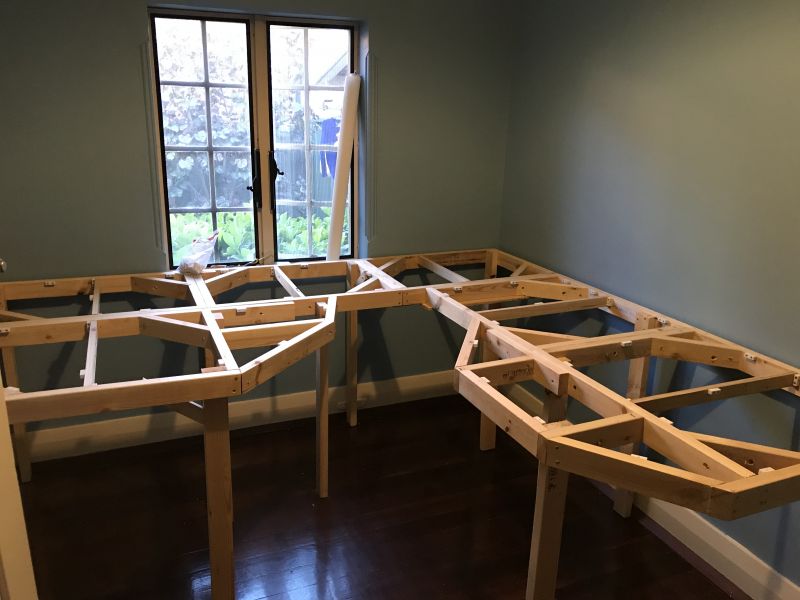
Colin
Last edit: by Colin W
Posted
Full Member
Day 1 we agreed on a suitable track plan to suit a 9-year-old / his friends, interesting but not too demanding for operation.
Hi Colin
I was recently asked by my own grandson (aged 8) for a "train set" layout. I am intrigued by your choice of plan that fitted the above criteria. Can you enlighten us? What I would have is not, of course, what my grandson would choose!!
Barry
Last edit: by spurno
Shed dweller, Softie Southerner and Meglomaniac
Posted
Full Member
Ha! Very good question. J's former layout had the luxury of using a lot of space on the floor of an upstairs room and had 10+m of single track snaking around a large L shaped board that gave long operating runs. There was a good passing lane and he could have up to 3 trains in operation successfully winding their way around. Not bad for a then 8 year old.
So, in the much smaller study, Dad and I presented him with the idea of either a smaller "L" as before or a" roundy round" at one end of the room. The look on his face told us he was not impressed by either after his Mark 1 experiences. Since he wanted a station, sidings etc. this was quite demanding spec. as we had a desk to be retained there against the inner wall. The room is 2.5m x 3.6m so the layout uses the full width on the window side.
The solution, maybe the least prototypical setting you could imagine does meet his needs and accessibility for 9 yr old arms was one of them, hence the deep indentation.
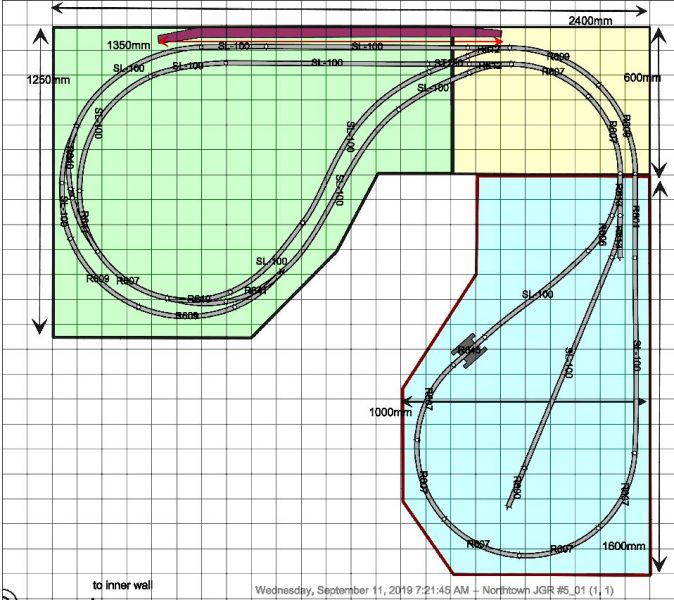
The overall design is not original, just a modification of someone's idea that meet our needs. Please let us know if there are critical flaws in the design as track will not be laid for a while. Retaining embankments / fence will protect the two areas where track passes near the edges.
Colin
Posted

Site staff
Ron
NCE DCC ; 00 scale UK outline.
NCE DCC ; 00 scale UK outline.
Posted
Full Member
DCC, what implications are there regarding isolating sections? I'd figured we'd need to isolate off the ends of all the crossing sections and have them all individually fed from the main power bus.
Colin
Last edit: by Colin W
Posted
Site staff
Ron
NCE DCC ; 00 scale UK outline.
NCE DCC ; 00 scale UK outline.
Posted
Full Member
I think that's the same as I'm saying in my edited post and yes it will be all insulfrog
Colin
Posted
Site staff
Ron
NCE DCC ; 00 scale UK outline.
NCE DCC ; 00 scale UK outline.
Posted

Full Member
What Ron is saying is that you need some means of switching the polarity on those two reverse loops as the train comes around. Track isolators and an electronic system that automatically detects the short and flips the polarity before the system responds. Same thing is used to switch frog polarity or turntable polarity. Doesn't matter whether it is insul or electro points.
Nigel
©Nigel C. Phillips
Posted
Full Member
now I get it. That's a complexity we'd not reckoned with and given how the layout is going to be used we might rethink the design as it will not be always under adult supervision.
Colin
Posted
Full Member
Regards
John
Posted
Full Member
Once the electronics are wired in that"s it, they automatically do the polarity switching. No nobs, toggles or sliders. Do not use the cheap relay based ones, they are usually too slow for DCC.
DCC Specialities autoreversers are one of the best ones available. £££ though. You may want to rethink the track plan and eliminate the reverse loops.
Nigel
©Nigel C. Phillips
Posted
Full Member
Problem #1 My Son's present setup is based on a very simple DCC Controller (an old Hornby Select and we have a spare) that works fine with his locos and the installed chips. No plans to upgrade while the main users are the youngsters. From what I've read this Controller needs the Hornby R8238 - Reverse Loop Module (2 in our plan A) and it's no longer available. Wouldn't be looking to spend heaps on another brand that probably won't work anyway knowing Hornby's foibles.
As I understand it, a paired switching of the point with isolation power switching will do the job. It was always intended for the points to be operated manually so this becomes a two switch throw, well within capabilities of the young operators.
Problem #2 It was hard to visualise before installing all the framework but the desk positioning in the remaining free space just doesn't work as was intended. Given this + the layout issues the project in the existing form is "under review"
Depending on what comes out of it I may see if I can get all posts related to this into a separate topic, once again thanks for your help,
Colin
Posted
Full Member
This is a shot from an unusual angle, the notional "East" taken while track painting so the back-scene was removed to give a view towards the playground, station and the hills behind. A thunderstorm brews in the SW. It would be good to have some temporary back-scene extension in the West for these shots so the hills don't end abruptly. Added to the list!

Nestled under an attractive section of the Quantocks Hills, Heathfield village centre, it's Norman church, station and cottages takes up just over 1m of my available 2.4m layout length. Previous views have been from the West and the village is presumed to extend beyond the level crossing on the far tracks.
The tunnel and village setting are my attempt to remove at least some of the sense of "roundy round" of this small layout.
Colin
Last edit: by Colin W
Posted
Full Member
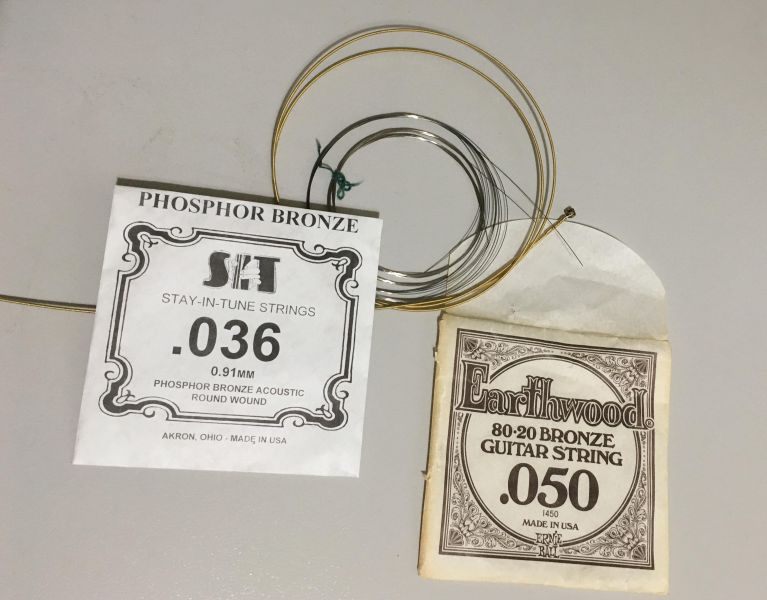
Today I passed by a Music Shop in Central Melbourne that is closing down after 55 Years in business. The owner has just 3 more working days and the closing down sale has almost cleared the shop.
I went in search of bargains and came away with all these for the grand sum of $5. Now, I've either made a modest donation to his retirement or got a bargain or both!
Suggestions are welcomed as to possible modelling uses. Because the bronze and phosphor bronze wound strings have a springy core I was wondering "extra wheel pickups?". Maybe in a guide tube they could be remote point lever connectors?
The remainder is 0.2mm steel springy wire, I got some 4 or 5m but he had a lot left. Would make great telephone or fencing wire.
If I'm inundated with your bright ideas I can always get back there!
Colin
1 guest and 0 members have just viewed this.