00 Gauge - Tiverton Junction and Hemyock
Posted
Inactive Member
An Edwardian GWR project in OO
Thank you for all the replies and best wishes for me and my wife. I think it just goes to show what a great friendly and supportive site this is thanks to its members.Thank you all from both of us.
Now for the modelling bit.
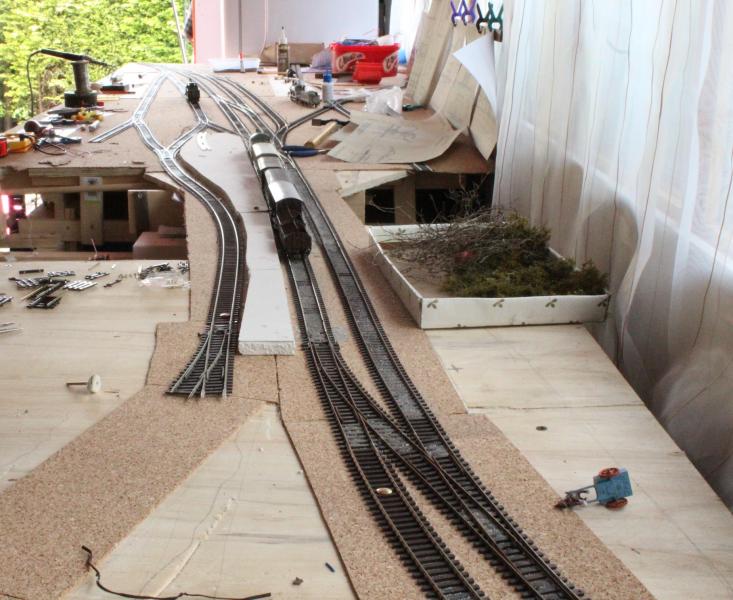
I found a bit of time to go and continue laying track and set about the next set of points almost half the way up the shed, these are the ones that are at the southern end of the platform and the start of the yard. I was happy with the first points and the ever so slight curve of the platform and hoped these would fit too.
I like to solder my points together and cut gaps after fixing so the completed set looked like this..

…I prefer doing it this way as when I position them the whole group move together to prevent any misalignment by moving individually, I think I also get smoother running through them as a solid unit.
It also gives me the chance to remove some of those angled sleepers that Peco seem fond of.

Just need to remove the springs now and trim those thick sleepers.
The unit on the layout.

It didn't look too bad until I viewed it down the line

As the track further back beyond the unit is curved I could not get an acceptable join of the two, the straightness of the X- over in particular just seemed to throw the flow of the track out completely and I knew the curve - straight - curve effect would annoy me.
So there was nothing for it, they were going to need curving!!
It's just as well the curve is minimal (must be a 240 inch radius at least):), so I started cutting the webbing on the X-over as this was always going to be the most difficult to do due to all the check rails moulded to it, especially toward the centre. I created gaps on one side and inserted small bits of plastic in the cuts on the other and got it to give that minimal curve I needed. A bit hard to spot but it is there.

I think it looks a lot better now and seems to flow and avoid that kink that was there.

I just need to adjust the two points now, solder them back together and they can be laid, at least I now have the easier bits to do which I can hopefully tackle in a couple of days time.
I will let the track straighten through the yard for a few feet before starting the curve to cross the doorway, the more I can minmise curving points the better.
There are times when I ask myself 'now, why did you choose a curved staion?', but like plenty of other modellers we think it looks great if it's right.
Hopefully I should have a few more pictures after Easter.
Have a great Easter one and all and enjoy whatever you are going to do.
Jim
ps. normally I go to York but am having to give it a miss this year, a great shame as it is a good day out.
My layout thread http://yourmodelrailway.net/view_topic.php?id=10930&forum_id=21
Buildings for Hemyock http://yourmodelrailway.net/view_topic.php?id=10931&forum_id=14
Buildings for Hemyock http://yourmodelrailway.net/view_topic.php?id=10931&forum_id=14

Posted

Inactive Member
I also take out both of the ties (sleepers), next to the tie bar. It sounds like that's what you're planning as well.
Max
Port Elderley
Port Elderley
Posted

Full Member
In spite of Peco doing their sums and designing the track geometry to be theoretically perfect, I've often found with multiple points, it just doesn't fit without a slight kink in the pattern or tracks spaced wider than the 6ft way. :roll:
 :oops: Bending a diamond would certainly overcome the problem in at least one site on Maxmill ……………:hmm
I don't solder my points but you have a good point ( :shock::shock:
 ) about shifting them as a unit rasher than individually then trying to line it all up again.
'Petermac
Posted
Inactive Member
Well I have been making progress - very slow progress - and the main lines through the Junction are now laid as is the sidings on the Culm Valley side, I still have the Exe Valley side to complete. The wiring is almost done and there is just the last crossing to connect up and I can then complete the ballasting.
I did waste quite a bit of time one day looking for a short on the crossing that had previously been OK, I kicked myself when I eventually found I had laid a rule across the tracks, doh.
Anyway a few pics of progress so far.

Looking from the London end toward Exeter

From the other end acroos the yard. You won't believe how many times I moved this lot to match photographs.

This is a shot showing a temporary down platform with the Hemyock line curling around the right hand side, this is from where the goods shed will sit.
The Hemyock line now on the left of the down platform, the curve took a while to get right as well as I had to ensure that it was going to look right over the bridge which is under the platform.

One last shot which also includes my printed copies of the building alterations of 1897, it took me a while too trace these but I found them at the Wiltshire and Swindon History Centre where there were several items listed that I didn't find in the National Archives. They do have quite a large GWR section which funnily enough included a drawing from Hull!
Well that's it from me until I finish wiring and move the freezer from the corner later to allow me to get the drop down section in across the door.
Jim
My layout thread http://yourmodelrailway.net/view_topic.php?id=10930&forum_id=21
Buildings for Hemyock http://yourmodelrailway.net/view_topic.php?id=10931&forum_id=14
Buildings for Hemyock http://yourmodelrailway.net/view_topic.php?id=10931&forum_id=14
Posted

Full Member
Cheers
Ron
Proper Preparation makes for Perfect Performance!!
http://yourmodelrailway.net/view_topic.php?id=13331&forum_id=21
http://yourmodelrailway.net/view_topic.php?id=13331&forum_id=21
Posted
Inactive Member
So, what has occurred since June last year.
Well firstly the junction had a few niggles that I thought I could live with but think straws and camels backs which resulted in it all being ripped up, new boards, relaid and rewired. It looks much the same but with no no niggles so one happy chap here.
Things then came to a bit of a standstill for a few months until earlier this year when another burst of activity started a few other projects, all of these can be seen in the next few shots.

First up was a scratchbuild of the rather unique 13ft coach of the CVLR that features in Jim Russels GWR coaches part 1, something I've wanted to do for quite some time. This is built up of 3 layers of 10thou plasticard to form windows, sides and panels.

The coach now fitted with steps and handrails sitting on the new wooden post bridge over the river extension, a growing weeping willow sits in the background over a pool.

A closer look at the bridge and coach - I might have to straighten those handrails a bit though.

A final look of the part built coach and a glimpse of the willow trying to dangle its inccomplete foliage into the as yet very shallow water.
That's it pictorially for now and things will continue to progress slowly, the willow has around 60 branches covered in silk lap and when I have completed the other 400 or so it will need a damn good comb and tone down in colour.
I don't know when the next update will be but at least you know I am fit and well and plodding on bit by bit.
All the best to you all and hope your own models are progressing well.
Jim
 Last edit: by spurno
My layout thread http://yourmodelrailway.net/view_topic.php?id=10930&forum_id=21
Buildings for Hemyock http://yourmodelrailway.net/view_topic.php?id=10931&forum_id=14
Buildings for Hemyock http://yourmodelrailway.net/view_topic.php?id=10931&forum_id=14
Posted
Legacy Member
Just do your best mate ,and whilst your wife must come first ,it,s nice to relax now and again by a trip to the shed.
reg
Posted
Inactive Member
You are in our thoughts.
Max
Port Elderley
Port Elderley
Posted
Full Member
Sorry to hear your wife's health is not good but, as others have said, family matters always come first but remember, we're always here. Just post whenever you feel like doing so.
Our best wishes to both you and your wife.
'Petermac
Posted

Full Member
Good to hear from you although I am sorry to hear that your wife's health has deteriorated.
I am sure you did the right thing with that junction…….I decided I could live with one of my bodges….big mistake and now it is too late to rip it up
My best wishes to you both
John
Posted

Legacy Member
:thumbs;-):cool:
Owen
Last edit: by Silver Fox
web-cam 2.2.74.174:8081
if the lights are off no cam
if the lights are off no cam
Posted
Inactive Member
Just to reply to John those little mistakes that we think we can live with just turn into an itch that just has to be scratched.
I did try and do a bit more modelling this morning and took a photograph of a little more progress.
This was a view of a fisher-mans path along the river on the recently built hill.

Unfortunately shortly after this when I was topping up the river to get an even coat along its entire length I lost my grip on the tin of varnish which landed on Hemyock station and platform.

It's all a bit shiny now and you can see where it went up the walls and doors, after a clean-up it has been left to dry and the shed vacated - too smelly.
Back again later after completion off domestic duties.
Jim
My layout thread http://yourmodelrailway.net/view_topic.php?id=10930&forum_id=21
Buildings for Hemyock http://yourmodelrailway.net/view_topic.php?id=10931&forum_id=14
Buildings for Hemyock http://yourmodelrailway.net/view_topic.php?id=10931&forum_id=14
Posted
Legacy Member
reg
Posted
Inactive Member
That must have been a terrible rain storm. Would a spray with matt varnish do as a repair ? Are we allowed to know what you said at that time Jim?
No,:lol:
I was pretty calm about he whole thing really, I finished what I was doing, put the tin away safely and cleaned the brush before dealing with the model.
I had to leave things for the day though as so many things were all sticky.
As for repairs I may try the glass fibre brush first on the plastic, the platform which was over 1000 cardboard setts I'm not sure about yet.
Jim
My layout thread http://yourmodelrailway.net/view_topic.php?id=10930&forum_id=21
Buildings for Hemyock http://yourmodelrailway.net/view_topic.php?id=10931&forum_id=14
Buildings for Hemyock http://yourmodelrailway.net/view_topic.php?id=10931&forum_id=14
Posted
Inactive Member
I knocked a tin of wash over only yesterday. :lol:
Max
Port Elderley
Port Elderley
Posted

Site staff
Regards
Alan
Born beside the mighty GWR.
Alan
Born beside the mighty GWR.
Posted
Inactive Member
I must admit I thought I would just have a quick look on here to what's new while having a coffee and was very surprised to see that at the top.
It has made my day, thanks very much.
Jim
My layout thread http://yourmodelrailway.net/view_topic.php?id=10930&forum_id=21
Buildings for Hemyock http://yourmodelrailway.net/view_topic.php?id=10931&forum_id=14
Buildings for Hemyock http://yourmodelrailway.net/view_topic.php?id=10931&forum_id=14
Posted

Site staff
Your stream in earlier posts still remind me of going fishing in autumn :thumbs
Ed
Posted
Legacy Member
:thumbs;-):cool:
Owen
web-cam 2.2.74.174:8081
if the lights are off no cam
if the lights are off no cam
Posted
Inactive Member
The station is not looking too bad, the fibre brush does a good job of cleaning up the plastic brickwork and the stone platform setts are almost back to a matt finish although a slightly different colour, the edging stones have been putting up more of a fight though.
Seeing the pic of the week encouraged me to start getting the riverbank sorted so the first bit of undergrowth has been applied.
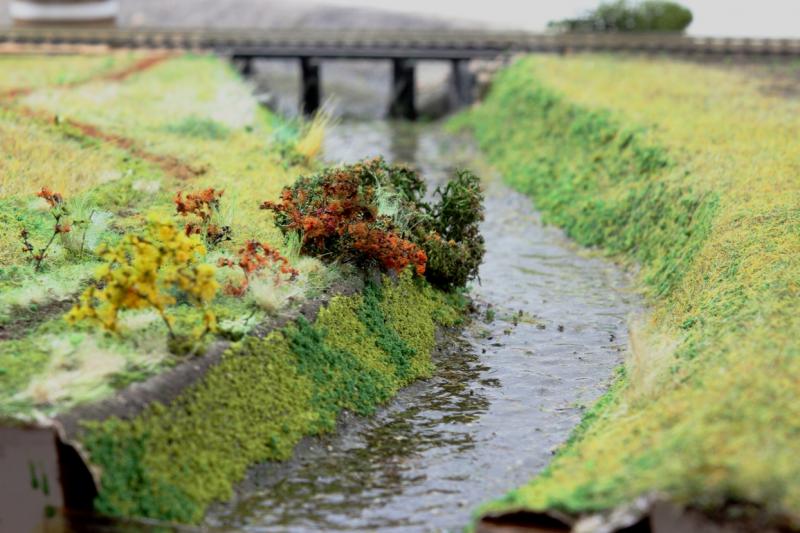
Just as a final picture I thought I would show some of the grass tufts made from seed heads'

Jim
My layout thread http://yourmodelrailway.net/view_topic.php?id=10930&forum_id=21
Buildings for Hemyock http://yourmodelrailway.net/view_topic.php?id=10931&forum_id=14
Buildings for Hemyock http://yourmodelrailway.net/view_topic.php?id=10931&forum_id=14
1 guest and 0 members have just viewed this.