00 Gauge - Tiverton Junction and Hemyock
Posted
Full Member
An Edwardian GWR project in OO
Just caught up with this, Jim. Fantastic modelling, especially the river; lots of variation and detailLook forward to seeing more,
Jon

Posted

Banned
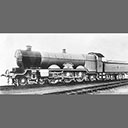
Found this whilst trawling the net… http://www.gwra.co.uk/CATALOGUES/November13/HTML%20Images/30.htm
It's yours for a measley sum… :shock:
Cheers, Gary.
Posted
Inactive Member
As I had a little spare time tonight I thought it a good idea for a brief update - I know Gary will be happy about that. Despite the problems I often escaped to the shed for a few hours peace and quiet and busied myself to clear the mind and looking back I notice I have made quite a bit of progress though it seemed as though I had done very little.
So enough of my waffle and a few pictures to show progress.
Compared to around a year ago a lot of groundwork and some new buildings have been added or started.

As you can see a few of trees and shrubs have been and are being added to the riverbank, also in the distance what was once a bare board now has cottages (behind the big trees) and the butter factory carcass is under construction.
A closer shot of the ever growing riverbank

A closer view of the new buildings.

A number of items are still awaiting final completion and fixing so try and ignore any 'wonky' bits. I'll post a few pictures up later of the cottages, later meaning a week or two as there is a fair bit happening again to occupy my time.
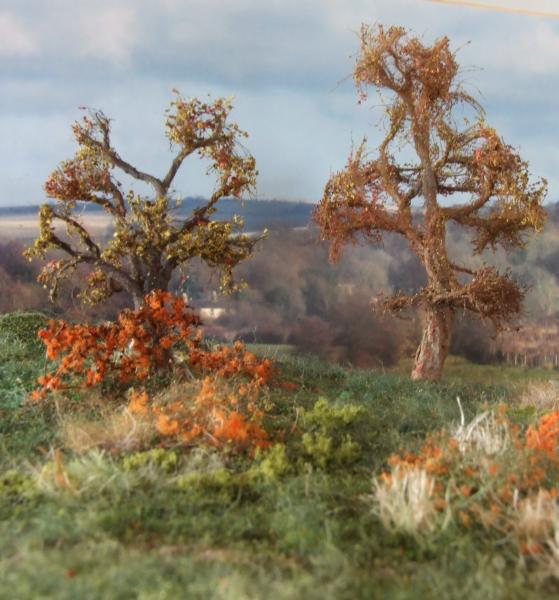
The trees were made some time ago and have just received some Ivy around the main trunk and hopefully the next pictures help to show this off.


I've even had time to scatter a few dying leaves over the grass.
A final picture of the cottages taken a few weeks ago.

It's an all too brief post I'm afraid with little detail but if anyone has any questions feel free to post them up and I will try and answer them when I have time to pay another visit.
Thanks for taking the time to look and I'll try to be a bit quicker in posting and not leave it for almost a year. No guaruntees in life though.:lol:
Bye for now.
Jim
My layout thread http://yourmodelrailway.net/view_topic.php?id=10930&forum_id=21
Buildings for Hemyock http://yourmodelrailway.net/view_topic.php?id=10931&forum_id=14
Buildings for Hemyock http://yourmodelrailway.net/view_topic.php?id=10931&forum_id=14
Posted

Inactive Member
Thanks for posting.
Max
Port Elderley
Port Elderley
Posted

Inactive Member
Ken.
'It don't mean a thing if it ain't got that Swing'
Posted
Full Member
Look forward to more updates in due course
Jon
Posted
Banned
Good to seee you posting again. I do like the use of autumn colours on the layou. The second pic really shows this off well, and the twin trees, what can I say apart from, beautifully done. :thumbs
Cheers, Gary.
Posted
Inactive Member
As I have a little more free time than I expected I will add a bit of detail about the cottages, I usually did this on my buildding thread but to make my life easier it will all appear here now.
The buildings are alll made from card and the larger one was covered with scalescenes paper, all the windows and doors were cut from plasticard. As I had just purchased the Portrait cutter I drew out the designs and then used it to part cut the materials and then finished theem off by hand, hopefully the pictures show the process.
The cottage walls

The windows being cut out - carefully - those bars were pretty thin.

The house assembled and brick paper added.
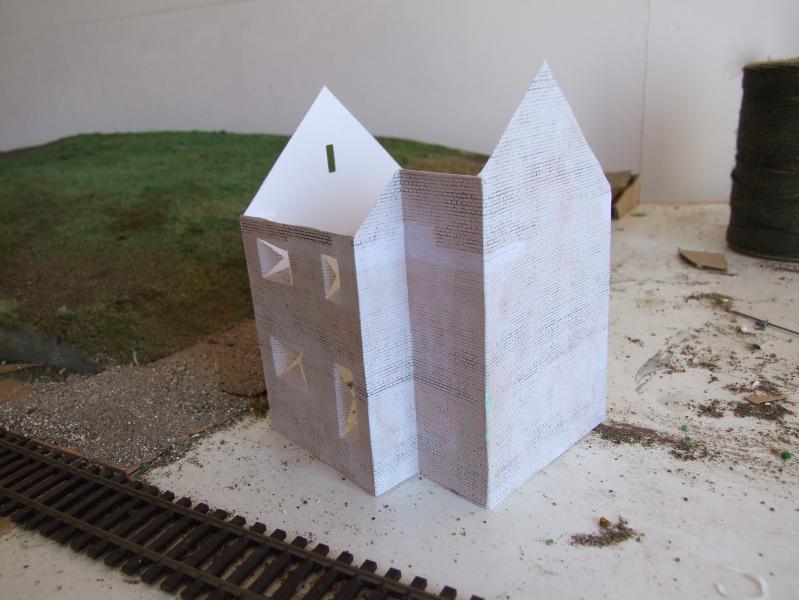
Glazing being glued in place, I used Glue & Glaze for this as it cleans off easily.

The windows in place.

The other cottage was cut out in the same way but once assembled I painted each side in PVA and then seived plaster into the wet glue, gave it a couple of minutes to stick and then gave the whole thing a sharp tap to shake off the excess. The plaster went off white once set into the glue and I feel I was left with a perfect rendered finish.

The two together after all doors and windows were fitted but waiting for some roofing. The small panes in the doors were from memory 2.5mm square. The bases are deep to sit in the groundwork later.

These were again made from card and the first was simply card strips with the slates cut half way up and glued in place. some curtains had also been added.

The other roof was thatched and for this I used hair - mine as it happened - I seem to have an endless supply.
This was glued in place in bunches using PVA again.

One side nearing completion.

Right, that's it for now so until next time it's goodnight.
Jim
My layout thread http://yourmodelrailway.net/view_topic.php?id=10930&forum_id=21
Buildings for Hemyock http://yourmodelrailway.net/view_topic.php?id=10931&forum_id=14
Buildings for Hemyock http://yourmodelrailway.net/view_topic.php?id=10931&forum_id=14
Posted

Full Member
Bob
Posted
Inactive Member
I must admit I like Autumn and wasn't sure whether or not I could capture the colours as being colour-blind can make things a bit tricky at times, luckily the wife is quite willing to put me right when I do get it wrong, I once had 'Forest green' mud:shock:, I now label all my paint tins.
As for the hair, I may be a bit thin on top but the rest growss pretty well and I have quite a tub full now.
Time for another update.
The cottage roof with the slates was completed first.

Followed by the thatched one, shown roughly in position with the first.

A closer view of each now nearing completion.
In need of a trim as I try and complete the ridge and try and model some hazel twigs to kocck it in place, chimney stacks are from Lcut creative.
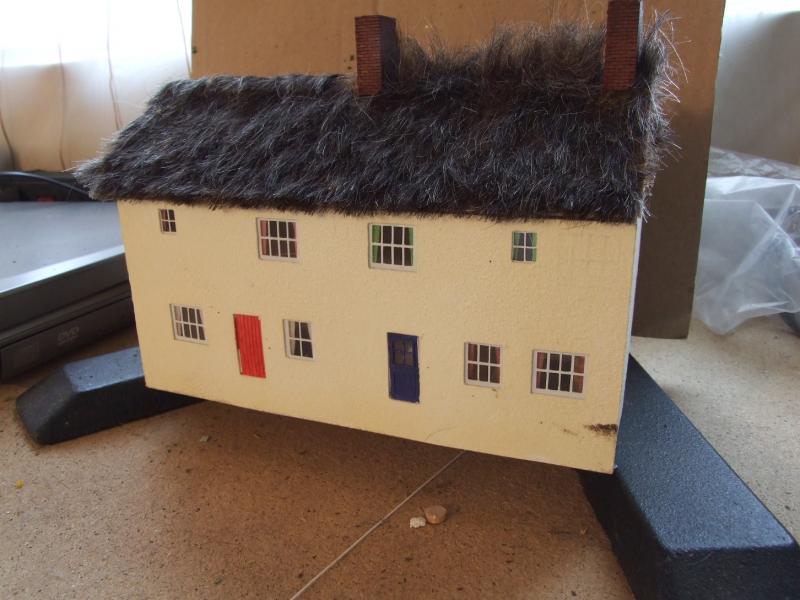
The other one with stacks (Lcut), gutters and slates painted, just some more work to do on doors and windows.


Resting in the final positions with some of the groundwork in place, walls are also an ongoing job and should look a little more like the bit on the right when complete.

Looking back I've actually done a lot more than I thought, deceived by the slow progress and daily visits I guess.
More in a few days on another bit of wall, hedges and trees which should bring me up to date.
My layout thread http://yourmodelrailway.net/view_topic.php?id=10930&forum_id=21
Buildings for Hemyock http://yourmodelrailway.net/view_topic.php?id=10931&forum_id=14
Buildings for Hemyock http://yourmodelrailway.net/view_topic.php?id=10931&forum_id=14
Posted

Full Member
I do agree with Bob regarding the autumnal look…….it is relatively unusual and your modelling of the season is very very effective…….I can almost smell the fallen leaves and perhaps the hint of smoke from a bonfire…….excellent…..well done indeed
I love the cottages…….particularly the roofs……mind you if I used my hair for thatch it would have to be a winter snow scene!
Kind Regards
Posted

Full Member
Having attempted a render on my NE mill owner's building I'm envious of the simple and effective method that you have used with such excellent results… should have let you go first… would have saved me some time! :lol:
Super work, keep it coming.
Marty
Posted
Inactive Member
I have always liked the Autumn season which is why I wanted to model it but I did have great doubts as whether or not I could pull it off, at least now I feel more confident in taking the whole thing forward. I know I have given myself a lot of work in making detailed trees but I quite enjoy making them so I don't mind.
As for the cottages I'm pretty happy with how they turned out and like you say Marty with the simplicity of the render, lucky for me my first thought and attempt worked, not always the case though.
I have found both of your layouts inspirational in the past and I think we can always benefit from each others work, which reminds me I'd better go and catch up with things before another update.
Jim.
My layout thread http://yourmodelrailway.net/view_topic.php?id=10930&forum_id=21
Buildings for Hemyock http://yourmodelrailway.net/view_topic.php?id=10931&forum_id=14
Buildings for Hemyock http://yourmodelrailway.net/view_topic.php?id=10931&forum_id=14
Posted
Inactive Member
First up is the wire & plaster method which you have seen the results of but here a couple of pictures of assembly.
All wire twisted and each joint soldered to prevent unravelling.

Adding a plaster mix to the main trunk and lower branches.

After this had dried I sprayed the whole tree with a coloured PVA mix and gathered up a handful of plaster and started to blow it all over the model until it had all been covered, this was repeated a few times until I was happy with the coverage of fine branches and the texture created by plaster landing in the PVA. A lot better than it ending up smooth.
It was then completed with either Heki or Woodland Scenics folige sparsely applied with added dyed tea leaves.
I then needed an option to make quicker trees to fill in behind the 'specimen' models or toward the back of the layout and eventually came up with this.
What could I do with a ball of string and some superglue, quite a lot apparently.
A tree being formed.

A tree nearly formed, a little plaster was added to the trunk only to conceal the twists.

A splash of paint, a bit of scatter and tea leaves, a tree is made.

Nice and quick, simple to do as long as you keep your fingers away from the string when capillary action causes it to run up the fibres.
A couple together placed on the layout.
The last things I used was some prunings from the garden which came from dwarf thyme.
These were perfect for placing along the river bank and for adding trees that were completly leafless, also no extra work needed as they were already tree coloured.

Some of this work can be seen on the earlier posts and shows where some have had foliage added to cover the bare branches, these can be made in quite large batches and I still have plenty left too. Just as well as I still have several feet of river to do in the future.
Back in a few days with some walls and hedges.
Jim
My layout thread http://yourmodelrailway.net/view_topic.php?id=10930&forum_id=21
Buildings for Hemyock http://yourmodelrailway.net/view_topic.php?id=10931&forum_id=14
Buildings for Hemyock http://yourmodelrailway.net/view_topic.php?id=10931&forum_id=14
Posted

Full Member
I think the river/stream in this shot is probably the best I've ever seen - love the pasture to the right and the gauze bushes in the scrub alongside the track. Just right to my eye and a real gem. :pathead
'Petermac
Posted

Full Member
 Last edit: by spurno
Always try to look on the bright side of life!
Barney
Barney
Posted
Full Member
Great trees.
Keep it coming.
Marty
Posted
Inactive Member
High praise indeed from you Peter on the river scene, I have tried to make it as real as I can as it is such a large part of the layout and was in fact one of the many things that attracted me to this station. I'm glad you liked it so much as it gives me great satisfaction to know that I have given pleasure and inspiration to others.
Those trees Barney, I started making trees like that back in the early 80s, the first was made on a night shift during the short summer nights during my breaks and was of one near the factory doors. I've been able to read more and practice a lot since then.
Be careful with that superglue Marty, it sticks to fingers quicker than string:shock: I have made a larger one in which I have perfected my technique to produce better looking models, I'll post it up later when I get time.
In the meantime here is a final river shot that was popular elsewhere.

Jim
My layout thread http://yourmodelrailway.net/view_topic.php?id=10930&forum_id=21
Buildings for Hemyock http://yourmodelrailway.net/view_topic.php?id=10931&forum_id=14
Buildings for Hemyock http://yourmodelrailway.net/view_topic.php?id=10931&forum_id=14
Posted
Inactive Member
All the best,
Derek.
Posted
Banned
Cheers, Gary.
1 guest and 0 members have just viewed this.