00 Gauge - Tiverton Junction and Hemyock
Posted

Site staff
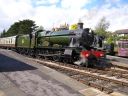
An Edwardian GWR project in OO
Lovely space to have Jim.I'm very jealous.Keep the pictures coming.
Regards
Alan
Born beside the mighty GWR.
Alan
Born beside the mighty GWR.

Posted
Inactive Member
 Last edit: by dursleydog
WARNING! Model may not be historically accurate due to implementation of Modeller's Licence
Posted
Full Member
Hi Jim,
A friend of mine on this forum has insulated his shed with polystyrene and then put plaster board on that. He has run his internal electrics in metal tubular trunking up to metal surface mounted sockets. He also put double glazing in and it was surprisingly cheap if you just get the sealed glass units without the plastic. I might be tempted to put outside shutters on your railway room as well to keep any strong sun out and also any prying eyes away.
Simon
Posted

Banned
Cheers, Gary.
Posted
Inactive Member
I spent a bit of time in the shed today and managed to bolt Hemyock back together again, I also looked over the damaged area and started preparing it to repair the track that had lifted over the winter, it's surprising how much damage a few drops of water and freezing temperatures can do. Hopefully now a thing of the past.I did think earlier in the year that I should not have started this until I had a suitable building, but then again if I hadn't I could still be sitting here dreaming about it, so all the saving up was worth it. The wife asked if I knew it was that big, I dare not tell her if I had the money and space it would have been bigger:lol:.
My electrics will also be in tubes and surface mounted, double gazing is on the cards for next week as well as putting some wire within each frame, some old net curtains donated by the wife will obscure unwanted viewing but still allow it to be light inside.
I will try and photograph progress as and when it happens.
Thanks for taking time to drop in.
Jim
My layout thread http://yourmodelrailway.net/view_topic.php?id=10930&forum_id=21
Buildings for Hemyock http://yourmodelrailway.net/view_topic.php?id=10931&forum_id=14
Buildings for Hemyock http://yourmodelrailway.net/view_topic.php?id=10931&forum_id=14
Posted
Inactive Member
I can't believe two months has passed since I last posted, so what has happened in that time?
Well in between taking the wife to her various appointments I did get the track lifted and re-levelled the boards before laying the track again, I must admit it looked a bit strange seeing the boards stripped again.
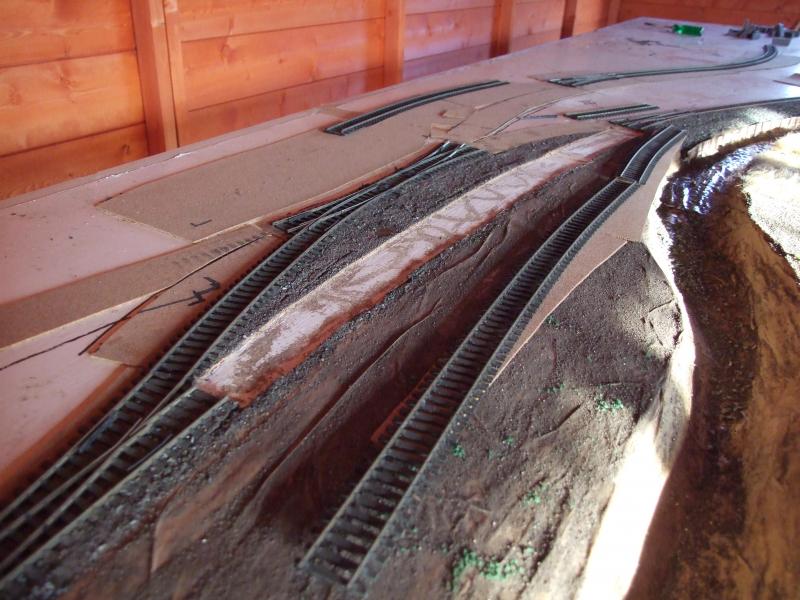
Once I had the track relaid I decided to have a quick break from the PW work and set about making the road bridge over the river, this was made from balsa wood and covered with embossed plastic, a couple of pics to show progress which wasn't that rapid.


At least those bare boards are covered a bit more again, a few pools of PVA can be seen drying on the river bed - quite a few more coats to go yet though.
Other progress has been made which I will post soon, in the meantime I have some plaster board to put up and yet more appointments to attend with the wife.
Apologies for the short and brief post but catch you all again later.
JIm
My layout thread http://yourmodelrailway.net/view_topic.php?id=10930&forum_id=21
Buildings for Hemyock http://yourmodelrailway.net/view_topic.php?id=10931&forum_id=14
Buildings for Hemyock http://yourmodelrailway.net/view_topic.php?id=10931&forum_id=14
Posted

Full Member
Cheers
Marty
Posted
Banned
Fantastic looking bridge. Is the bridge covered with printed papers or plasticard ? Also, how did you make the capping stones ?
Cheers, Gary.
Posted
Full Member
Cheers, Jon
Posted
Legacy Member
The progress you had made when I last looked was very impressive indeed, lovely authentic sweep into the station and dairy siding - perfection in miniature, just can't wait for further progress and now you've got the shed built, there'll be no excuses !
Cheers.
Allan.
PS: pleased to hear that your wife is well, please pass on my best wishes.
Last edit: by allan downes
Posted
Inactive Member
I have had a good day in the shed and I have almost completed half of the plaster boarding, though it is difficult to do the roof on ones own but once I get this next week out of the way I should get it finished and be able to concentrate on the layout once more.
As I have a bit more time I can add a bit more detail about the bridge and hopefully answer the questions. It took me a while to find some pictures of the bridge as I had lost my originals from my site visit some time ago(10 years, I think) and I couldn't remember how many arches it had so I was quite glad I found some when on google street view. The bricks are Slaters plasticard - random stone I think - and the coping stones are individual bits of card which were fitted over the edge that I had sanded down to get the curve, glad you asked that Gary as I had forgotten that. It was all painted with Humbrol colours which are now all labelled to stop me using that bl–dy green that looks brown.
Right on with the update, with the track being relaid it was the ideal chance to modify those Peco points! I had always wanted to remove that cumbersome spring mechanism and chunky sleepers but was struggling to find a way to lock the points over with manual operation, inspiration came while rooting about in my other shed while doing something totally unconnected to modelling, a ball catch!!
So as I have spent my modelling budget on the shed this year anything I could do for free was a bonus so the next couple of photos show the results of the point mod and what can be done with a ball catch, a bit of wood, a coachbolt and a pin, oh and a door knob!


Works a treat, locks the blades against the rail and didn't cost a penny as all the bits have been knocking around for 12 years or so from when I was renovating some old barns and I've loads more. The simple things in life are the best.
The cattle dock was also secured in place and the ground level built up before I raided an old stock box of odds and ends to sort out some wood for the fence down to the road - a rickety old thing from what I can gather from the original pictures - and this was built up and gluing those planks in was awkward if I didn't get the fit just right.


I then completed the fence and started to experiment with other materials I found to get long dead/dying grass or weeds and road surfaces which is where I will pick up again in a week or two.


I think I need to spend an evening or two catching up with the work of others now so until the next time,
bye
Jim
My layout thread http://yourmodelrailway.net/view_topic.php?id=10930&forum_id=21
Buildings for Hemyock http://yourmodelrailway.net/view_topic.php?id=10931&forum_id=14
Buildings for Hemyock http://yourmodelrailway.net/view_topic.php?id=10931&forum_id=14
Posted
Banned
So, are you going to tell us how many rails were cut too short..?? ;-);-)
Cheers, Gary.
Posted
Inactive Member
All work in and outside the new shed has now been completed and I can now focus on the layout a bit more. Time is still an issue with the wife attending seven clinics at various hospitals around the county but the majority of what is spare goes on modelling.
So what has been happening.
I had been focusing on the river and banks as now the bridge is in place it seemed logical to push that area along, however this stopped for a while as we took a few days away in Devon so I could get a feel for the area to get the scenic detail just right. Lots of photos taken including this one,
Millhayes Bridge

I took that mainly so that I could compare it with my model as I had very little information to go on when it was built, all in all I am quite happy with the result, the next picture shows the first few shrubs taking root amid the dead foliage which now coats one of the banks and ripples formed on the river surface which were left to dry while I was away.

A couple more shots of the river and bank.This one showing the bed before the application of ripples and the vacuum cleaner - oops! :oops: plus close up of dead undergrowth/leaf litter as it will be autumn when complete.

An overall view showing weeds growing at the base of the boards supporting the bank. Loads more to do yet.

Another addition are the hills that are behind the station yard and the retaining wall that holds the bank up, this wall is just under a metre in length.

A close-up of the wall, I added some microstrip behind the sheet to thicken up the top to give an impression of stones where I intend them to be in view, a lot of it will be covered by grass and weeds. The reason for the collapsed sections is that the Elm trees that stood here will have forced some of the stones to get pushed out, the first Elm is also under construction.One of the joins still shows slightly so I may have to work on that a little more.

As for the hill I left a hole in that to place the refreshment rooms when they are built, but as I couldn't resist starting them as well they are now underway:roll:
The carcass of the refreshment rooms on the hill, as is normal this will appear on the building thread later as it got some bricks on now.

As you can see I won't get bored as I have plenty of irons in the fire so I can pick up on whatever I want or if I am waiting for glue, varnish or paint to dry.
I've a couple of hectic weeks ahead so things will stop again for a bit but I hope to get going again after that, though progress seems too slow to me I've probably not done too bad in 14 months considering my time constraints and building a new home for the layout.
Maybe I need one of those energy drinks to stay awake longer:shock:, or maybe not.
Catch you later
Jim
My layout thread http://yourmodelrailway.net/view_topic.php?id=10930&forum_id=21
Buildings for Hemyock http://yourmodelrailway.net/view_topic.php?id=10931&forum_id=14
Buildings for Hemyock http://yourmodelrailway.net/view_topic.php?id=10931&forum_id=14
Posted

Full Member
Cheers
Ted
Ted
Posted
Banned
Cheers, Gary.
Posted
Guest user
The river and the bridge are fantastic. Keep it up.
Cheers
Toto
Posted
Site staff
Regards
Alan
Born beside the mighty GWR.
Alan
Born beside the mighty GWR.
Posted

Inactive Member
Ken.
'It don't mean a thing if it ain't got that Swing'
Posted
Inactive Member
How does the new railway home feel?
Also I do hope your wife is overcoming her health problems.
All the best,
Derek.
Posted
Inactive Member
The ripples - by design or accident, I'd like to say it's the former but it was rather the latter and it developed over quite a while. I originally wanted to use yacht varnish but the price put me off so I used a cheap water based one from B&Q, that was the first mistake as it shrank, cracked and dried cloudy with trapped air bubbles in the deeper sections, I wasn't too bothered as the river is very deep and I knew I could easily cover any problems. A few light coverings of PVA soon filled the cracks and I then decided I would use some polyurethane varnish which covered the work done so far and made the bed look weedy, result. Since then I vary the amount I add as thin equals flat and thicker results in more ripples, I also find the interior varnish dries flatter and faster than the exterior unless it was the weather. But that's it, a happy accident, nothing more nothing less.I just hope I can make the next stretch of river the same when I get that far,:hmm
Ken- always happy to receive a bit of criticism as I want things to be right but I did orinally put the fence up by using a square and I think the effect you see is the cameras macro facility distorting the picture a bit. Mind you I will check it again now when I go out in case I did fix it back wrong when it last got knocked off (3 times) and I got the longer securing posts wrong.
As for the new shed - it's great.
Back to my winter projects now - Buildings.
Thanks again for the replies.
Jim
My layout thread http://yourmodelrailway.net/view_topic.php?id=10930&forum_id=21
Buildings for Hemyock http://yourmodelrailway.net/view_topic.php?id=10931&forum_id=14
Buildings for Hemyock http://yourmodelrailway.net/view_topic.php?id=10931&forum_id=14
1 guest and 0 members have just viewed this.