00 Gauge - The Heatherburn Garden Railway.

Post

Posted
Rating:
#28326
Guest user
Cheers John might look into that one. If push comes to shove I could always model with the barriers down complete with workmen and a yellow van!:lol:
Back to the top

Post

Posted
Rating:
#28474
Guest user
One of the great advantages of roofing over the wall section of the railway is that I can now work outside in all weather. Last night I decided to do a bit more work on the signal gantry that I started on sunday evening. The gantry is based on one over the ECML a few miles up the road from where I live. I have no photo of the actual structure so I am building it from memory although it is pritty much a standard BR design. I started off by cutting two posts from some square brass tube. This has had access holes cut into the side at the base to allow the cables to be fitted later. The main cross member is another section of brass tube slightly bigger. This section has had some holes 'milled' out of one side to allow the cables to run down to the signal heads. Two more posts were cut for the other side and the whole lot soldered together. The gantry is fastened to the baseboard by soldering the posts to some woodscrews that were first screwed to the base. The posts then had some cross members added to produce two A frame structures. The bracket work for hanging the signals on was added next allong with the handrails for the upper walkway. Tonights job will be building the signal heads. Once installed the gantry will be fitted with some mesh panels to protect the 'little people'! Here's some pics of the work so far………..


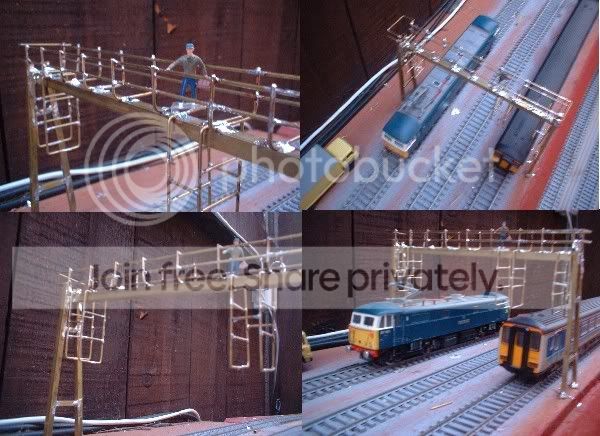
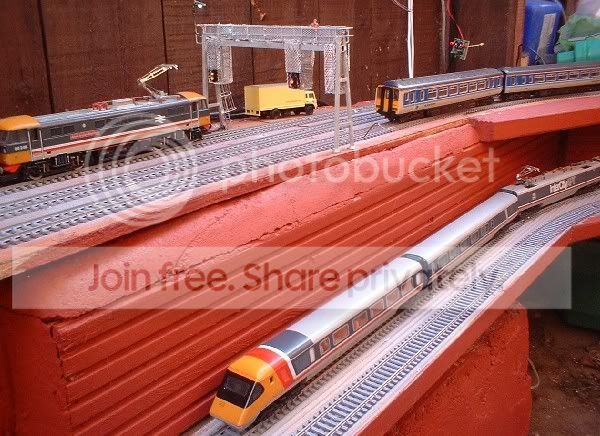
And here's a bigger one just for Bob!;-)


Back to the top

Post

Posted
Rating:
#28475
Avatar
Full Member
Well thats looks great Dave. What colour is any are you going to paint it and will it be easy to apply paint onto it.?.

Phill
Online now: No Back to the top

Post

Posted
Rating:
#28477
Guest user
I will be giving it a coat of grey car undercoat once i've finished soldering the rest of the bits on! The signal heads will be black while the mesh I have is aluminum so might leave that as is.;-)
Back to the top

Post

Posted
Rating:
#28478
Guest user
Superb scratchbuilt gantry dave they will last for years outside

Do you do some sort of engineering job as you mentioned milling out sections that is something most modellers would not have the facility of doing.

cheers Brian.W
Back to the top

Post

Posted
Rating:
#28481
Guest user
No I drive around all day in a white van fixing vending machines! I actualy used a cutting disc in a mini drill to cut a series of slots across the square tube. I then carefully removed the bits between the slots leaving a nice square hole for the cables to go through.;-)

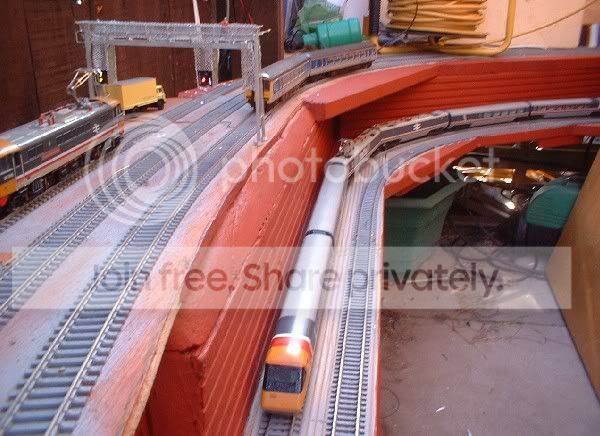
On the set of four pics you can just make out the hole under the workman ( bottom left pic).
Back to the top

Post

Posted
Rating:
#28501
Guest user
Dave that signal gantry is marvellous!!

 Mike
Back to the top

Post

Posted
Rating:
#28509
Avatar
Full Member
Nice work Dave, looking forward to seeing it in action.

Marty
N Gauge, GWR West Wales
Newcastle Emlyn Layout.
Newcastle Emlyn Station is "Under construction"
Online now: No Back to the top

Post

Posted
Rating:
#28514
Guest user
Did another 'night shift' on the railway last night. Will take some pics tonight when I get in from work as it was 11pm when I came back in from the garden! Managed to get the wires threaded through the gantry legs and frame work. This was an absalute pig of a job as I had to thread them up from the base one at a time with a pair of long nose pliers. After much grumbeling and getting extreamly wound up I managed to get all 11 cables in place. As some of the insulation got caught on the brass work I thought it would be a good idea to test the cables before going further so out came the multimeter. Thankfully all the cables are intact so I wont have to pull them back out and start again! I also cut the mesh panels for the walkway and signal housings along with fitting some more brass channel to hold the cables in place. Pics to follow later.;-)
Back to the top

Post

Posted
Rating:
#28526
Avatar
Full Member
It will be a beauty and worth all the sweat. Keep it up.

Marty
N Gauge, GWR West Wales
Newcastle Emlyn Layout.
Newcastle Emlyn Station is "Under construction"
Online now: No Back to the top

Post

Posted
Rating:
#28531
Avatar
Full Member
 

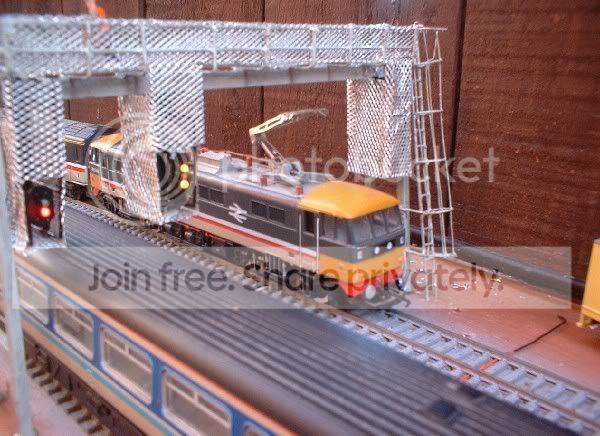
 Excellent progress Dave, love the gantry:doublethumb:doublethumb

'Kev
Online now: No Back to the top

Post

Posted
Rating:
#28923
Guest user
Sorry about the picture quality will take some better pics tomorrow in the daylight. As im on call this weekend im stuck around the house just incase the phone rings. On a more positive note the phone has been quiet all day so more time for modeling so I managed to finish the gantry……..


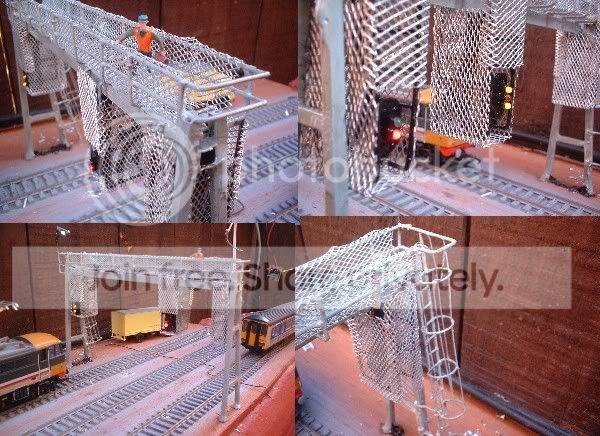
For the signal heads I came up with the simple idea of mounting the leds on some strip board then carefully cutting round with a mini drill. Once painted black they look ok. The mesh is from a car accessory shop and is usualy used for bodging car bodywork! The ladder was scratchbuilt from some brass rod. It was quite fiddly to solder the rungs on but well worth the effort. The safety hoops were again made from brass rod that was bent around a pen. Will stick some better pics up tomorrow.;-)
Back to the top

Post

Posted
Rating:
#28945
Guest user
As promised here's a few pic's taken this morning………


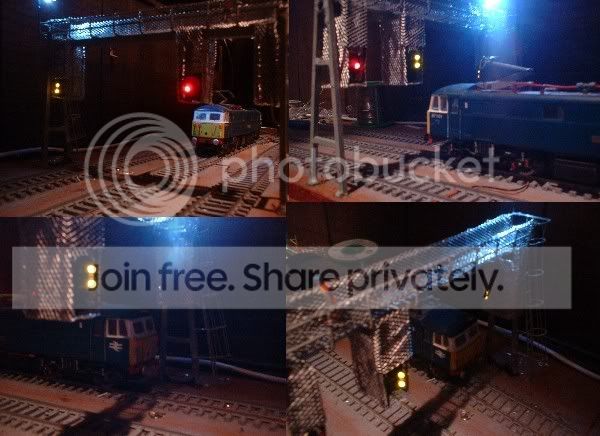
Today (provided that I don't get called out) I will be installing the reed switches and wiring the gantry in properly. Last night I found a way of getting flashing aspects! I think flashing yellows are used on the approach to high speed junctions whilst flashing greens are used for a 'fifth' aspect for high speed running on the ECML.

This gantry is actually two sections away from the terminus so I decided not to fit a green led ( I'm running short of then anyway!) The signal head for the up main instead uses two yellows and a red. The next signal 'up' the line will be located just off the canal bridge and will probably be two aspect red/yellow due to the junctions and aproximity to the end of the line. On the approach to the station is a high speed crossover that allows trains to bypass the station and return to the garden so this will be my excuse for the flashing signals, steady for the terminus flashing for the return loop. The flashing is achived via a small kit from maplins that I got to operate the lights on the zebra crossings. As my signals are all common +ve all I need to do is pick up one of the -ve legs on the flashing circuit. I should then be able to switch between the flashing and steady states via the switches on the point motors. Anyhow enough waffel for the time being need to get out into the sunshine and get some more work done!:lol:

Back to the top

Post

Posted
Rating:
#28955
Guest user
Dave the gantry looks extremely good you have made a very good job of that

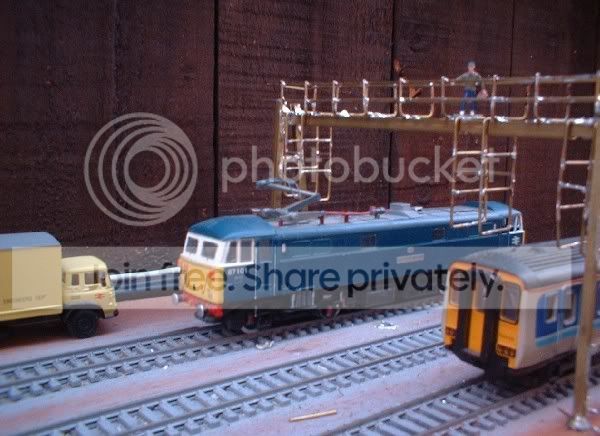
When you get your catenary in place it will really set it off

cheers Brian.W
Back to the top

Post

Posted
Rating:
#28957
Guest user
Sorry. this is a personal opinion but i dont think the mesh looks right with the gantry, Trying to be constructive, dont know whether its scale or maybe just the photo, but somethings not quite right.

Mikey
Back to the top

Post

Posted
Rating:
#28964
Guest user
Mikey the mesh like that is quite commonly used like dave has done it these days its a safety thing so personel cant fall between the gaps in the railings.

Safety measures today are far more strict than they were years ago

Im sure someone has a photo somewhere you will see what i mean

cheers Brian.W
Back to the top

Post

Posted
Rating:
#28965
Guest user
Brian. I'm not stupid! i know what mesh on gantrys etc looks like. To me the test of a good model is whether it looks realistic and the mesh, in my opinion doesnt. This constant backslapping doesnt do a modeller any good at all.

Now as I say its only my opinion. i'm not saying its right or wrong.

mikey
Back to the top

Post

Posted
Rating:
#28977
Guest user
Mikey

you seem have  a lack of concept of perspective

This Heatherburn layout is not something built on a 6 ft x 2 ft board if that were the case you comments may have merit.

This is an extensive indoor and outdoor layout covering a vast area if Dave spent so much time on detail on every item on the railway it would take more than the rest of his life to complete.

One has to realise that on a outdoor layout of this type he would not have the phsical time to make every detail exact thats why perspective comes into any comments myself and other members make.

I found the backslapping comment extremely rude and distatsefull and i stand by my comments Dave has made a extremely good job of this gantry.

cheers Brian.W
Back to the top

Post

Posted
Rating:
#28978
Guest user
Here we go again! I am not getting involved any more in this.I made a comment that i clearly stated wass my opinion. I stand by my backslapping comment. This forum has earnt itself a reputation as friendly forum, a bunch of friends together. If my friends constantly told me how good I was, they would not be my friends. a friend is somebody who can tell you something without it causing offence.This  is the last straw I'm off bye bye everybody happy modelling!

Mikey
Back to the top

Post

Posted
Rating:
#28979
Avatar
Legacy Member
OK fellas let's stop it right there shall we.
This is Dave's topic, and the time and trouble he takes to keep us all informed as to his progress, when he could just as well be spending the same time on his modelling, isn't going to be spoiled by totally irrelevant wrangling over other members words which have nothing to do with him. Let's try and keep to the subject matter and aim our comments at the model and the modeller, not each other.
Online now: No Back to the top
1 guest and 0 members have just viewed this.