00 Gauge - Maxmill Junction
Posted

Full Member
Petermac's Railway
Coming along really well. Remind me never to build a stone/brick viaduct on a curve.Looking forward to your air brush experiments.

Posted

Full Member
You may recall I am replacing all the insulfrog points with electrofrogs to improve running.
As a temporary measure before I build a proper mimic panel, I'm using the Megapoints switch panel designed for exactly that purpose.
This panel, once the remining 12 switches are installed, can control up to 24 servos. What one controls with these servos is up to the operator - in my case, initially, points. 1 row of wires connects the LEDs and the other, the push button switches. Currently, there are 12 servos connected although, because some buttons operate 2 servos (cross-overs etc), I'm only using the first 8 switches.
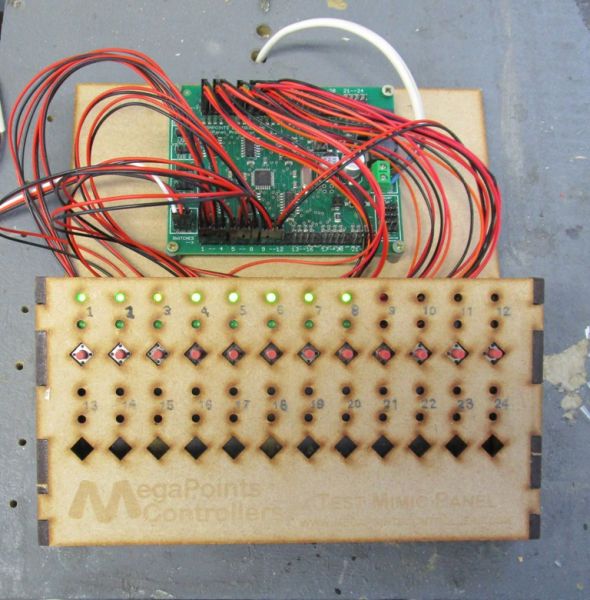
My chosen convention is that the top row of LEDs is lit when points are set straight. When set for the turn, at the press of the red buttons, the lower row lights up and the top row is out. Everything you see here is "plug and play" with no soldering required. All the hardware is supplied by Megapoints at very reasonable cost (once you've swallowed the initial cost of the circuit board controllers).
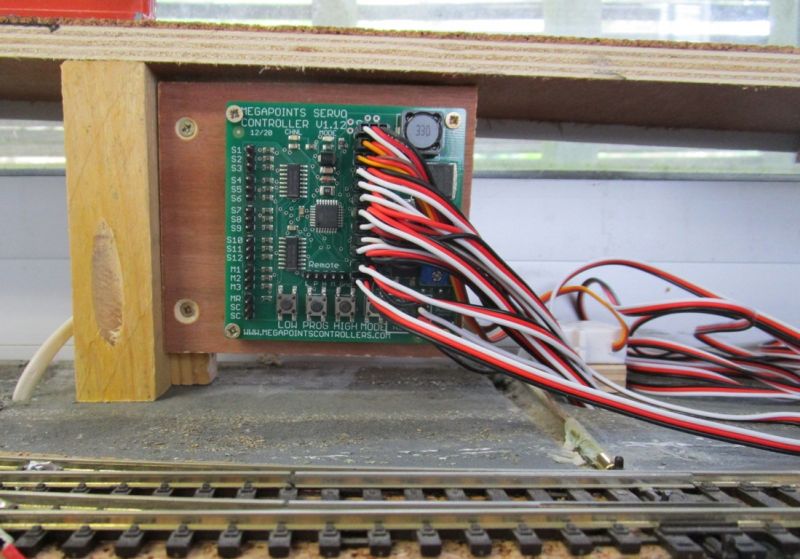
A single RC type cable connects this master controller to the actual servo control boards placed wherever on the layout. Each servo control board handles 12 servos and RC type leads feed from the board to the servo mounted under the point. This board - one of 2 required for the time being, is around 2 metres from the switch panel. Again, everything is a simple "plug and play" with no soldering required.
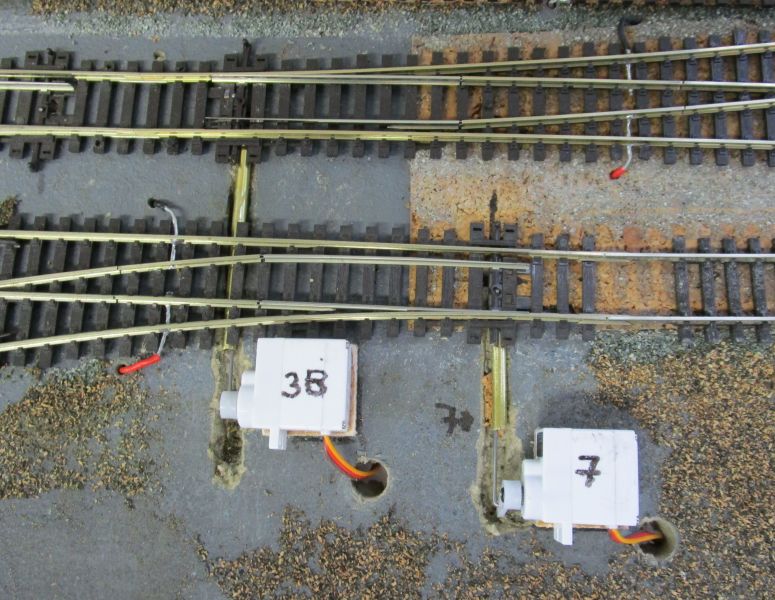
On a few occasions, battens prevented fitting the motors below the baseboard so I glued them to blocks of wood with the operating wires (piano wire) running through brass tubing. The servos will be covered by strategically positioned track-side buildings although in this shot, motor No 3B will be front, sides and roof only because I fixed it before adding the lower point (No 7) and it's rather close to the track………………. :oops: :oops: :oops:
I like the Megapoints system very much - it's easy for dummies like me, all the work having been done by Dave at Megapoints, it's versatile in that modules are available for servos, Tortoise type motors and solenoids. The are modules for almost everything one might require - DCC modules, feedback modules etc. etc.
The initial investment is maybe quite high but once you've got that, the rest is almost pocket money expenditure.
I make up my own servo leads to whatever length I require - the crimp tool and a box of assorted connectors cost me around £20. The wire itself (3 core Futaba type flat wire) is around 80p per metre.
'Petermac
Posted
Full Member
Roger OO DC Steam
Posted
Full Member
I'm using both mounting systems - on my old layout, I used aluminium channel but this time around, I thought I'd try his laser cut ply mounts.
To be honest, whilst the Megapoints mounts are well thought out, I find screwing them to the underside of the baseboard very fiddly - there isn't much room alongside the servo to get in with the small screws and I don't think fitting the servo after installing the mount is an option once the point is in place.
To be fair, I'm retro fitting the servos and my baseboard is probably the worst possible height for me - not high enough to sit upright and my arms aren't long enough if I lie under it. Working underneath is a right pain for we oldies………
If I were starting from scratch, I'd draw my trackplan then drill holes for the point operating wires, fit the servo mounts then fit the servos with the operating wire poking through the hole and finally fit the points dropping the tie bar onto the wire rather than poking it through from below. Naturally one would have to be accurate with your placings - that's why I never ever do it that way ……….. :oops: :oops: :chicken ;-)
'Petermac
Posted
Full Member
Regards
Roger
Roger OO DC Steam
Posted

Full Member
Lay the track as normal, following the break apart system of your choice. Best wishes Kevin
Staying on the thread Kevin.
Posted

Full Member
B
:thumbs
At 6'4'', Bill is a tall chap, then again, when horizontal he is rather long and people often used to trip over him! . . . and so a nickname was born :)
Posted
Full Member
The only "under baseboard" soldering I ever do is soldering droppers to the main bus. Otherwise, I de-mount whatever needs soldering and do it on the bench.
'Petermac
Posted

Full Member
BTW, what happened to the piercing saw you bought :lol:
Phil
Posted
Full Member
In this area, there are 2 points plus a double slip sitting right on to of a big double batton under the boards. You may recall I bought the layout already built inside the portable office unit and the previous owner had all insulfrog points operated by the "hand of God". I've swapped the insulfrogs for electrofrogs and powered them. Some were impossible to access from underneath.
Regarding the piercing saw, I used it to cut the arches in the viaduct sides but it's still work in progress - I have some Milliput somewhere ti fill and scribe the joins but can't find it at the moment …….. Ordering more isn't an option until I can make up a reasonable order to make the postage worthwhile. I'm 75 miles from our nearest model shop here and Covid restrictions limit me to a maximum of 10km from home plus I think model shops are closed as being "non essential" ….!
Here's a shot of the viaduct so far :

'Petermac
Posted
Full Member
The viaduct is looking great, I've used a thick mix of Polyfilla in the past for filling, that is if you don't have to drive 75 miles for it

Phil
Posted
Full Member
Staying on the thread Kevin.
Posted
Full Member
 Last edit: by Phil.c
Phil
Posted

Site staff
I wonder if its worth colouring in those servos so they arent stark white ? And then hide them further as mentioned with buildings or foliage or a pile of redundant old sleepers ?
That Viaduct will be a thing of awesomeness Peter :thumbs
Cheers
Matt
Wasnie me, a big boy did it and ran away
"Why did you volunteer ? I didn't Sir, the other three stepped backwards"
"Why did you volunteer ? I didn't Sir, the other three stepped backwards"
Posted
Full Member
Actually, it's probably because the viaduct is hinged so could well flex during lifting and lowering. That would surely crack the Polyfilla …… :hmm
I've had to move that "3B" point servo - it was indeed tioo close to the track. :sad:
I was indeed going to hide them under buildings - or rather "sheds" but foliage is another option I hadn't thought of. Immediately to the left of 3B is the main station which, if you recall, will be "under ground" as in Birmingham New Street.
I haven't actually worked out the topography of this area in detail yet. I'm conscious that, unless I'm careful, it could look very contrived, or even "toy-like" with those hedgehog type tunnels …….. :cheers
They could indeed be painted Matt but hopefully, they'll be invisible…..
'Petermac
Posted

Full Member
I don't think any of us like surface mounted points, but sometimes there is no option, and as yours are close to the station, some small sheds would be ideal disguises and once done, we will be none the wiser.
Michael
Posted
Full Member
Cheers,
Andrew :cheers
Posted

Full Member
For cracks you might try an acrylic gap filler normally used around the house out of a caulking gun. There are coloured grades to be found.
I squirt some into a small plastic disposable syringe with a shortened nozzle then inject a fine stream where required. The syringe then can be wrapped in wet paper towels and stored in a ziplok bag for repeat use. This way it can keep for ages if stored somewhere cool.
At a much higher unit price it's sold in a small tube here but that's a luxury concept.
Colin
Posted
Full Member
Nice tip re using sealant in the smaller syringe and keeping the sealant in a working condition - :cheers
Posted
Full Member
Michael
1 guest and 0 members have just viewed this.