00 Gauge - Maxmill Junction
Posted

Full Member
Petermac's Railway
I haven't read all of this thread but what's wrong with Polyfilla?
Phil

Posted

Full Member
It's too heavy, would take the rest of my lifetime to set at the required thickness and it's brittle Phil…………….. :roll:I haven't read all of this thread but what's wrong with Polyfilla?
The viaduct, being across the doorway, is hinged and, as it is both narrow and slightly curved, there will be a sli ght element of flex in it when it's being moved but especially when it's "parked" in the "I can open the door and go in/out" position - it rests on the wall ……….. :shock:
I'm going to try Michael's suggestion of glueing the soffit card to the side panel edge to see if I can avoid any compound curves before I have to attack it will foam. If that works, then the voids can remain as exactly that - "voids". ;-)
'Petermac
Posted

Full Member
Shaun.
Posted
Full Member
My main concern, even given the light weight, is that the corners of the arches would require a much thicker plug than it's designed for. Imagine a "T" shaped structure with an arch in each corner - that's quite a chunk to fill. Plus, anything "rigid", as are all plasters, would crack at the slightest flex.
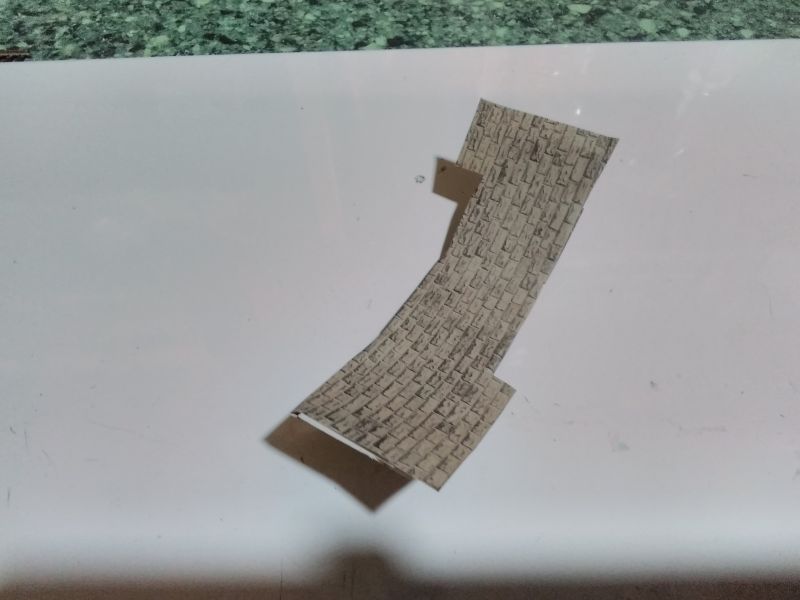
This photo probably shows the shape I need to fill. It's the size of the corner gussets :
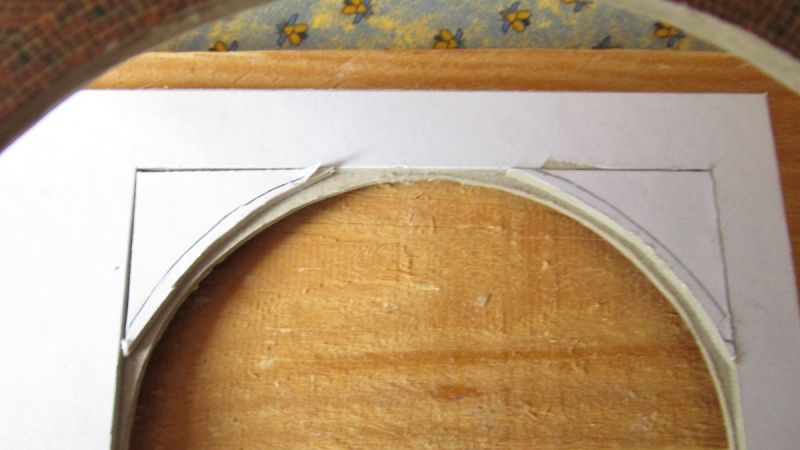
I'm going to try with card first but, if that's not successful, I'll resort to foam I think…………..
'Petermac
Posted

Full Member
Nice to see the progress Peter.
Posted
Full Member
Just give me a bit more time and I'll think of a reason to not do it ……….. :Red Card :cheers
'Petermac
Posted

Full Member
''Agree'' button ticked :thumbs :thumbs :thumbsJust a thought…. cut to shape and glue a gusset centrally inside the void to support the soffit card. Cheap and easy as long as you can use the viaduct arch as a guide?
Nice to see the progress Peter.
Bill
At 6'4'', Bill is a tall chap, then again, when horizontal he is rather long and people often used to trip over him! . . . and so a nickname was born :)
Posted
Full Member
LX036-OO Single Track Bowstring Bridge OO/4mm/1 76
Scale Mode Scenery seemed delighted I'd given them some money - £8 delivery to France, Royal Mail tracked, didn't seem too bad.
Regarding the viaduct at the other end of the unit - the one I was thinking of using expanding foam on - I did a trial run at forming the arch soffits with 1mm grey board and it's a no-go. The arch radius is too tight for the card so it just kinks………..even after a modicum of pre-bending…………….
I have a couple of options now before resorting to the foam. The first is to use much thinner card and laminate it in situ. I'm not a great fan of this type of structure because I've always found getting an even coating of adhesive over a large-ish area and then maintaining full contact as the glue cures to be quite difficult. It also strikes me as being very time consuming.
My second option is to use thin plasticard similarly laminated until I achieve a reasonable thickness. This would have the same problems re maintaining full contact during curing, albeit for a much shorter time, as with card plus, gassing of the solvent can be problematic in these situations I'm told ………………….. An additional problem might be getting the plasticard to stick firmly to the edges of the card viaduct sides - what actually sticks plastic to card ?
'Petermac
Posted

Site staff
Try on some scrap pieces and see if it works for you
Cheers
Matt
Wasnie me, a big boy did it and ran away
"Why did you volunteer ? I didn't Sir, the other three stepped backwards"
"Why did you volunteer ? I didn't Sir, the other three stepped backwards"
Posted

Full Member
Michael
Posted
Site staff
All of a sudden, foam doesn't seem such a bad idea!
Michael
 . :thumbs
Cheers
Matt
Wasnie me, a big boy did it and ran away
"Why did you volunteer ? I didn't Sir, the other three stepped backwards"
"Why did you volunteer ? I didn't Sir, the other three stepped backwards"
Posted
Full Member
All of a sudden, foam doesn't seem such a bad idea!
Michael
That's exactly what I was thinking …….
Matt - I see what you're thinking but I would still have the laminating problem plus the cost of the paint tin/tub/whatever. :shock: :lol:
Also, i wonder if glueing it all on the flat and then attempting to bend it would create extreme stresses on the glue line where the two layers meet ……… I'd have thought each layer of the lamination would have to be glued in situ to avoid such stresses……. :hmm
I'll see if I can get something as thin as a cereal packet to bend sufficiently - I understand Doug has shares in the product so maybe he can get me some discount……
'Petermac
Posted
Full Member
Chris, of Teasel Bay, is a big fan of scale model scenery products and his recent humpback bridge is an excellent model from them, so I think you will enjoy constructing the girder bridge. It is likely to be very well designed, judging by the things I have ordered from them, albeit that they were small detailing items.
Michael
Posted
Site staff
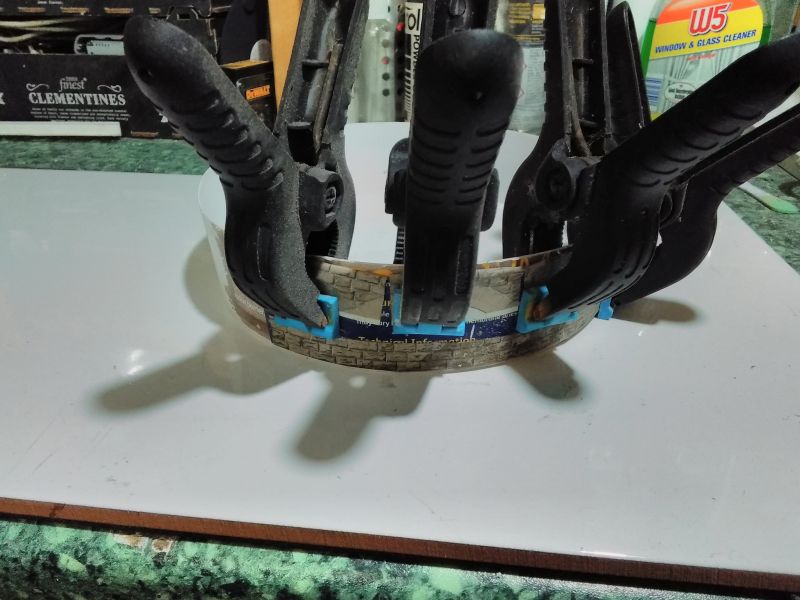
I cut the tub off 2 inches from the bottom and used the bottom piece as the former, cut my strip from the top piece, glued paper on and then clamped it to the curve of the bottom piece until it was dry
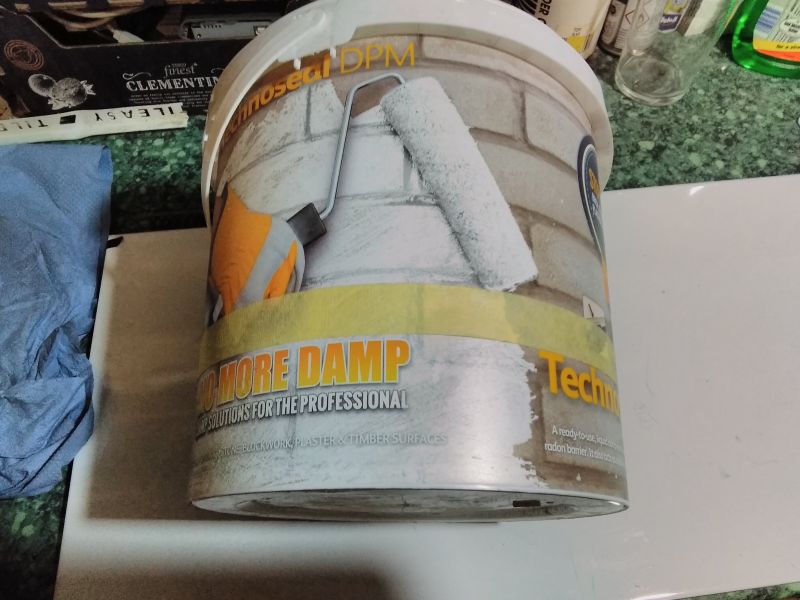
Foam will probably do you just as well but I would definitely see if you can get a tin of the non expanding stuff like I linked. I use this in preference when doing remedial work on walls in bathrooms as its much more forgiving and controllable
Look forward to seeing your final solution :thumbs
Wasnie me, a big boy did it and ran away
"Why did you volunteer ? I didn't Sir, the other three stepped backwards"
"Why did you volunteer ? I didn't Sir, the other three stepped backwards"
Posted
Site staff
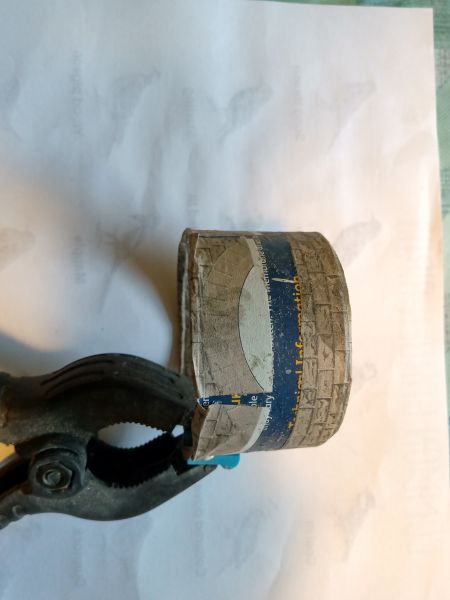
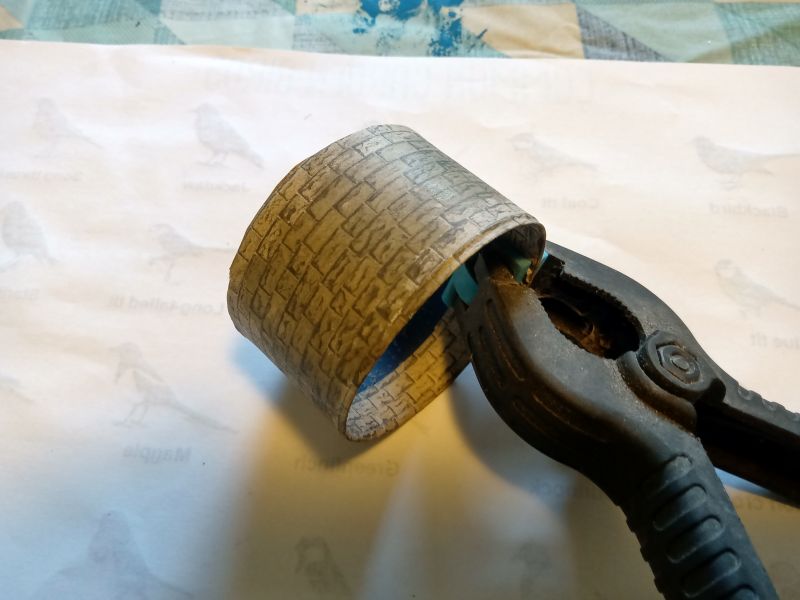
Its rough as a Badgers todger, was thrown together in a three minute challenge in a dark room wearing boxing gloves ( my usual modelling method
) and is covered in spray mount glue as I was using a tin at the time. But ignoring all that :-Take a tub
Cut the bottom off
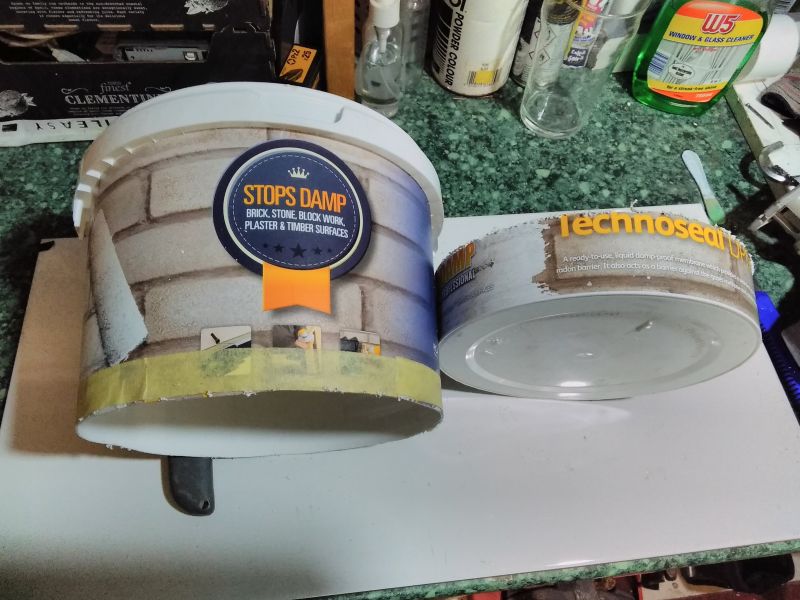
From whats left cut a ring to the height or width you want
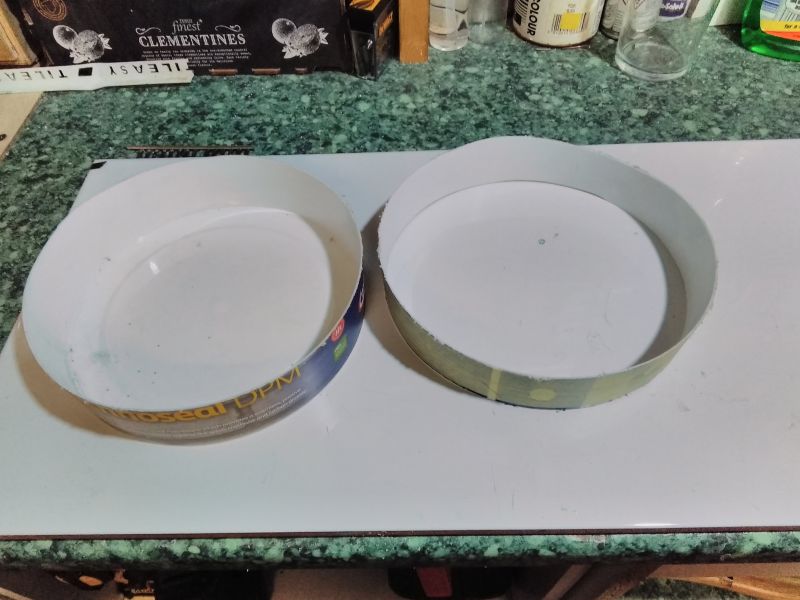

Cut out a piece from this ring to the size you want, and then cut your brick paper to wrap it in ( the pencil marks show where I have cut the edges so it will wrap around the curve and lay flat)

Put glue on the plastic on the FACE of the wall and wrap your paper round ( you can rough it up with sandpaper if you want to help it stick)
(I would suggest you peg and let the face dry THEN wrap the tabs around to the back surface and glue, trust me its safer !)
Smooth out your paper face so its smooth on the plastic, Then Peg your piece around the bottom of the tub to press the paper tight and hold it until dry
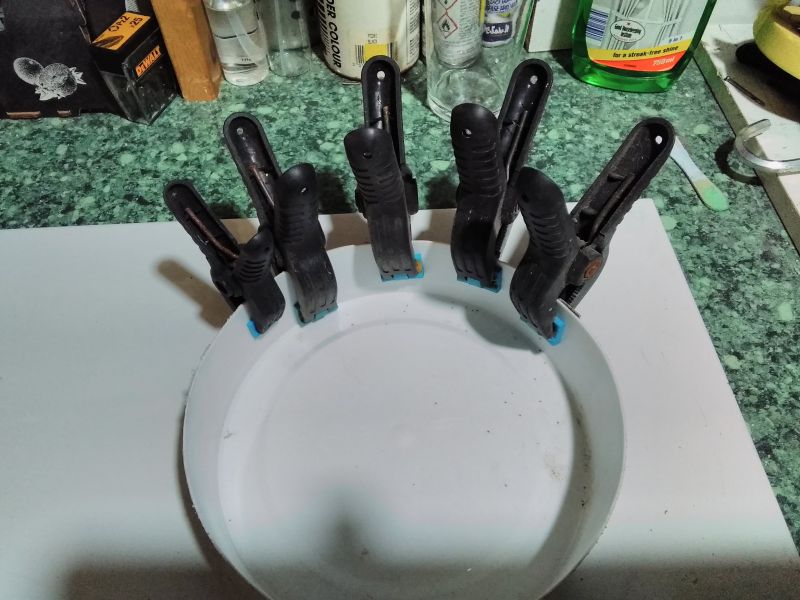
The result flexi wall
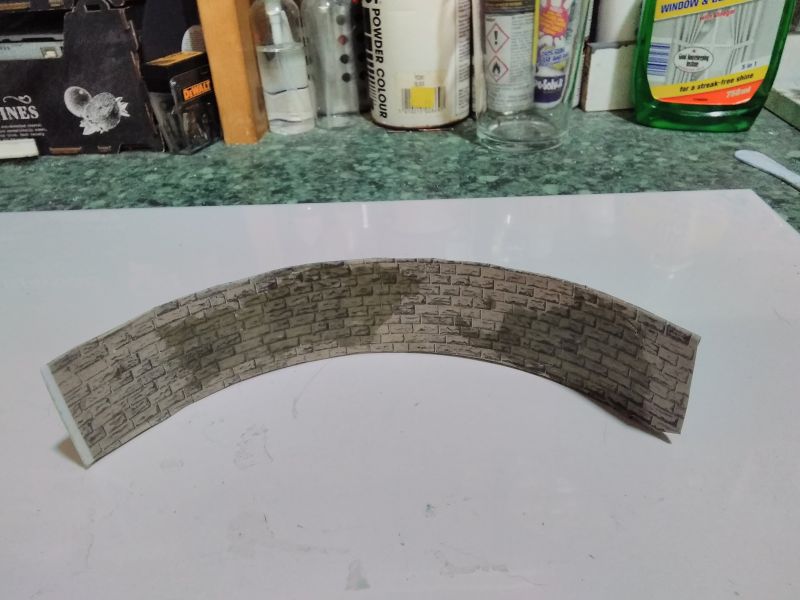
Yeah its rough lol and glue all over the face as I just covered the whole thing in spray mount and got it all over, but it shows the technique
Ok now I can bin it and get back to glueing my fingers together :thumbs
Cheers
Matt
Wasnie me, a big boy did it and ran away
"Why did you volunteer ? I didn't Sir, the other three stepped backwards"
"Why did you volunteer ? I didn't Sir, the other three stepped backwards"
Posted
Full Member
Cheers Pete.
Posted
Full Member
I'm assuming the tin/tub is that "poly"type of plastic one often sees paint tins made from :roll: Are you sayiny spray mount will stick paper to it . :shock:
Additionally, from an earler post, you reckoned acrylic mastic (decoraters caulk) would then stick it to card…….
I'll certainly give your method a whirl and let you know how I get on - but it won't be today - I need to cut the grass but I punctured the mower yesterday so need to get that repaired first job …………..
'Petermac
Posted
Site staff
I think the glue gives it a nice bit of weathering. That'd suit me just fine, as when I use glue, it's like a kid with an ice cream on a hot day. :)
. A man after my own heart :thumbsYes Peter pretty much Any 'Bendy' plastic tin will do depending on how stiff or bendy you want your wall/ infill piece
Peter I say spray mount. . . I mean this stuff

As you can see it sticks paper to plastic, also fingers to fingers, fingers to nostrils, fingers to hair. . Its quite sticky !
So careful when spraying
I buy it from Screwfix £3.99 A tin. Way cheaper than 'Craft' spray mountIt Sticks to lots of things :-
Carpet, Wood, Concrete, Stone, Tiles, Rubber, Foam, Metals, Rigid plastics, Polyethylene, Canvas, Fabrics, cardboard, paper, Cork, fingers, etc, etc
Ignore the wrinkly bits at the edges/ on the back etc thats just becouse it was done in a rush and not smoothed down properly. Also as I mentioned I would do the face first, leave to dry overnight and then wrap the tabs round and stick to the back. A much cleaner method :thumbs
As you can see I've ended up with a ’bendy' bit of wall
Yup Decorators Caulk should hold it once its dry, you could use the spray adhesive but would probably ruin the Viaduct in the process :shock:
Have fun, practice first !!
Cheers
Matt
Wasnie me, a big boy did it and ran away
"Why did you volunteer ? I didn't Sir, the other three stepped backwards"
"Why did you volunteer ? I didn't Sir, the other three stepped backwards"
Posted
Full Member
Have fun, practice first !!
Cheers
Practice makes Peter perfect!Matt
Now that's a frightening thought, as we won't have half so much fun :)
Hope it works spiffingly Peter.
Best,
Bill
At 6'4'', Bill is a tall chap, then again, when horizontal he is rather long and people often used to trip over him! . . . and so a nickname was born :)
Posted
Full Member
I'll see what I've got in the way of "bendy tins" - I do have empty pool chemical buckets in what I'd guess is similar material but experience tells me that something in the chemicals eventually turns the plastic brittle. I only discovered that when I was using one as a paint kettle up a ladder ……………………………… :shock: :shock: :shock:
I'll have a look for a similar adhesive - I do have some "construction adhesive" which I'll check out tomorrow - it claims to glue most things to most things. I don't think I need to worry about glueing anything to my hair ………….or was that just your reference to my reflective head…….. :Red Card
Thanks for taking the time and trouble to post all those photos - I know how long that sort of thing takes. :thumbs
'Petermac
1 guest and 0 members have just viewed this.