00 Gauge - Maxmill Junction
Posted

Full Member
Petermac's Railway
I'm finally making a start on cladding the viaduct with Wills coarse stone sheets. I had been chewing over how to do the edge stone courses and have decided to go with Phil's suggestion as shown here :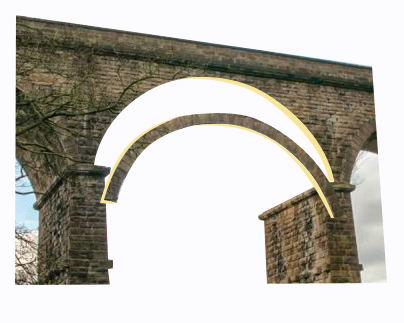
The arch will be cut from card and "individual" stones cut from sandpaper creating some texture, glued on and painted - I think ! I have yet to experiment with the method but thus far, I haven't come up with an alternative so thanks Phil :thumbs
Whilst "chewing", I had another idea for which I'd appreciate your opinions.
Having stuck the card sides onto the timber framework, I end up with this situation:
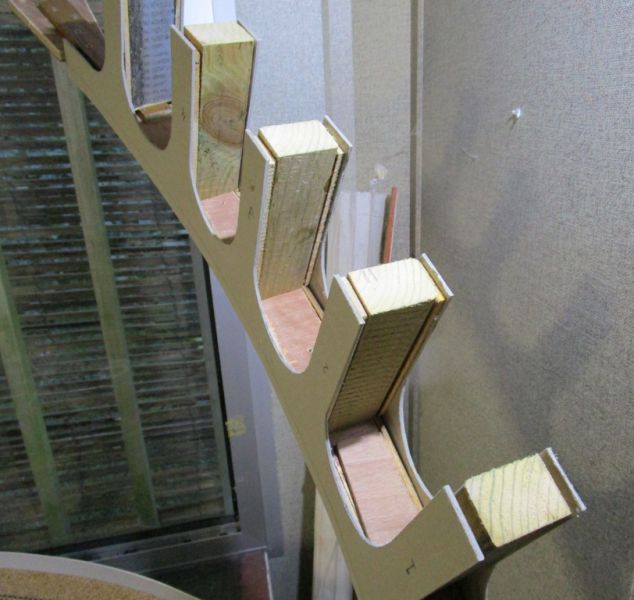
Disregard the gap on the lower "leg" - that's because the ply spacer attached to the supporting leg doesn't quite reach ground level - it's only a packer so not important. The timber framework is a series of "T" shapes and this leaves an odd shaped void in the corners of each arch. I thought I would fill these voids with expanding foam and carve/file/sand the arch soffit in the foam using the card sides as a guide. This is a problem I hit when doing the Scalescenes viaduct - trying to get the soffits to fit properly. Filling it all with foam would give me a sold base to work on with virtually no added weight. What do you think ?
'Petermac

Posted
Full Member
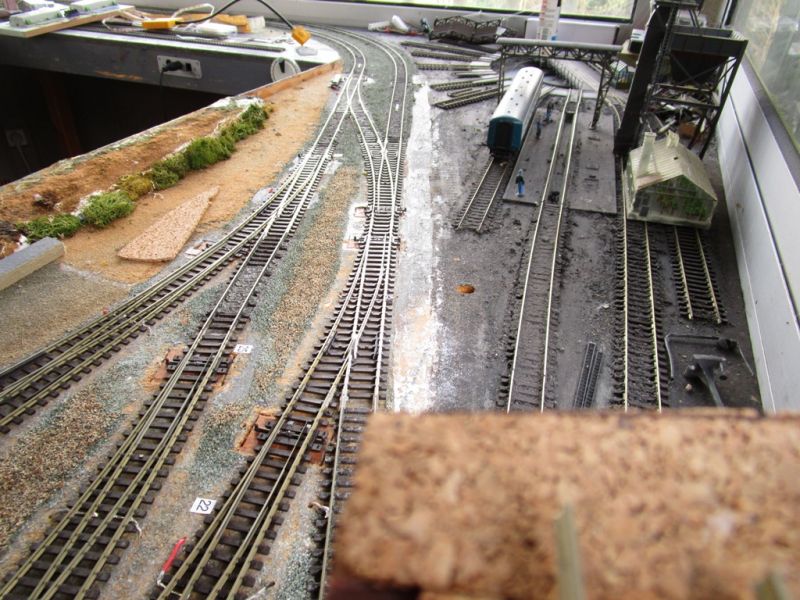
A scalscenes viaduct, with slight alterations to the piers, will just fit without fouling any trackwork. However, it can't join the chunk of cork in the foreground in the above photo - this is the roadbed for the rising track as it leaves the back of the station building.
The positioning of the piers leaves this "missing link" (the parapet walls are still to be added) :

It is around a scale 100 ft so too big for a plate girder bridge, which was my initial idea. On the other hand, a bow-string bridge would, I think, look rather "scrunched up" so I'm thinking along the lines of a truss girder bridge. Truss under the trackbed or above it ? High truss or slimline truss ?
Anyone got any more ideas please ?
This shot probably gives a better idea of the scale of the gap. (I know, there's a missing pier second from the left - it's being modified to give more clearance to the track tight up to the back of the viaduct ……………. ;-))

'Petermac
Posted

Full Member
Hi Peter and good to see you on the viaduct again, which it is going to look magnificent.
The timber framework is a series of "T" shapes and this leaves an odd shaped void in the corners of each arch. I thought I would fill these voids with expanding foam and carve/file/sand the arch soffit in the foam using the card sides as a guide. This is a problem I hit when doing the Scalescenes viaduct - trying to get the soffits to fit properly. Filling it all with foam would give me a sold base to work on with virtually no added weight. What do you think ?
I think you may have an issue with foam control. Have you tried a sample test piece with the foam? I would advise testing it to see just how little foam you can get exactly where you need it. It does go rather big after you apply it.
Have you thought of trying the high density polystyrene, or similar lightweight fill material, finished with DAS air dry clay? You will have total control over it and I’d rather build up the arches, rather than remove material from them. Balsa if you already have some may also answer.
Bon courage and I’m look forward to seeing how it goes.
Best,
Bill
At 6'4'', Bill is a tall chap, then again, when horizontal he is rather long and people often used to trip over him! . . . and so a nickname was born :)
Posted

Full Member
I may have the wrong end of the stick, but why not line the arches with card so that it is fixed to the to edge of the arch (as opposed to inside the arch)? Obviously it will give a join, but you are covering it in Wills stone or the sandpaper so it won't show. Or have I misunderstood the problem?
Michael
Posted
Full Member
On the second point Peter (big gap:viaduct to cork), where’s that bit of track in the background going to?Unfortunately it’s in the way of giving the bearing you need for a girder bridge. Hopefully it stops no further than it already is, in which case you could build a goalpost type of structure (concrete bases (faced with brick to look as if it goes with the viaduct if you fancy), with fabricated steelwork over the top of the turnout at right angles to the track to provide the right hand bearing for a girder or arch bridge, with the left hand taking its support from the viaduct, cosmetic beefed up to look prototypical.
The joy of civil engineering is that there are many solutions. Just ask IKB.
Bill
 Last edit: by Longchap
At 6'4'', Bill is a tall chap, then again, when horizontal he is rather long and people often used to trip over him! . . . and so a nickname was born :)
Posted
Full Member
You don't have the wrong end of the stick at all Michael but the reason I thought about the foam is that the arches are not "designed" as such and, because the viaduct is on a slight curve, the arches will be slightly skewed and are not necessarily identical………….. :???: My take on "it looks OK so it probably is" …………….. :hmmHi Peter
I may have the wrong end of the stick, but why not line the arches with card so that it is fixed to the to edge of the arch (as opposed to inside the arch)? Obviously it will give a join, but you are covering it in Wills stone or the sandpaper so it won't show. Or have I misunderstood the problem?
Michael
Filling the arch with foam would give me a solid base whilst being totally flexible in terms of how I stick anything to it. I'll certainly try your suggestion, which I finally used with success on the Scalescenes viaduct, but I'm worried that I may end up trying to force sheet card into compound curves - a bit like trying to plank the bows of a ship without tapering the planks ……………… I know what I mean even if I can't describe it !! :???:
'Petermac
Posted
Full Member
Another option might be to glue foam into place, like foam board, then cut that back. You might have to do several layers to fill the gap, but you would be in control. Or papier mache? Or something like Sculptamold, which can be smoothed when drying and sanded when dry, and always handy to have around for landscaping.
I'm not saying any of these are better, just throwing them into the mix..
Michael
Posted
Full Member
The voids to be filled are probably larger than they appear on the photo Bill but yes, that expanding foam does have a habit of……………….well, "expanding". I think some of the better marques claim up to 400 times although the cheaper stuff is considerably less lively. Another problem is that, in my experience, once you start with it, you've either got to use it all or throw what's left out. In spite of their claims about clearing all the "works" with acetone before storage, I've never succeeded in doing so. The last time I was in "Brico", I noticed they stock some smaller aerosols now - someone else must have complained about wasting the stuff.
I'm not unduly worried about it taking over the viaduct and once thoroughly cured, it's wonderful stuff to carve with none of the polystyrene "prills" to chase around as they stick to everything in sight that can hold a static charge !! :twisted: You'll have guessed I don't have a hot wire cutter ……………. ;-)
Regarding the truss bridge - I had imagined the left hand end of the bridge would be supported by the viaduct - as you rightly say, with "cosmetic" blending into the brickwork - hence the rather abrupt stop to said viaduct. The right hand end would indeed sit on a goalpost type structure. Heavy duty round columns, probably of smooth concrete, would be erected, the rear one approximately where the round "weight" is next to the "carefully stored" water crane and the front one sitting on the point of the platform - the grey area at the bottom right of the photo. A hefty "steel" beam forming the crossbar would carry the bridge. But what design of truss girder bridge ? I could have the "tunnel" type - high trusses with the train travelling through the structure - Peco do a pair of sides in their "LK 11" kit or, it could be a much less imposing structure with smaller trusses slung below the trackbed - Noch, for example, make a kit as shown here : https://www.walthers.com/laser-cut-steel-bridge-kit-12-7-8-quot-32-7cm
.
'Petermac
Posted
Full Member
Cheers Pete.
Posted

Full Member
I too found that it's best to use as much as you can in one sitting. After all it's not that expensive (close your ears Doug…)
Posted
Full Member
When using expanding foam, wet all the areas you need the foam to adhere to (spray bottle works fine).
I too found that it's best to use as much as you can in one sitting. After all it's not that expensive (close your ears Doug…)
Yes, wetting the required areas is the key to making it stay put Shaun. Regarding the cost, if you only want to fill a small hole, then it can work out quite pricey. I tend to "store up" potential jobs for it then have a blitz thereby reducing the waste (I'm nearly as bad as Doug when it comes to parting with shekels - what would one expect from one being half Yorkshire and half Scottish…………)
'Petermac
Posted

Full Member
Would this be more acceptable/adaptable, perhaps two in line supported on some sauncy steel girder legs?
https://www.scalemodelscenery.co.uk/lx036-oo-single-track-bowstring-bridge-oo4mm176-924-p.asp
Stratospherically Offended Chubber
Last edit: by Chubber
'You may share the labours of the great, but you will not share the spoil…' Aesop's Fables
"Beer is proof that God loves us and wants us to be happy" - Benjamin Franklin
In the land of the slap-dash and implausible, mediocrity is king
"Beer is proof that God loves us and wants us to be happy" - Benjamin Franklin
In the land of the slap-dash and implausible, mediocrity is king
Posted
Full Member
One 'undred an sixty quid! :shock:
I have absolutely no intention of buying one of those Peter - I just used the link to show the alternative type of truss bridge. German stuff is notoriously expensive - probably excellent quality but way outside my budgets.
:cheers
'Petermac
Posted
Full Member
It does look good and, whilst I've never used them, I have heard good comments about Scale Model Scenery products.
Certainly worth a re-think so thanks for the link. :thumbs
I've had a bit of a play with thin card forming the arch soffits as suggested by Michael in #844 and, contrary to my initial reservations, it might just work. I did have a dry run with very thin card so will try again with 1mm card. If it works, that would be great although I did invest a hefty € 6.50 in some cheapo expanding foam - I gibbed at the "proper" stuff at € 12.90 a can ……………………. :shock:
'Petermac
Posted
Full Member
Best,
Bill
Last edit: by Longchap
At 6'4'', Bill is a tall chap, then again, when horizontal he is rather long and people often used to trip over him! . . . and so a nickname was born :)
Posted
Full Member
'Petermac
Posted

Site staff
Wasnie me, a big boy did it and ran away
"Why did you volunteer ? I didn't Sir, the other three stepped backwards"
"Why did you volunteer ? I didn't Sir, the other three stepped backwards"
Posted
Full Member
https://www.youtube.com/watch?v=JGaBlygm0UY
The fun starts at 3:04 minutes in.
Bill
Last edit: by Longchap
At 6'4'', Bill is a tall chap, then again, when horizontal he is rather long and people often used to trip over him! . . . and so a nickname was born :)
Posted
Full Member
You need some of This Peter. Much more amenable :thumbs
That's photoshopped Matt - where are all the blobs and drips plus the gummed up hands and spout ………? :shock:
'Petermac
Posted
Full Member
Nah, what you really need is this:
https://www.youtube.com/watch?v=JGaBlygm0UY
The fun starts at 3:04 minutes in.
Bill
Now that's more like it Bill - lots of noise and writhing around as I slowly get swallowed up by the stuff. :cheers
'Petermac
1 guest and 0 members have just viewed this.