00 Gauge - Maxmill Junction
Posted
Full Member
Petermac's Railway
[user=6]Petermac[/user] wrote:I've just got home from a "French lunch" with friends - I'm actually quite surprised I'm home before dark but sorry for the delay in writing - and also for any typos which may result from my support of the Bordelais vinyards ……………………………………………………………………………. :cheers :cheers
If I may, I'll answer Michael's questions first -
1. All the sounds, except maybe me tripping over a box, are from the decoder - including all whistles, clanks, puffs and voices. Apparently it is the responsibility of the train guard to give the driver certain details about the train such as the weight etc. Paul has included these in his project. I think this chip has around 16 different sounds and uses 26 or 28 different buttons.
2. Most, but not all, sounds are user controlled via the hand throttle - in my case, a Lenz Set 100 but the make isn't important. A few sounds are either automatic or user operated. Immediately springing to mind (I don't have the sound details in front of me so this is from memory), is the sound of coal being shovelled into the firebox and another, the pressure relief valves blowing. Both these can be switched on or off via the throttle but will also trigger automatically from time to time when the loco is static. Another user controlled function I didn't show was the light/heavy start. One can take the light engine from the yard and hook it up to a heavy train. Steam chuffs are light and "hissy". Once hooked up, the engine sets off on full pressure with the heavy train in tow producing heavy poweful chuffs. There's a function which sounds like the coupling "chink - chink - chink" as the train moves off and the slack is taken up. He's done a really amazing job and it takes time to learn all the effects.
3. All engine sounds are perfectly matched to the loco speed. Ever faster chuff - chuff - chuff when accelerating, and just a slight coupling rod clank on deceleration with no steam sound. There are speed related flange squeals for bends and points etc. - the slower the loco is moving, the louder the squeal. As it moves faster, the squeals become less evident and eventually disappear altogether.
4. The sound is matched to the particular loco. Paul travels the country making sound recordings of any preserved locos he can find and then edits those recording for his projects. He always uses Zimo decoders, considering them the best for functionality and is himself considered the undisputed master of the UK sounds/Zimo decoder mating.
There are other manufacturers and other sound projects, some of which I have but, in my opinion, the Zimo/Chetter combination is in a different league.
It's not for everyone - indeed, for those running big mainline layouts, I suspect it could be quite boring just listening to locomotives, steam or diesel, rushing round a circuit with little to listen to.
At lower speeds, one really is driving the locomotive and sound really comes into it's own. I don't know if you've noticed but 'm totally sold on it. :cool wink
Now, the thorny question of that unfenced and unbridged representation of the Aire and Calder Navigation ………………………… :hmm
To the left of the "Loco Leap" is the new fiddle yard area and to the right, the original boards. The original board in that area is topped with Sundeala. Over time, the Sundeala has, shall we say, "moved". When I built the fiddle yard board, the edges matched perfectly but I hadn't realised just how much sag there was a foot or so back from the edge. When I laid the track, I was faced with either a big dipper type structure or a very definite downwards kink. To resolve this, I removed the end panel - 4 inches or so - and sanded the remaining Sundeala where the track was laid to create a more gentle transition. A further advantage was that, at present, I can still hinge up the left hand board to access the point motors etc, underneath but to do so, I have to split the tracks at this void. You will see that a few of them don't exactly present a snug fit at the joints. Once I'm all set and confident I won't need to flip the board again, the void will be properly bridged ………………. :cool wink
I'm a dyed in the wool Zimo user and wouldn't willingly use anything else. I have one loco, a Bachmann DP2 with an ESU decoder, which while it sounds really good with it's Earth Mover speaker which vibrates the baseboard, I can't really figure out how to alter things to give it a smoother start or stop the loud whistle when I turn it on and I don't think there's any way to get active braking. You'll have guessed by now that Paul didn't have a sound for the DP2.
Anyway, the Zimo manual, while not the easiest thing to get my head around has lots of information that really helps. Altering chuff rates, independent sounds, making lights work prototypically etc are all easy. With a stay alive unit installed, the maximum time a loco keeps going with no signal can be programmed in as can stopping it dead when that time is up, rather than reverting to the set braking distance, which in my decoder is very high because I like to use the brakes. I hope I don't sound like the Aussie rep' for Zimo. :)
Cheers Pete.

Posted

Full Member
So easy too, with just a push of a button for each sound, the speed chuffing of course is automatic.
Phil
Posted
Full Member
For some reason I have not seen your thread recently until now! Not sure why….The skeletons of the bridges are done as here:
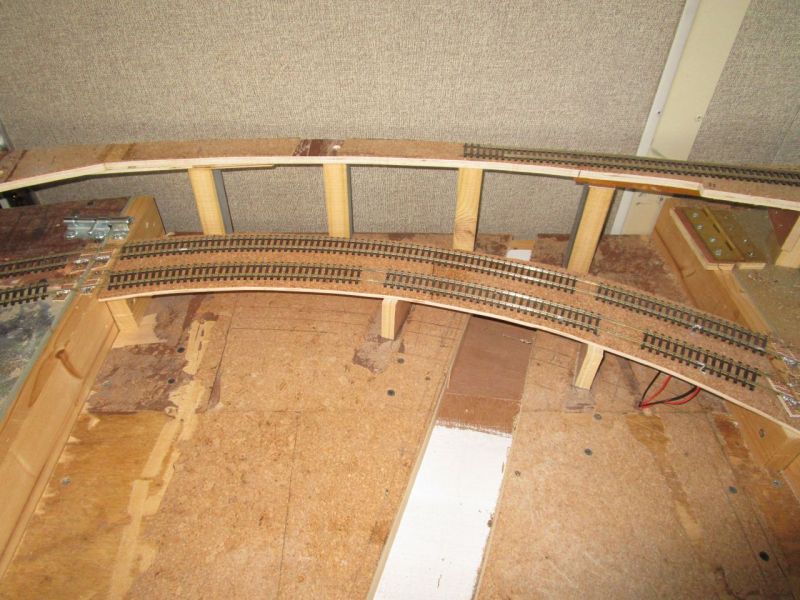
The viaduct hinges to the left whilst the main flap hinges to the right. I almost need a pre-launch checklist to ensure everything is done in the correct order !!
At this point, I'm half way round the unit with the gradient. The track is level at both ends of the unit (where there are 90deg. corners) but climbs at 1 in 50 on the remaining 2 sides. Given that ultimately, the clearance between the two levels will be double what you see here, I'm pretty sure I'll have plenty :

My plan is to clad the viaduct skeleton with card, forming the arches and side walls in the process. The lower level track supports will be hidden by trackside/canalside warehouses/factories etc. All the buildings sited on this section will be removable to enable the lifting flaps to operate.
That looks fantastic Peter. I'm planning a lift out section on Teasel which I expect I'll get around to next year (maybe!). You may have stolen this this from Sol, but I'm going to steal the idea from you :P. I like the way even though its a lift out section there is still lots of relief and it isn't simply flat. That is going to look fantastic when completed.
Posted

Full Member
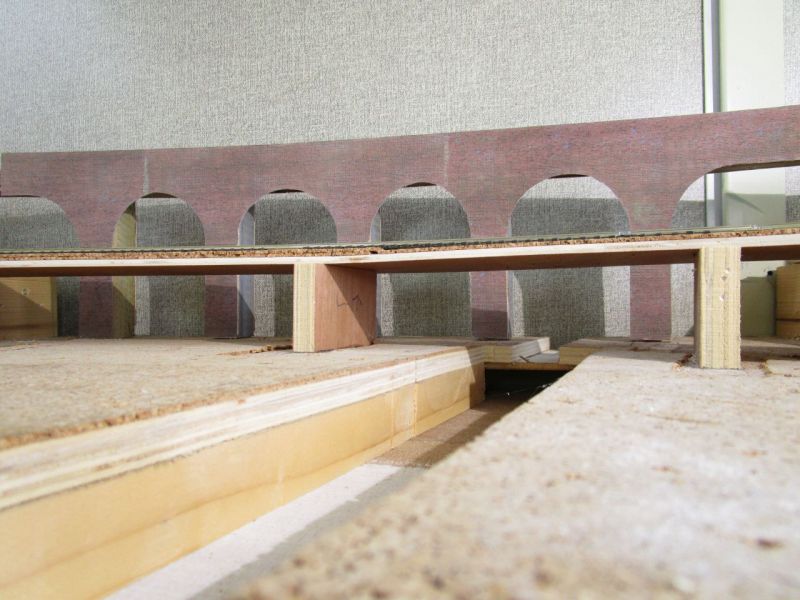
I've redesigned the viaduct by adding a couple of extra "piers" so they're a bit closer together. This first incarnation looks too much like a series of bridges rather than a viaduct.
Photos later ……………. :thumbs
'Petermac
Posted

Full Member
Staying on the thread Kevin.
Posted
Full Member
'Petermac
Posted
Full Member
What are you using for the viaduct? I'm considering using the Wills viaduct Kit.Thanks Kevin - I'm waiting for bricks at the moment ………………………. :lol:
Posted
Full Member
I had considered a kit but nothing about this viaduct is "standard" - length, curve and width are all purpose made for the site.
I've done a mock-up of the facade - 1mm card covered in Scalescenes dark red brick but, for this exercise, absolutely no embellishments on the brickwork. As you know, it was rare for Victorian brickies to build just a plain brick wall and this structure screams out for something to break it up. They usually incorporated some kind of fancy design work and, for the final article, I'll do the same.
'Petermac
Posted
Full Member
What is the plan for the track in the foreground?
Posted
Full Member
Most of it won't be seen anyway because there will be lift-off mills and factories built tight up to the railway - just as one would normally see in an urban setting. John Dew's Granby is my guiding light in this respect - both his memory and imagination are far better than mine !!
The industrial structures will have locating "beds" to sit in when in situ but will be lifted off to enable the hinged flaps to operate. Either that, or I'll crawl underneath to get in and out …………………….. :cool wink
'Petermac
Posted

Full Member
I think you are flattering me again. I am made a whole series of errors with mine which you appear to be avoiding by careful planning.It will cross the canal on a plate girder bridge Chris. Either side will just be on a brick embankment, possible with the traditional 2nd hand car dealer lock-ups built into them - if it's high enough.
Most of it won't be seen anyway because there will be lift-off mills and factories built tight up to the railway - just as one would normally see in an urban setting. John Dew's Granby is my guiding light in this respect - both his memory and imagination are far better than mine !!
The industrial structures will have locating "beds" to sit in when in situ but will be lifted off to enable the hinged flaps to operate. Either that, or I'll crawl underneath to get in and out …………………….. :cool wink
I am glad you are making the building easily removeable…….the more you can consolidate modules the better……..ideally you should have a secure place where you can plonk them when clearing the area……I suspect you will be surprised how often you leave them off and the gate open when you are working on other areas .Regularly ducking under will certainly keep you fit but you will find it a huge plus being able to walk through. You have no idea how many times I duck under, haul myself to a vertical position and look back longingly at the very tool I need…..still on the desk. It is all very well having a precise memory of the fifties but in many ways the the last 5 minutes would be more helpful…..I have to have a set routine with my pills now otherwise who knows what might happen:shock::lol:
The viaduct looks very promising…cant wait to see it finished.
Posted
Full Member
Looking at your magnificent hotel, I think I'll just send you the ground plan and leave the rest to you……………
That "forgotten screwdriver" syndrome I think only comes into play with duck-unders, not lift-ups. The number of times I've been in and out of the unit with the lift-ups open far exceeds the number of times I've crawled under. However, the minute I decide to crawl under, my memory shuts down and that errant screwdriver winks at me from it's last known position usually just fractionally beyond arms length !!
'Petermac
Posted

Site staff
Ron
NCE DCC ; 00 scale UK outline.
NCE DCC ; 00 scale UK outline.
Posted
Full Member
As for duck unders, I had a guy fixing a CCT box a few years ago, he got up and bumped his head against the overhang, dislodging the track and pointwork from the ballast, did I do any damage he said, I said YES! :shock:
Phil
Posted
Full Member
I could of course, change everything to stone but, as I'm no Rembrandt, want to use Scalescenes type printed papers. What about their "random ashlar" stone. It's similar to Wills coarse stone but already painted, much cheaper and easier to work with and, probably fairly important as I'm in France, here on my computer !
On the other hand, it's probably high time I tried my hand at proper stuff and learnt how to paint ……
I do agree that having some relief in the surface would look good……. :hmm
'Petermac
Posted
Full Member
I am glad to read that I share that same problem with both John & Peter regarding that "tool" !!!
I thought you'd done major permanent way alterations on your lift-up Sol ……. or do you still get down on your knees … :roll:
'Petermac
Posted
Full Member
Phil
Posted
Full Member
I do also quite like the idea of using embossed styrene now that you've sown the seeds, with the added bonus that I'd have to learn to paint….. :hmm
I think initially, I'll have a practice with both mediums and see a) how it looks and b) see if I can make any sense out of a paintbrush - or even an airbrush which has probably lain idle since the days of £.s.d. …….
'Petermac
Posted
Full Member
All of this will work, providing the colour is right and the stone sheets look realistic in the first place, if they don't then no amount of painting will put it right!
You can use the airbruch again for the weathering.
 Last edit: by Phil.c
Phil
Posted
Full Member
Would you advise acrylics or enamels ? I understand acrylics dry very quickly but are easier on an airbrush in terms of cleaning ……
I also know you can't paint one over the other but can never remember which way round it is !
'Petermac
1 guest and 0 members have just viewed this.