00 Gauge - Maxmill Junction
Posted

Full Member
Petermac's Railway
That is indeed very impressive sound! You will have to explain a few things to me, if you don't mind….1. Were all the sounds coming from the sound decoder? Whistles, voices etc.?
2. Are these played automatically or are they functions that you choose to sound?
3. Is the engine sound dictated by the speed of the loco is or it generic, regardless of the actual speed the model is running at?
4. Is the sound matched to the actual model, or is it a generic "steam engine"? i.e. if you were running 4 different engines, would they all sound the same?
As you can tell, I am a complete novice when it comes to sound as it hasn't been anything I have investigated…. but I have seen a sound equipped Lord Nelson going relatively cheaply…….!!
I too was a bit worried about the LNER cost saving bridgeless bridge….. or is it that you forgot the old adage, measure twice, cut once?

Great video though.
Michael

Posted

Full Member
If I may, I'll answer Michael's questions first -
1. All the sounds, except maybe me tripping over a box, are from the decoder - including all whistles, clanks, puffs and voices. Apparently it is the responsibility of the train guard to give the driver certain details about the train such as the weight etc. Paul has included these in his project. I think this chip has around 16 different sounds and uses 26 or 28 different buttons.
2. Most, but not all, sounds are user controlled via the hand throttle - in my case, a Lenz Set 100 but the make isn't important. A few sounds are either automatic or user operated. Immediately springing to mind (I don't have the sound details in front of me so this is from memory), is the sound of coal being shovelled into the firebox and another, the pressure relief valves blowing. Both these can be switched on or off via the throttle but will also trigger automatically from time to time when the loco is static. Another user controlled function I didn't show was the light/heavy start. One can take the light engine from the yard and hook it up to a heavy train. Steam chuffs are light and "hissy". Once hooked up, the engine sets off on full pressure with the heavy train in tow producing heavy poweful chuffs. There's a function which sounds like the coupling "chink - chink - chink" as the train moves off and the slack is taken up. He's done a really amazing job and it takes time to learn all the effects.
3. All engine sounds are perfectly matched to the loco speed. Ever faster chuff - chuff - chuff when accelerating, and just a slight coupling rod clank on deceleration with no steam sound. There are speed related flange squeals for bends and points etc. - the slower the loco is moving, the louder the squeal. As it moves faster, the squeals become less evident and eventually disappear altogether.
4. The sound is matched to the particular loco. Paul travels the country making sound recordings of any preserved locos he can find and then edits those recording for his projects. He always uses Zimo decoders, considering them the best for functionality and is himself considered the undisputed master of the UK sounds/Zimo decoder mating.
There are other manufacturers and other sound projects, some of which I have but, in my opinion, the Zimo/Chetter combination is in a different league.
It's not for everyone - indeed, for those running big mainline layouts, I suspect it could be quite boring just listening to locomotives, steam or diesel, rushing round a circuit with little to listen to.
At lower speeds, one really is driving the locomotive and sound really comes into it's own. I don't know if you've noticed but 'm totally sold on it. :cool wink
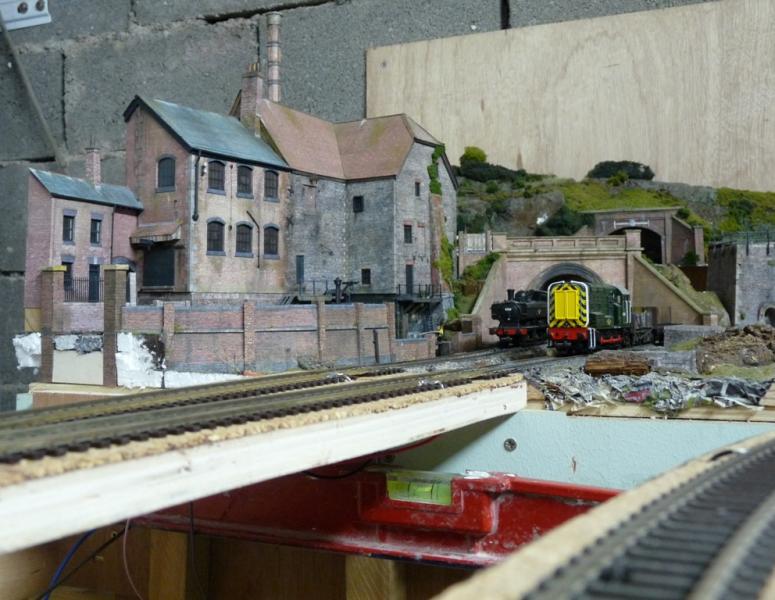
Now, the thorny question of that unfenced and unbridged representation of the Aire and Calder Navigation ………………………… :hmm
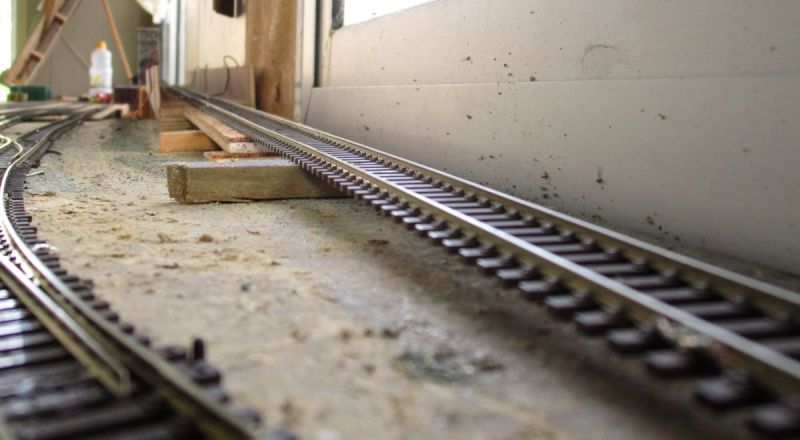
To the left of the "Loco Leap" is the new fiddle yard area and to the right, the original boards. The original board in that area is topped with Sundeala. Over time, the Sundeala has, shall we say, "moved". When I built the fiddle yard board, the edges matched perfectly but I hadn't realised just how much sag there was a foot or so back from the edge. When I laid the track, I was faced with either a big dipper type structure or a very definite downwards kink. To resolve this, I removed the end panel - 4 inches or so - and sanded the remaining Sundeala where the track was laid to create a more gentle transition. A further advantage was that, at present, I can still hinge up the left hand board to access the point motors etc, underneath but to do so, I have to split the tracks at this void. You will see that a few of them don't exactly present a snug fit at the joints. Once I'm all set and confident I won't need to flip the board again, the void will be properly bridged ………………. :cool wink
'Petermac
Posted
Full Member
Thanks again… damn you!! :thud
Michael
Posted

Site staff
Ron
NCE DCC ; 00 scale UK outline.
NCE DCC ; 00 scale UK outline.
Posted
Full Member
As I said, I seldom run more than one sound loco at a time, my enjoyment coming from listening to that particular locomotive. Other locomotives on "standby" tend to be parked somewhere gently simmering until called up. I will occasionally have a couple chugging round and round whilst I do a little shunting in one of the yards but not often. To really enjoy sound, you do have to listen to it.
'Petermac
Posted

Full Member
Great sound on the V3, it's an excellent install job by Paul and those 3 Cyl locos with their 6 chuffs a cycle make a GWR man suffer some serious "Chuff Envy". I'd also agree with your highlighting of another benefit of smaller layouts. 2 Locos running at one time is plenty for me so I'm close to going "all in" with my various sound conversions now.
Regarding quality, a key variable when comparing installs is the speaker used. The V3 has plenty of room for a big speaker in the bunker and that shows through in the richness of sound you've got. I had an interesting experience with my Dean Goods which I bought with sound on board. Plenty of room in the tender for a speaker but OR supplied the tiniest, tackiest one they could find (IMO). When I swapped it out for a decent speaker the change was nothing short of dramatic.
In my favourite little tank engines, you have to make do with a smaller speaker and this limits both volume and sound quality compared to larger speakers.
I've been following the drama of the Rails/ Dapol Terrier and was amazed to find they've put in a tiny speaker crammed into the side tank, so far I've yet to hear a decent sound recording of this model, see for example this latest Hornby review, all hiss, squeaks and steam but no bass:
https://youtu.be/279yU-b_Qe0
Then listen to the real thing here, spot the difference!
LB&SCR No. 55 'Stepney' - Brake van ride Bluebell Railway
https://www.youtube.com/watch?v=H8qsKAr6ptY&t=48s
 Last edit: by Colin W
Posted
Site staff
Ron
NCE DCC ; 00 scale UK outline.
NCE DCC ; 00 scale UK outline.
Posted
Full Member
Posted
Full Member
What time I have spent on the layout over the past few weeks has been spent underneath the boards adding droppers here and there and generally tidying up or re-wiring the existing maze of wires. The previous owner bought some ready made modules and joined them together but didn't remove the old wiring. This obviously left somewhat of a tangle of redundant wires which I'm attempting to remove and replace - in between the odd bit of "testing" of locos and sound chips.
This latter chore, being far more enjoyable than the initial one, has taken up rather more of my spare time than it ought to have done ……………………….. :roll: :roll:
On the construction side, I have started to add the incline which will serve the high level boards. The gradient is, near enough, 1 in 50 which thus far, hasn't posed any problems to any of my locos although I haven't tried it with a 14 coach train as yet !!!
The incline is single track, originally intended to be a branch line serving a small rural terminus (shades of the ubiquitous GWR branch line spring to mind). Mostly temporarily chocked up at the start of the grade :
Because the incline will be above open ground with a substantial drop below, I decided to add some side panels for safety. These will be hidden from view by the upper level (note to self - must remove that ugly stain from the wall - old glue I think) :
At about 5ft into the incline, I could almost clear stock on the lower level. I have another 4 or 5 feet of rise on this side then rising the whole of the other side of the 20ft unit. It should therefore, befairly easy to reach the storage roads you see here under the high level boards :
My intention was to make an embankment from expanding foam before reaching the "closed" section but I'm not fully decided on the structure of the embankment yet :
My next dilemma is, do I continue with the idea of a rural branchline or in fact, make the whole thing urban ? John Dew's Granby really impresses me and I'm not totally convinced that a rural branch line, in the available space, would have the impact I'd like. Maxmill 1, you may recall, had over 30 ft of length - 50% more than I have now. I had intended entry to the "rural" setting to be via Doug's mill - "rescued" from his Bears End layout and now residing "Chez Petermac" awaiting incorporation.
I suppose I could still use the mill in an urban setting as a sort of "industrial" relic although it does lend itself to more of a rural setting ………………………….. :hmm
'Petermac
Posted

Full Member
Ha! Thanks for that Colin. Asthmatic wheezing compared to the real thing. Decent speakers (or even 2) and a proper enclosure makes a big difference (no matter what decoder). If possible some acoustic foam in the enclosure helps.Peter,
Great sound on the V3, it's an excellent install job by Paul and those 3 Cyl locos with their 6 chuffs a cycle make a GWR man suffer some serious "Chuff Envy". I'd also agree with your highlighting of another benefit of smaller layouts. 2 Locos running at one time is plenty for me so I'm close to going "all in" with my various sound conversions now.
Regarding quality, a key variable when comparing installs is the speaker used. The V3 has plenty of room for a big speaker in the bunker and that shows through in the richness of sound you've got. I had an interesting experience with my Dean Goods which I bought with sound on board. Plenty of room in the tender for a speaker but OR supplied the tiniest, tackiest one they could find (IMO). When I swapped it out for a decent speaker the change was nothing short of dramatic.
In my favourite little tank engines, you have to make do with a smaller speaker and this limits both volume and sound quality compared to larger speakers.
I've been following the drama of the Rails/ Dapol Terrier and was amazed to find they've put in a tiny speaker crammed into the side tank, so far I've yet to hear a decent sound recording of this model, see for example this latest Hornby review, all hiss, squeaks and steam but no bass:
https://youtu.be/279yU-b_Qe0
Then listen to the real thing here, spot the difference!
LB&SCR No. 55 'Stepney' - Brake van ride Bluebell Railway
https://www.youtube.com/watch?v=H8qsKAr6ptY&t=48s
I'm also a fan of sound, especially on a small layout.
Nigel
©Nigel C. Phillips
Posted

Full Member
I think thats great progress on Maxmill. I know how tedious re wiring can be and your purchase certainly won awards for complexity and redundant circuits.
The gradient is looking very promising and thats a good height you have achieved for the storage yard……you wont regret that when operating. How gentle is the curve at the top and does the 1:50 gradient continue? Its the combination of both incline and curve that can cause trouble. However my bank is 1:40 at best :roll: and there is a moderate curve at the top. Only my 7' long coal train stutters at the summit……and thats when the banker at rear does its bit. :lol:
I think the mill will look great incorporated in the branch. In the early sixties I used to do car rallies around the Pennines. I remember being surprised how quickly you would drive out of a gritty Mill town (Hebden Bridge or Todmorden for example) into very nice Pennine scenery climbing to Moorland before running down into the next town nestling in a valley
Best wishes
John
Posted
Full Member
I tried the gradient again last night, this time with 11 coaches hauled firstly by a Bachmann V3 and then by my latest Bachmann K3 locomotive. Both climbed the 1 in 50 with ease. In then tried them starting with everything just fitting the gradient I'd completed. No problem at all for the V3. The K3 also did well after some initial slight wheel spin.
I'm very happy with those results. An 11 coach train takes up around half the available length in the unit so will never be a reality. Once I have the full length of the gradient installed, I might hook up further coaches just to see what the limit is.
If you remember the unit John, the branchline will climb for the length of both sides - 20ft each - but be level at all 4 corners and across the ends. Hopefully, that will reduce the drag created by a combination of grade and corner.
Each corner has to turn through 90deg. so I'm thinking of using 4th radius set track for the actual corner piece. I think that has a radius of around 22 inches …………….. :hmm Two of these corners will be hidden by buildings/scenery and the other 2 can be disguised somehow or other - I hate seeing tight corners where coaches appear to head off at a tangent at the apex of the curve.
I'll cut some test formers today to check exactly how much space I'll need for the corners but I suspect it will require around 2'6" for each. This will of course, reduce the effective length for the gradient to around 30 ft in total. At 1 in 50 that should give me a clearance of slightly under 7.5 inches over the storage roads. I think that ought to be manageable.
'Petermac
Posted

Full Member
It sounds like you’ve cracked your gradient issue rather well, 11 coaches being a goodly amount. How about continuing the incline up and over the line by forming a tunnel in one of those corners, possibly with a lift out section when the inevitable Murphy’s Law event happens?
Good luck in completing the incline and getting the trains running.
Bill
At 6'4'', Bill is a tall chap, then again, when horizontal he is rather long and people often used to trip over him! . . . and so a nickname was born :)
Posted
Full Member
One of the corners will be hidden by industrial buildings - a mill or warehouse type structure so that won't present any problems. Another will form a viaduct over existing buildings etc. but the remaining 2 will, unfortunately, be visible although not particularly prominent. Neither of these locations will be suitable for a tunnel because of the lower level "scenics". I'll come up with some kind of cunning plan ………………………… :lol:
'Petermac
Posted
Full Member
Michael
Posted
Full Member
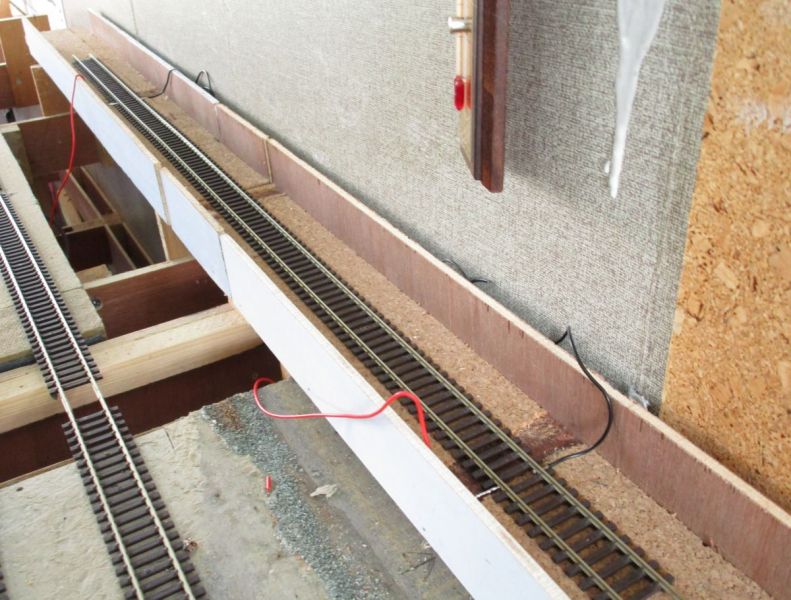
The dropped baseboard section is a lifting flap. The three tracks (double track main and single track climbing to the high level boards) cross a river/canal at this point as does the higher level. The low level will utilise a conventional plate girder bridge whilst the higher level single track will utilises a slightly curved viaduct. (ideas shamelessly stolen from both John Dew's Granby and the late Dave Shakespeare's Tetley Mills).
All the cut track ends are soldered to copperclad PCB and flap/bridge alignment is by cupboard type catches (again, shamelessly stolen from Sol) plus a removable 6" nail which is a tight-ish fit into a pre-drill hole.
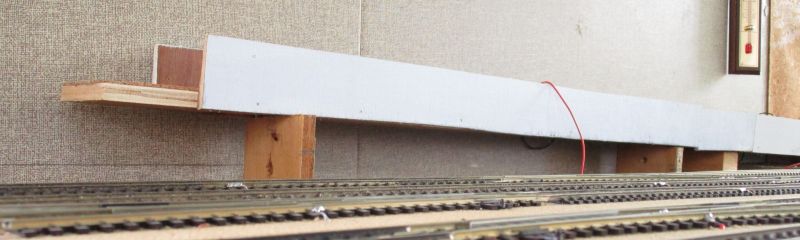
The skeletons of the bridges are done as here:
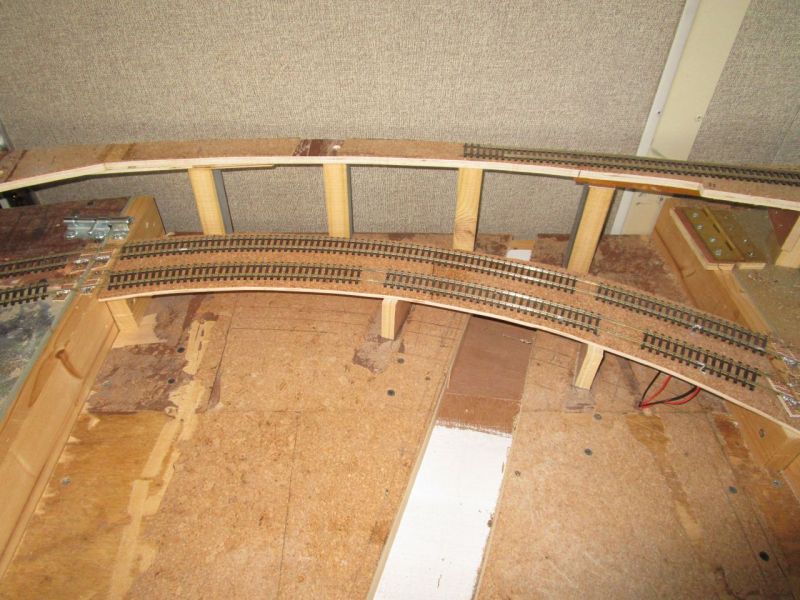
The viaduct hinges to the left whilst the main flap hinges to the right. I almost need a pre-launch checklist to ensure everything is done in the correct order !!
At this point, I'm half way round the unit with the gradient. The track is level at both ends of the unit (where there are 90deg. corners) but climbs at 1 in 50 on the remaining 2 sides. Given that ultimately, the clearance between the two levels will be double what you see here, I'm pretty sure I'll have plenty :

My plan is to clad the viaduct skeleton with card, forming the arches and side walls in the process. The lower level track supports will be hidden by trackside/canalside warehouses/factories etc. All the buildings sited on this section will be removable to enable the lifting flaps to operate.
'Petermac
Posted

Full Member
Phil
Posted

Full Member
Barry
Shed dweller, Softie Southerner and Meglomaniac
Posted
Full Member
It's looking good though, I am sure that once scenery construction is underway it will look great. I do envy your space and what you are doing with it and admire the planning involved. It's going to be a super layout!
Michael
Posted
Full Member
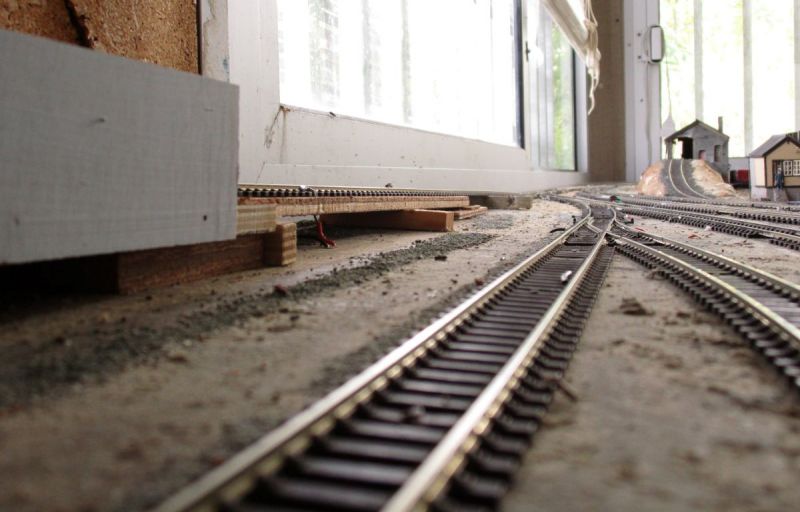
River/Canal? Looks as though you are already committed to a canal…….is that a lock foundation at the end? I think they make a great feature…….. you may recall that I had a lot of fun researching mine with the help of Richard (Wheeltapper).
You may have thought of this already but if not could I suggest you create a removeable sub layer on which to permanently mount the buildings that will be placed in front of the bridge? It will save a load of time and avoid damage.
You must be very pleased with this progress after the assorted frustrations you have encountered.
Best wishes
1 guest and 0 members have just viewed this.