00 Gauge - Maxmill Junction
Posted
Full Member
Petermac's Railway
You are moving along very well Peter. Good to see it all taking shape now. You have certainly made a great job of integrating Pudding Lane into the rest of the layout. If that left hand tunnel is proving to be too much of a hassle, you might try replacing it with a slightly larger diameter pipe. The one I used is close to scale for the diameter, but the bend is of course, much too tight.As an alternative, I wonder if you have enough room to make that end of the underground loop with a larger radius curve and then reduce the bend on the pipe?
Watching with interest. I trust you will invite us all over for a play when you have trains running???

Posted

Full Member
I've sorted that troublesome tunnel. ;-)
From what I could make out, there were 2 problems.
Firstly, some of the paper lining was coming away - probably some damp from somewhere when it was in storage here. I stuck that down OK with Evostick (or UHU - don't remember which)
The other problem I think was, as you say, the very tight clearances within the tunnel.
I think the bottom of the outer archway wasn't sitting down on the base tight enough and the train was catching it half way through the tube.
I solved that by cutting away the bottom outer pipe and re-attaching it with hot melt higher up the white foamboard edging. The flexi-tube now has the inner face as was but the outer face is cut away almost to where you'd cut the hole to see the signal.
This has effectively increased the tunnel diameter although it's hardly noticable from the viewing position. She runs through it perfectly now - at least she did when I last ran it a few days ago …………I've done some more woodwork on the baseboards since then ……….hope I didn't bump anything :roll::roll:
My next challenge with Pudding Lane, should I choose to accept it, is to make up a longer "umbilical" from the "set" to the "box of tricks" so I can bring it to the front of the layout - that beam is starting to hurt ………….:???: Looking at it, there are lots of connections so I may not bother.
'Petermac
Posted

Full Member
Bob
Posted
Full Member
The underground is already virtually there. It has an option for "continuous running" where everything just goes round and round although the sound synchronisation doesn't work in "continuous" mode. You still get all the noises and flashes, but not in time with the train.
Pressing the red bell push on the front of the module sets off the timed automatic sequence.
The station lights come on, the train sets off from the rear of the module, blue lights simulate arcing in the tunnel and the sound of a tube train is heard approaching. There's a fan that blows a (yet to be fitted) bit of tissue paper fixed to the station entrance - just like the draught from the real thing. Then the train slows to a halt with the associated humming sounds of the electric generators and various indecipherable announcements.
That infamous "Mind the Doors" echoes through the station, the signal in the tunnel changes from red to green and the train departs - again accompanied by the "rumble" of tube trains in tunnels and blue flashing from the arcing "live" rail. Although I don't yet have one, a second train would then repeat most of the process on the second platform before the system shuts down to "re-charge" for the next run.
I wish I could say I'm clever to have devised it all but every scrap of credit goes to Geoff R (of Mangarth fame) - the "electronics genius" and builder of the module from whom I bought it.
The trams will not be anything like as clever but, if I can get overhead power collection to work well enough, it's a simple "mechanical" operation (more my scene) to get a tram to stop and then be triggered off again by a second tram bringing up the rear - and so on. Otherwise, I could perhaps learn about electronic timers and "halt" modules ………..:roll::roll::roll:
The overland will be me …………………….:cheers:cheers
'Petermac
Posted

Full Member
Otherwise, I could perhaps learn about electronic timers and "halt" modules ………..:roll::roll::roll:
Many moons ago, I wanted a circuit that would gradually dim the lights in my bird room, as some of the canaries and the Chinese Painted Quail would get in a right state if 'sunset' happened abruptly.
After much head scratching and a few 'sploded' power I devised a foolproof method involving a length of catapult elastic, two small paint-tins for sand, a box with a sliding lid [think big pencil box]an old flat-iron, a brass toggle-type light switch, a sash pulley and a length of knotted cod-line.
Method….
Swap the empty bucket for the full one thus pulling on the switch and raising the shutter on the box wherein lay the 40 Watt bedtime light. Allow the sand to run through the hole in the bucket [filling the empty one on the floor beneath] causing the shutter to slide down, the switch to eventually click off under the weight of the flat iron…..
So? Your railway room is quite high up and I am envisaging Maxmill Tramways Corp controlled by a length of nylon line, rove through several pullies to a weight out of the window together with a series of toggle switches tied to the main line at appropriate points……..
I have to go now, as the nurse has told me to take my little yellow pill and drink my nasty medecine……
Doofer[Emmet]Dog
'You may share the labours of the great, but you will not share the spoil…' Aesop's Fables
"Beer is proof that God loves us and wants us to be happy" - Benjamin Franklin
In the land of the slap-dash and implausible, mediocrity is king
"Beer is proof that God loves us and wants us to be happy" - Benjamin Franklin
In the land of the slap-dash and implausible, mediocrity is king
Posted
Full Member
My next challenge with Pudding Lane, should I choose to accept it, is to make up a longer "umbilical" from the "set" to the "box of tricks" so I can bring it to the front of the layout - that beam is starting to hurt ………….:???: Looking at it, there are lots of connections so I may not bother.
Do you just want to move the main control box, Peter?
If so, all you need is an extension lead between the two halves of this connector:-
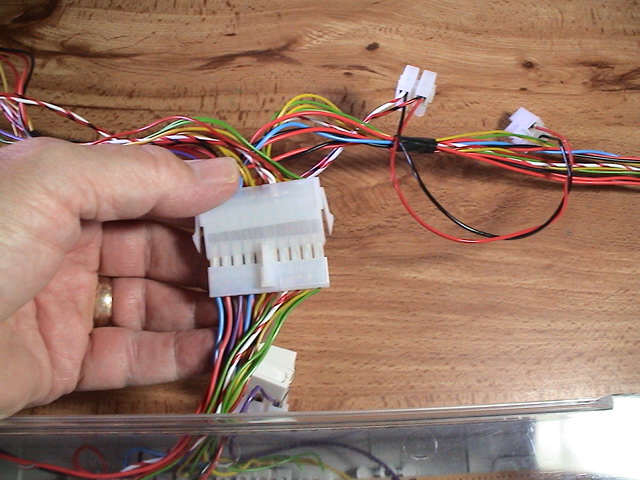
If you tell me what length you need, I will make one up and send it to you.
Posted
Full Member
Geoff, it is just the control box I'd like to move. If you're serious about making one for me, that would be fantastic. :pathead:pathead
I'll measure it up tomorrow and let you know. :cheers Do you still have the wiring plan available or should I identify those too ?
'Petermac
Posted

Full Member
Posted
Full Member
Yes, I am serious. I do have the wiring plan still, but it is not really necessary as it is just a one to one connection needed across a pair of matching plugs and sockets. I know that I have used different size and colour wires, but I can make the umbilical universal - a bit like a mains extension lead, but with more wires!Geoff, it is just the control box I'd like to move. If you're serious about making one for me, that would be fantastic.
I'll measure it up tomorrow and let you know. Do you still have the wiring plan available or should I identify those too ?
Posted
Full Member
The extreme right hand track is fixed as is the right hand "Y" point. The next left is fixed to within a yard of the "Y" but I need a large diamond crossing before I can join it all up. The two tracks on the left are just there to see how the curve looks going off to the low level circuit. The missing sleepers at the joints will be replaced with dummys when I'm happy with everything.
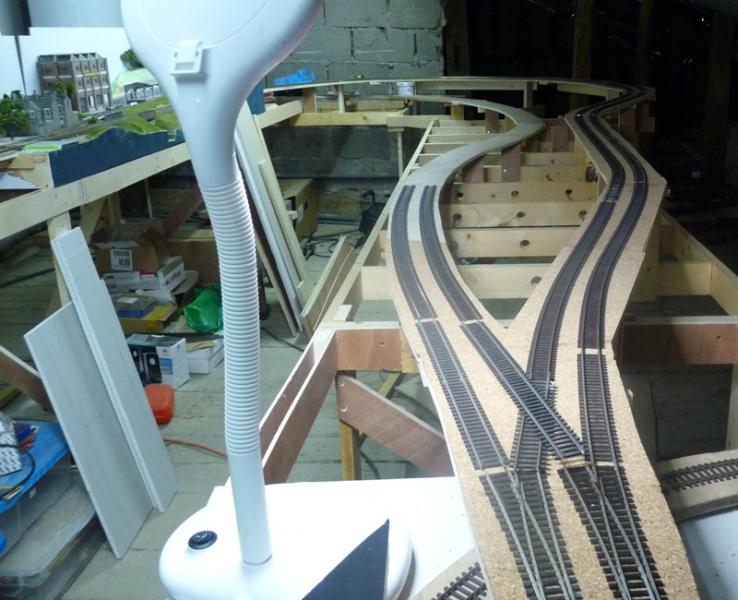
I've had a Class 47 and 6 Pullman coaches up the bank without it even realising it's not level. The grade is a tad over 1 in 80. The curves are slightly tighter than I'd hoped and in the odd place, are down to 3ft radius but in the main, it's a 4ft radius on the bank.

'Petermac
Posted

Inactive Member
Are those spaces between the right of way and the edge of the framework going to be hillsides?
Max
Port Elderley
Port Elderley
Posted
Full Member
At least that's the plan ……………
'Petermac
Posted
Full Member
You may have problems finding the right shaped 'diamond' but you can always cut them I suppose.
Posted
Full Member
According to the Peco track design possibilities on the back of their paper templates, this junction is made up of 2 x large "Y" points and a long diamond. Until I get the diamond, I don't know exactly how it will work out - hence not fixing the second "Y" nor any of the other 3 tracks yet. As it is, there's only 1 track and 1 "Y" fixed in place.
I suppose I could print off the paper templates and see how it looks (good thinking !!! :roll::roll::roll:).
We'll see ………………………..:roll::roll:
'Petermac
Posted

Full Member
ps. I herd that a certain pair of A4s from overseas are due to arrive at shildon next week.:cool:
Busy building a new show layout …..
www.westcoastminiatures.com
www.westcoastminiatures.com
Posted

Full Member
Wayne
Posted
Full Member
Thanks Wayne. :thumbsBoy Peter, that is looking great. Don't suppose you could work in a small waterfall anywhere. :lol:
Wayne
I'm waiting for you to do your Niagara before I do mine ……….:roll::roll::roll:;-)
I have an idea to have a rock face at the far end (where the two levels cross) with a waterfall coming down the face at the start of the river. The river would be fairly shallow at that point - a sort of "babbling brook" with lots of stones and boulders in the bed before being backed up by the mill wier :hmm
Perhaps not very prototypical of a UK scene - more in line with your side of the pond - but it might look good. I'll read your tutorial when you've done yours ……………:cheers
'Petermac
Posted
Full Member
That must be "Dwight D" and "Dominion of" Dave ……..:roll::roll:The peco templates are reasonably accurite Peter. Remember when I built most of potters before I laid any track …… ;-)
ps. I herd that a certain pair of A4s from overseas are due to arrive at shildon next week.:cool:
Unfortunately, I'm not over until later in the month. How long are they staying at Shildon ? Surely they'll also make a visit to York.
With any luck, I might get to see them somewhere ………………:cool wink
'Petermac
Posted
Full Member
Busy building a new show layout …..
www.westcoastminiatures.com
www.westcoastminiatures.com
Posted
Full Member
Busy building a new show layout …..
www.westcoastminiatures.com
www.westcoastminiatures.com
1 guest and 0 members have just viewed this.