00 Gauge - Maxmill Junction
Posted

Full Member
Petermac's Railway
Hey Peter…….you've done this before:lol:It's coming together nicely, my only criticism……those concrete blocks are a little out of scale:lol:
Phil
 Last edit: by Phil.c
Phil

Posted

Full Member
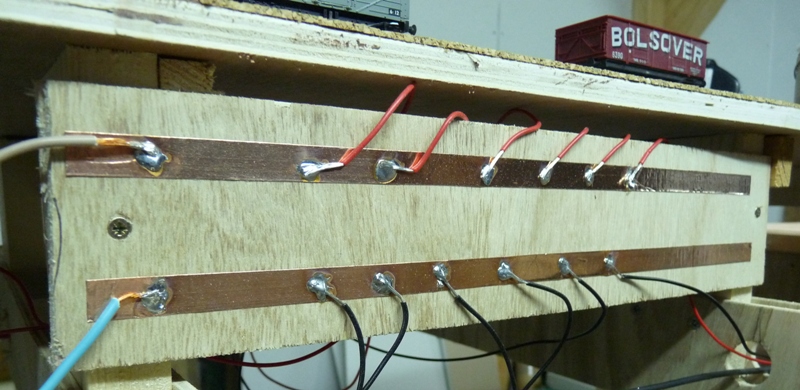
I've borrowed half an idea from Geoff (of Mangarth fame) for my "bus" wires. Having read, and experienced, the difficulties of soldering droppers under the baseboard, Geoff suggested I tried copper tape along a convenient horizontal section of the frames and soldered my droppers to these.
Copper tape isn't particularly cheap so I use 2 short lengths, mounted vertically and centrally on each frame. These short lengths are linked by lengths of flexible 1.5mm wires from frame to frame and the droppers are simply soldered to the copper tape - easy-peasy. :cool wink
The "panels" will be hidden by removable scenery depending on what the landform ultimately will be.
'Petermac
Posted

Inactive Member
Max
Port Elderley
Port Elderley
Posted

Site staff
Ron
NCE DCC ; 00 scale UK outline.
NCE DCC ; 00 scale UK outline.
Posted
Full Member
I did have some difficulty posting the shot - it was in the gallery but didn't appear to transfer to the post. It sort of "flashed up" then disappeared. I clicked "Send" and checked the result but the photo wasn't there. All the rest were done using "Edit" to try to get the shot to print. It appears they were there but didn't show on my "Preview". :???::???::???:
I wonder if this was the sort of problem Ben Alder was getting so annoyed about. It has happened to me before but I just put it down to me.
Clean up squad on the way ……………..:thumbs
'Petermac
Posted

Banned
Just read your thread and it's good to see/read about its progress. Have you a detailed track plan of the whole layout, apart from the basic diagram shown earlier in the thread ? It would be good to see. As for your copper board bus wires, have you thought about using a 2nd hand length of flexi-track ?
Cheers, Gary.
Posted

Inactive Member
Ken
'It don't mean a thing if it ain't got that Swing'
Posted
Full Member
Thanks Gary. :cheersG'day Peter,
Just read your thread and it's good to see/read about its progress. Have you a detailed track plan of the whole layout, apart from the basic diagram shown earlier in the thread ? It would be good to see. As for your copper board bus wires, have you thought about using a 2nd hand length of flexi-track ?
Cheers, Gary.
A detailed track plan ? Yes I have but it's in my head - untill I discover how to take a wscreen shot of my brain, I can't do m,uch about that one. :roll::roll::lol::lol:
I do have a rough idea about where I'm going with it and have been trying to persuade myself to buy Anyrail. If I do, then I'll do the plan.
I'd never thought about using track as the bus - a good idea but with one slight drawback - I find it incredibly difficult to clean old rail enough to do a half-decent solder joint. The thoughts of constantly trying to get the rails clean enough would tend to put me off. I even try to use new track rather than re-cycled stuff for the layout for that very reason. How do you clean yours ?
'Petermac
Posted
Full Member
I'll try to work on a track plan at which point, it might make more sense to you all …………..:roll:
'Petermac
Posted

Full Member
Hi Peter,
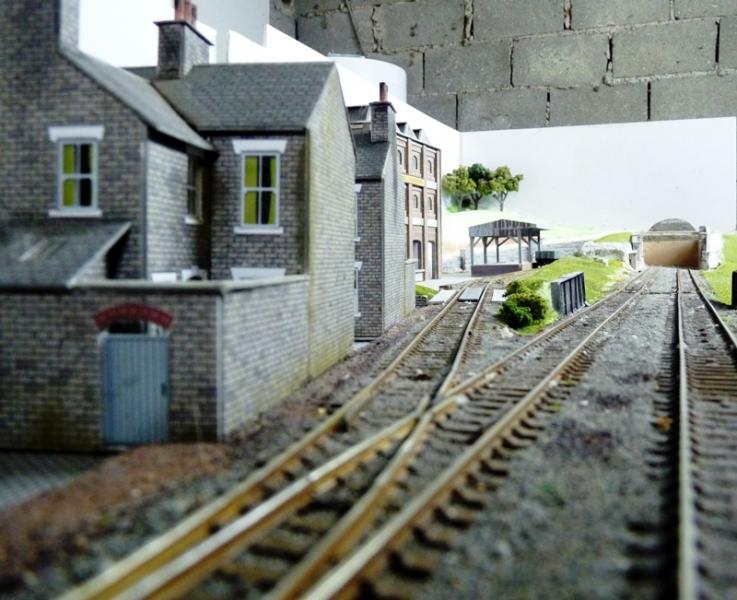
Love the detail work in the embankment walls, that drivers eye view certain looks great to me.
Totally thumbs up work.:doublethumb
Cheers Mike.
Jusswoteesed! And I love the 'squiggle-in-the-middle', was there a reason or have I missed that bit?
Doug
'You may share the labours of the great, but you will not share the spoil…' Aesop's Fables
"Beer is proof that God loves us and wants us to be happy" - Benjamin Franklin
In the land of the slap-dash and implausible, mediocrity is king
"Beer is proof that God loves us and wants us to be happy" - Benjamin Franklin
In the land of the slap-dash and implausible, mediocrity is king
Posted
Full Member
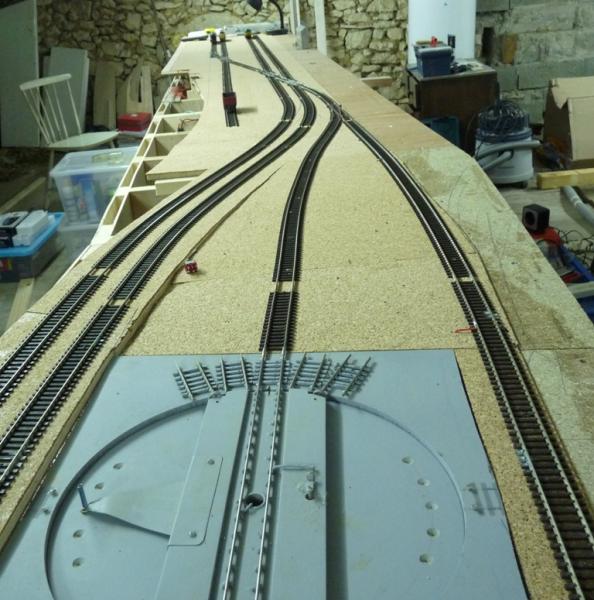
Regarding the "squiggle", I presume you mean the curve in the trackwork between the "module" and the station area at the far end………..or even the fact that the boards are not in a straight line.:hmm
If it's the track, that's just to get the tracks from the rear where they exit the station to the front where they were on the module.
If it's the frames themselves, access to the railway room will be at the station end from the right. This "module/station" area will be a peninsular some 3" higher than the lower "Junction" boards.
The "Junction" boards will offer a complete roundy-roundy - running both to the left of the peninsular and along the plasterboard wall to the right.
The extra space offered by the left shift of the far end boards will be for easier access and to walk around the far end to the operating area. In the foreground, the boards are parallel to the plasterboard wall on the right and will allow (fairly tight) access to the 2ft wall mounted lower level circuit.
The idea is that I can have a couple of trains running round on the low level (whilst I sip my Chateau Laffite) or, whilst these are running, I can also do some independant shunting on the peninsular - should the mood grab me …………:roll:
If I do manage to get a track plan up and running, my ideas will become clearer.
'Petermac
Posted
Full Member
Doug
'You may share the labours of the great, but you will not share the spoil…' Aesop's Fables
"Beer is proof that God loves us and wants us to be happy" - Benjamin Franklin
In the land of the slap-dash and implausible, mediocrity is king
"Beer is proof that God loves us and wants us to be happy" - Benjamin Franklin
In the land of the slap-dash and implausible, mediocrity is king
Posted

Legacy Member
Posted
Full Member
Like Shakespeare's Cassius, I tend to "think a lot" ……………………:cheers:cheers
I'm trying to create an illusion of space. I was inspired by both Rick Gwiwer's and John Dew's layouts and of course, by "Tetley Mills" for the industrial flavour.
The only "crowded" areas (train-wise) will be the two stations - Maxmill Town on the higher level and Maxmill Junction lower down. The rest will be scenic but with an industrial flavour. Lots of cameos in the future hopefully ………………….:roll::roll:
'Petermac
Posted
Banned
The way I clean my old track is to wipe the rails down with an automotive thinner to remove paint etc, but choose carefully as some thinners my do nasty things to the plastic chairs. Always test first. If the track has ballast stuck to it, I wash it down with water as majority of the time I use PVA to adhere the ballast. If it will not remove easily I rub a light wire brush over it to remove any excess build-up. Occasionly, this may leave marks on the sleeper surface, but this track could be used in hidden sidings or in yards where ballast covers most of the sleepers and will not be as noticable.
If you find it difficult to clean an area to solder to, use a small wire wheel in a Dremel or similar tool. As this is in regards to the bus wire, it does not matter if some sleepers are removed to clean a/several soldering point/s.
Cheers, Gary.
Posted
Full Member
It's not an MPD but I might install a single road engine shed for housing the yard shunter.
Excuse the mess surrounding the layout - Liz hasn't had time to get up there to do any cleaning up yet…………..:roll::roll::roll::cheers
The "Maxmill Engineering" works with the loading dock. Still most of the scenery to attack as yet but I'll get around to it in due course:
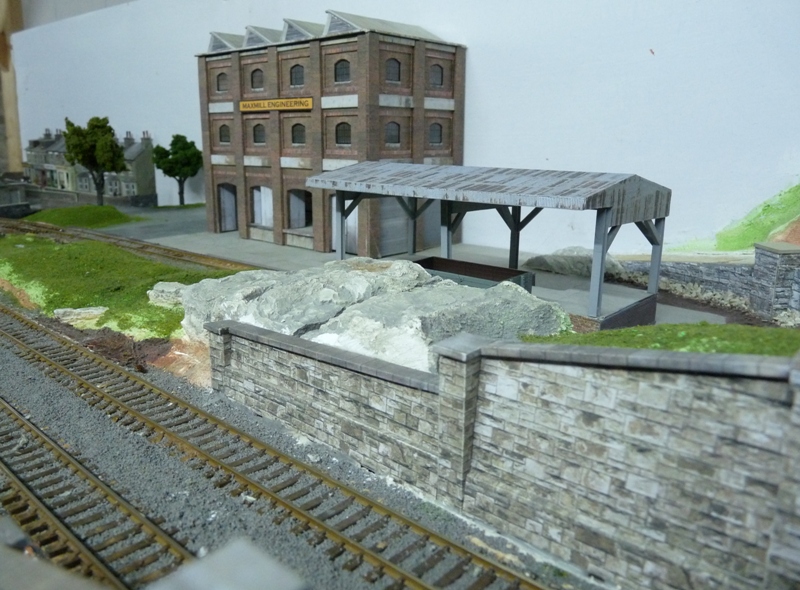
The works siding leaving the down line. Still all the fencing to do - particularly where the houses are.

Another shot looking towards the works from the main lines.
'Petermac
Posted
Inactive Member
Track code changes can be made using metal joiners. I know, heresy - but needs must. Flatten one side of a Code 100, slip it on to the Code 100 track and then slip it under the Code 83 and solder it in place.
Max
Port Elderley
Port Elderley
Posted
Full Member
Phil
Phil
Posted
Inactive Member
Ken
'It don't mean a thing if it ain't got that Swing'
Posted
Full Member
Thanks also for the tip on joining different code rails Max - the problem here is that the Code 80 (?) is already fixed to the turntable so it's either a case of making a join further back or filing the Code 100 down so it meets at the turntable edge …..:hmm
Phil, if you've noticed the junk lying around the attic, you'll realise "clean" isn't my thing ………………;-) I'm always impressed by good weathering and agree that, done properly, it adds a lot of realism. I try to read as much as I can on the subject but don't feel competent enough yet to have a go at some of the more expensive rolling stock. A Metcalfe house or two is no great loss if I make a pig's ear of it …….
Ken, I assure you, there's been no "rush". Other than a bit of time spent very recently on the baseboards and track laying, progress has been pitifully slow. The "Maxmill Module" bit was half built for the Cornwall show a couple of years ago and has hardly been touched since. I have basically posted as I've done it - that way, I can benefit from "live" comments and correct any errors you "experts" spot before they become major issues. Modelling on your own, one can often miss the woods for the trees …………:roll:. I find it invaluable to have "outside" advice from those who've done it all before.
Now that I've got to this stage, I'm keen to cash in and get on with the rest of it. I also now have a little more spare time than I've had over the last few years so hopefully, progress will be a little more noticable.
Having said that, you can still send the Epsom Salts - just in case ………….:cheers:cheers
'Petermac
1 guest and 0 members have just viewed this.