00 Gauge - Maxmill Junction
Posted

Full Member
Petermac's Railway
OK chaps - many thanks for your input, all of which has been taken on board. :thumbsIf I could "do" photoshop Matt, that would be an easy solution, however, I can't so that's no good ……………

I took a couple of rushed photos of the single rising track so you can better understand the problem facing me. This shot (the only one of the "couple" I bothered to post
 ) is from slightly further back than the earlier one and from that "higher level" I mentioned. The 3 tracks disappearing centre bottom are the main through routes into the station and that swinging off left serves the rear platform. Once under the board carrying the station building, it is completely underneath the gradient track extreme left. The 2 bunches of wires you see adjacent to the throat points are the Megapoints servo controllers feeding the motors used in this area. You can see just how little space there is between the shed wall and the retaining wall. The rear platform track will have to go into a tunnel almost immediatelt it leaves the main lines so, at that point, I'll have slightly more area covered although I'm not sure what I'll use for landform between that track and the 3 main lines - there isn't a heap of space ! I may just manage some terraced house backs along the shed wall with little more than a footpath behind them before the 30ft drop down the retaining wall. A factory wall, built on top of the retaining wall however ………………….. :hmm :
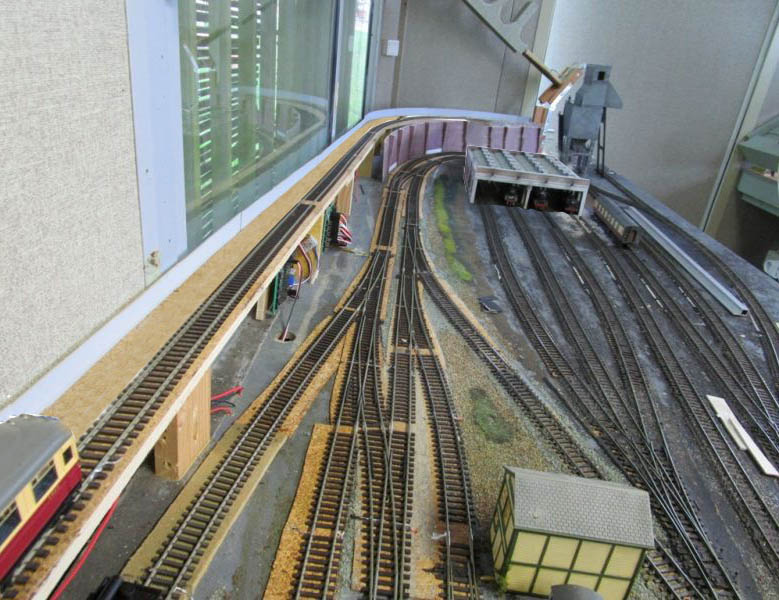
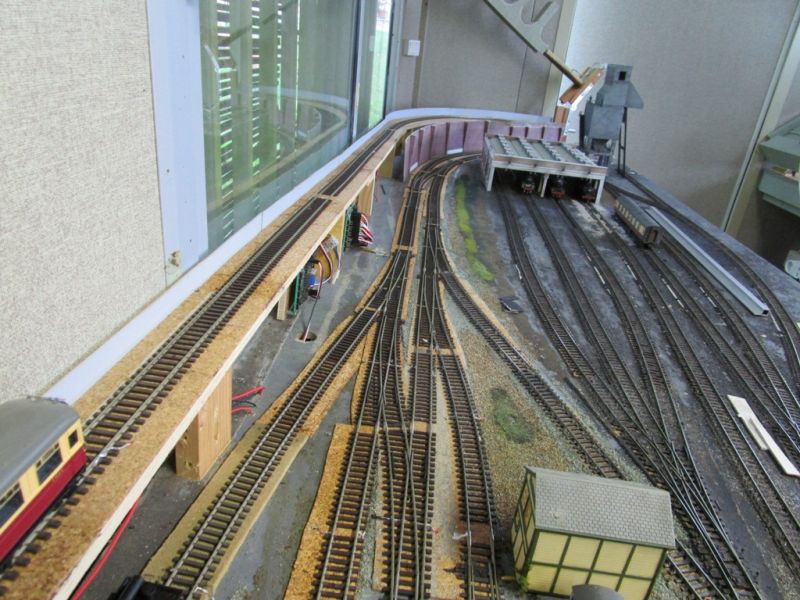
'Petermac

Posted

Full Member
 Last edit: by Phil.c
Phil
Posted
Full Member
Yes, it would be possible to move the single track to the edge although I doubt it would make a huge difference, not in housing terms anyway. The trackbed it sits on is only about 3 inches wide, if that. If anything, I'd have thought it would be better to move the track closer to the back wall so that the disguising houses could be a tad further away from that drop onto the tracks below the retaining wall. Remember also, this track is rising all the way. It's level with the retaining wall about half way along its current length so it would be quite a drop at this end …..
I admit to being confused by your comment about moving the engine shed. When you say "move the engine shed forward", do you mean towards the camera position or towards the operator's position on the right ?
Again, moving it closer to the camera position wouldn't do anything positive - the main lines curve around behind it so I'm not sure I understand what I'd gain…… :roll:
'Petermac
Posted
Full Member
I would move the single track nearer to the wall because that would make distance between the trains and the houses, even though it's just a small amount it would create depth, as for the engine shed move, I moved it towards the camera because you mentioned that there was very little room where the tracks are behind, I just thought your comment meant, not much room for modelling etc?
If you need me to PS something to see what it looks like, let me know, but it would depend on what photographs I can find, for example houses at the right angles etc. The pictures don't need to be spot on as PS allows bending, streching and warping.
Phil
Posted
Full Member
Sounds like my attempts at springing out of bed…bending, streching and warping.
Cheers Pete.
Posted
Full Member
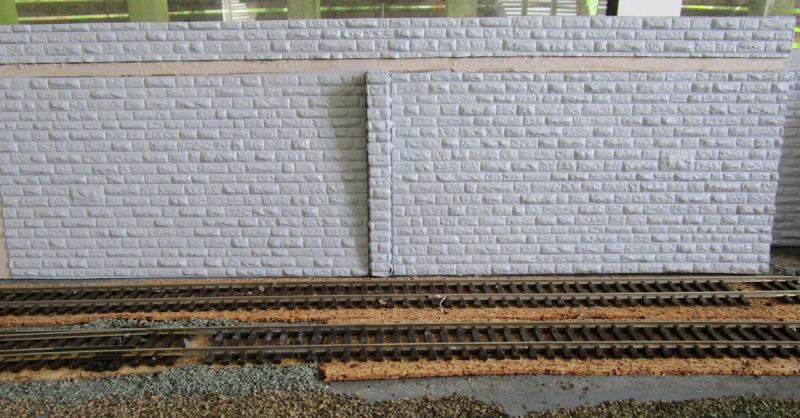
I want my stone retaining walls to look like those filthy sooty walls in the industrial north in steam days. (GWR modellers please look away ;-))
My starting point is Slaters "O" Gauge stone plasticard primed with rattle can grey acrylic primer. I do have an as yet unused airbrush but think maybne hand painting/washing is the way to go:
Usually with me, everything looks just passable until the paint arrives. Then everything goes to pieces.
I have read about how you did your beach wall on Teasel Bay Chris but that's not the effect I'm after.
Any hints and tips chaps ?
'Petermac
Posted

Full Member
Plenty of filthy sooty walls on my GWR layout
. Although, sadly, I have never quite captured the grimy look that I remember so well from mill towns on both sides of the Pennines. Tetley Mills and Pen y Bryn are two layouts which I think do reproduce it accurately. Hopefully I can do better when I get round to the long wall that will finish off the hotel/town square module….all those Wills packs are still languishing in the drawer:oops: Bearing in mind the above I am not sure how useful my painting advice will be!:roll: ……anyway this is how I will be doing it
Spray the entire wall with paint that is a shade or two darker than the desired finish
Paint the courses with diluted mortar colour. Dont worry about paint getting on the stones, before it dries brush it off with water……..hence the base paint being initially darker than required.
Now the tedious part……you can dry brush some area with variations of the base colour…particularly the foundations but many of the stones should be picked out individually in a variety of shades
I would then finish it off with some weathering powders
Good luck…..I look forward to seeing the finished product!
Best wishes
Posted
Full Member
Many thanks for your tips on painting the walls. I had in fact assumed it was better to base paint lighter than finished colour on the premise that it's easier to darken than lighten. Obviously not……..
I had planned to do the base colour then dry brush the "soot". I read the Tetley Mills thread again but coildn't see any details about his paint scheme. Sadly of course, I can't ask him ………
If you're about to do yours, we can at least compare notes. I'm practicing on a spare piece of plasticard which should prove interesting.
'Petermac
Posted

Full Member
Michael
Posted
Full Member
I'm not sure Colron dye would stick to plasticard - there's nothing for it to soak into - one can't "stain" plastic…. …………. :hmm
'Petermac
Posted
Full Member
Michael
Posted
Full Member
Posted
Full Member
Posted
Full Member
Cheers Pete.
Posted
Full Member
Good to hear from you again John - hope you're recovering well whilst not suffering too much from the dreadful heatwave in your part of the world. :cheers
'Petermac
Posted
Full Member
Michael
Posted

Full Member
"Anything You Can do, I Can Do Better ! Robinson and Downes. - Scenery, Structures & Transport - RMweb
Last edit: by IanLMS
Ian Lancaster
Please visit my OO Gauge 1930's LMS layout "Jencaster"
http://yourmodelrailway.net/view_topic.php?id=14622&forum_id=21&page=1
Please visit my OO Gauge 1930's LMS layout "Jencaster"
http://yourmodelrailway.net/view_topic.php?id=14622&forum_id=21&page=1
Posted
Full Member
I'll also dig up both Allan's and Tetley Mills threads on here. :thumbs
'Petermac
Posted
Full Member
Hi Peter
To save you time here is Allan Downes answer to the question "How do you weather Wills Random Stone" :
All the stonework used here was WILLS RANDOM STONE SHEETS (SMP 200) where I first brushed them over with COLRON LIGHT OAK WOOD DYE which acts both as a primer and the base colour to the plastic sheets.
Working a sheet at a time, lay it flat then aim a very light dust coat of ACRYLIC MATT BLACK up and under the stone courses but don't over do it.
When this has dried, rub talcum powder well into the joints then scrape off the surplus.
Using the COLRON ENGLISH LIGHT OAK again DAB, NOT BRUSH, this over the stonework with a large FLAT modelling brush where it will soak into the talcum powder and because the dye is corrosive, it will adhere the talc between the courses permanantly.
However, you can use different shades of wood dye if you wish but it MUST be COLRON as this is spirit based and not water based which will just run off the plastic. - oh, and the matt black MUST be acrylic as the dye will not attack it.
I hope this helps but try it out first on a spare sheet.
There were 266 pages in that RMWeb thread :shock: fortunately I didnt have to read every post, in fact I found this in a much shorter thread. It was actually quite fascinating going through the posts. He was the most amazing modeller, such a sad loss.
Now I have to locate a similar spirit based dye in Canada……the local hardware stores dont stock Colron and importing isnt an option……I would imagine that it should be a bit easier for you.
I will be interested to see how you get on
Best wishes
Posted
Full Member
I'll certainly see if there is a similar product available here - like you, importation from UK is somewhat of a minefield here since Brexit. The "everyday" wood dye here is from the Liberon range but I have no idea if they are water or spirit based.
Again, many thanks for digging this up for me and, to all those I suggested Allan used fireclay and not plasticard for his stonework - my apologies, I stand well and truly corrected !
'Petermac
1 guest and 0 members have just viewed this.