00 Gauge - Maxmill Junction
Posted

Full Member
Petermac's Railway
I agree………that is a good base. I am looking forward to seeing the black spray effect. Dont forget to measure the spray angle Allan was a bit casual in his instructions.
I am still struggling to find a spirit based wood dye in Vancouver! :roll:

Posted
Full Member
[user=1120]peterm[/user] wrote:Hi Dr Peter. Would you be interested in writing a paper on the subject?
Writing a paper ? Good Heavens, paper's a bit old fashioned isn't it ? I've moved on since those days and made a whole digital film demonstrating the theory ………………. I'm planning to submit it towards my PhD :cheers

Cheers Pete.
Posted
Full Member
Cheers Pete.
Posted

Full Member
Surprisingly, as painting is one of my least skilled activities, I'm still pleased with the result :
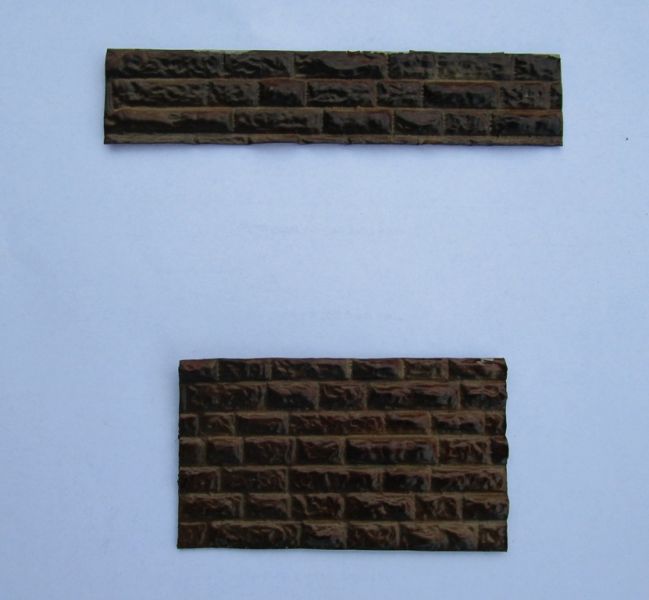
The spray angle was very low but it really is starting to take on tha soot covered look I'm after.
It's the talc next ……………………… ;-)
I ought to add that all these photos are completely untouched - just as they come off a point and shoot pocket camera.
'Petermac
Posted

Full Member
Michael
Posted
Full Member
In Allan Downes instructions as copied from "another place" by John, he said lightly dust with matt black spraying "up and under" the stones ………..
Do you think he meant spray the wall from the bottom which would tend to blacken the bottom part of the stones leaving much of the upper part just the stain colour ?
Thinking about it, rain would tend to wash the soot downwards but conversely, the soot particles would land on the upper part of the stones and stain that area first.
My question therefore is, do I spray "upwards" (from the base of the wall) or do I spray downwards (from the top of the wall) ? I haven't yet found a suitable photograph showing if the bottom or top of these blocks has the most soot ……..
My test pieces look good enough both ways up ……….
'Petermac
Posted
Full Member
I assumed that Allan meant spray at an angle, upwards from the base……thats what I will try……eventually
I like your stage 2 sample……now for stage 3 and the talc!
Posted
Full Member
It would get stuck under the stones if the wall is reasonably high and it’s blown towards the wall. So there would be a variation between the buildups at different height?
 Last edit: by TeaselBay
Posted
Full Member
As I said earlier, rain would wash that soot downwards, perhaps tending to clean the exposed upper surfaces of the blocks.
However, whilst there was usually plenty of rain, the fall of soot would be virtually continuous from engines and domestic coal fires. Those days were exceptionally dirty ………………
I'm trying to find a suitable photo of the real thing to see what actually happened. My memory is just of black………… :roll:
'Petermac
Posted
Full Member
I haven't taken any photographs of my efforts because frankly, there was virtually nothing too see - no difference at all other than a darkening of the overall colour from the 2nd layer of dye over the black "mist". Certainly nothing a point and shoot camera would pick up ……………
Firstly, I'm not sure how I am supposed to rub the talc "well into the joints" - the plasticard is impervious so the talc just sits on the surface.
When I try to "remove the surplus" - everything just drops off leaving a slight chalky colour to the wall. I've tried wiping, blowing, tapping and every other method I could think of to allow some powder to remain in the joints but nothing did so.
Dabbing with a wide, flat brush of wood dye, as I said, simply darkened the whole thing which was strange given that half the "undercoat" was the black "mist" coat …………….
Maybe that's the effect it is supposed to create - just a darkening in which case, why the talcum powder ?
'Petermac
Posted
Full Member
I was going to use a sharpened cocktail stick to rub the talc into the mortar courses
I somehow got the impression that the undercoat of spirit based dye not only coloured the sheet but also made it more permeable for the talc………..alternatively perhaps when you dab on the second coat of wood dye that enables the residual rubbed in talc to penetrate the surface?
I hope Colin will be along shortly….he should be able to advise
I am beginning to feel less irritated by my continued failure to find a suitable dye in Vancouver…..its good to have a guinea pig showing the way!:pedal
Posted

Full Member
I went back to the RMWeb link to see examples of Alan's O gauge weathered stonework and his results are inspirational, so let's not give up so easily.
I reckon that the larger 7mm scale sheets hold the key for accurate talc placement and if I had a Slaters 7mm stone sheet, I'd give it a go, so do persevere Peter and see what you can do.
If after that, the result is still lacking, try posting a question on RMWeb and you should get a hat full of replies.
Bon courage,
Bill
Last edit: by Longchap
At 6'4'', Bill is a tall chap, then again, when horizontal he is rather long and people often used to trip over him! . . . and so a nickname was born :)
Posted

Full Member
"- oh, and the matt black MUST be acrylic as the dye will not attack it." (meaning subsequent application of dye)
So keying into the PS surface after the acrylic coat is not the issue. In fact the acrylic coat may provide the very surface to which talc particles will physically adhere in the grooves.
A good analogy might be how very fine dust and clay sticks like crazy to a clean smooth car surface, holding strongly enough not to wash off with rain once it has dried on. Just simple physical binding at a microscopic level.
So, once you've worked the talc into the grooves, dabbing with further wood stain,(a lighter colour you'll note) in the grooves must wet the talc. Under these conditions in the grooves the less volatile components, glycol ether (~10%) and diacetone alcohol will certainly hang around helping hold the talc there and perhaps help loosely bind it to the acrylic coat.
All sounds plausible and as Bill says, keep at it.
Posted
Full Member
I "dabbed"all over the sheets - the instructions said using a "large flat brush". It hadn't occurred to me that I should only dab in the joint lines. That would work on the horizontals but "large" simply doesn't fit the vertical lines ……
I'll try to acces his thread on RmWeb and see what it looks like close up …….
'Petermac
Posted
Full Member
'Petermac
Posted
Full Member
'Petermac
Posted
Full Member
I'm giving that a try to see if it's better/easier ……………..
I gave a piece of Slaters 7mm stone walling a good covering with talcum powder and then flooded it with the wood dye using a flat brush just laid on the surface. The dye has filled the mortar lines, hopefully taking the talc with it.
Once it's dry, I'll see what result I have …………………
'Petermac
Posted
Full Member
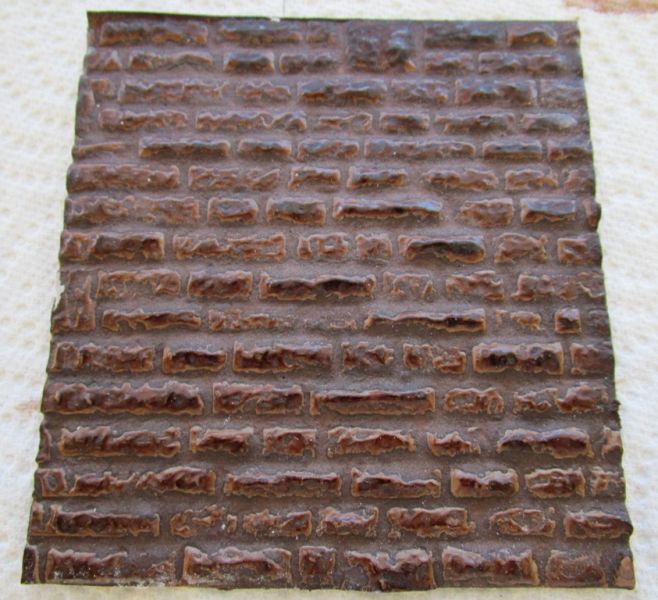
Talc stuck well into the mortar lines:
This, if you can make it out, shows a comparison between the above "new" method (on the right) and the original method (little or no talc mortar visible) on the left:
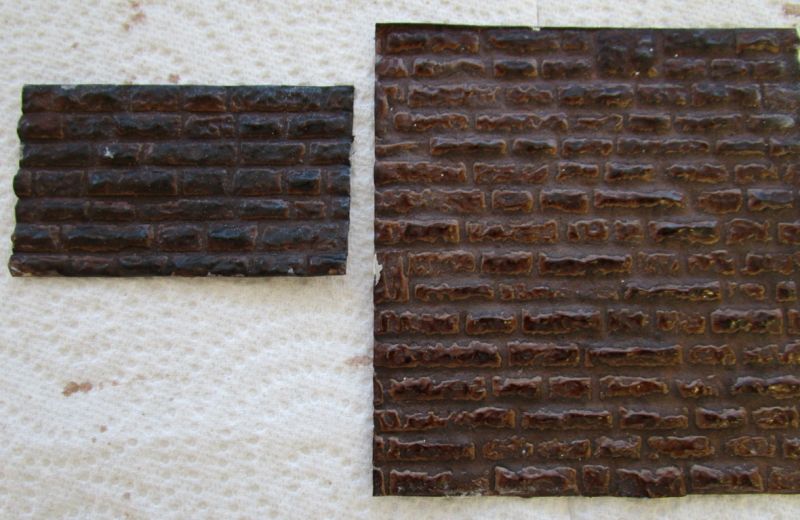
The piece on the left has maybe too much matt black on it whilst the one on the right has yet to have the black "dusting".
The talc has reduced the relief considerably - maybe I should try using less - but the upshot is, I'm not sure which I prefer, or indeed, which is more prototypical ………………………… :hmm
What do you guys think ?
'Petermac
Posted
Full Member
That aside, you now know you can get the talc to go where it's needed, so you can now perfect your method. :thumbs
Bill
Last edit: by Longchap
At 6'4'', Bill is a tall chap, then again, when horizontal he is rather long and people often used to trip over him! . . . and so a nickname was born :)
Posted
Full Member
With say half what's in there, you'd hardly see it using the 3ft rule but, if I can find another offcut, I'll give it another bash using less talc and see how that turns out.
'Petermac
1 guest and 0 members have just viewed this.