00 Gauge - Maxmill Junction
Posted
Guest user
Petermac's Railway
PeterWhat ever happened to the layout, reading most of the thread again, reminded me what a good layout this would have been, it's s real shame that Tim's axe fell on yet another good layout !
Have you started another, maybe even just the building of the baseboards ?
Posted

Full Member
I haven't done much other than build a few of my "girder" frames and some angle pieces to get me around the corners more gently. I've also spent a fair bit of time thinking about what can be and what can't.
At present, I don't have much spare time - been doing some work on our letting house during "closed season" so it's ready for our first clients in April.
Other than the module and the wagon project, railway modelling has gone a bit quiet. It will soon fire up again and then I'll continue the saga !!
'Petermac

Posted
Full Member
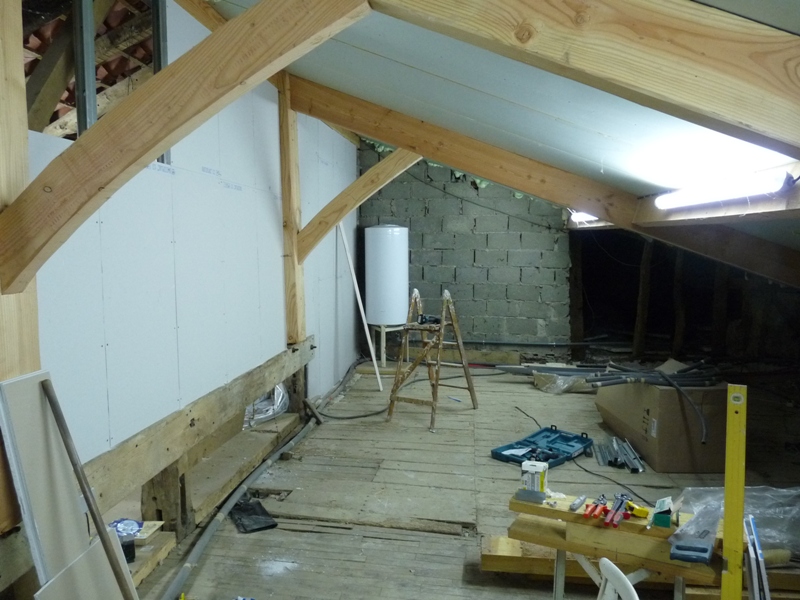
The water heaters have been moved - they used to be in the middle of the floor against a roof truss before we renewed half the roof to create a clear span. I have full head height as far back as the beam on which the strip lights are mounted. I'm currently constructing the stud wall you see which splits the attic in half - there were some rather awkwardly placed timbers prohibiting me from using the full attic so the other half will continue to be used for storage !!!
Access for sheet material is a problem so I had to cut the plasterboard into 2ft panels before I could get it up there.
The available area will be around 30ft x 10ft although I'll need to work around the 2 water heaters and leave access to them along the stud wall.
I still have to complete the studding beyond the 2nd beam and clad below the horizontal tie-beam on the right. That section will include a door.
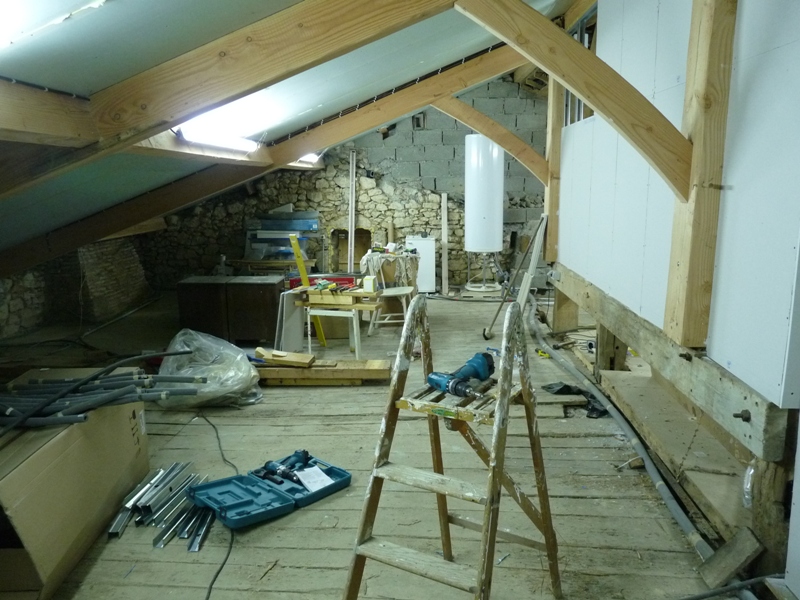
The dark area to the right leads into another attic over the oldest part of the house. That will be semi-sealed off (we still need access from time to time to check for "things that eat wood" - there are termites and capricorn beetles amongst many other timber pests in this part of France. I haven't yet decided what to do with that dreadful concrete block wall - paint it or plaster it. It was added after the war when a DIY "expert" decided to raise the level of the old roof. Oh - the green stuff you can see apparently dripping down is foam sealer used to fill the joints between the bonded insulated panels used to the roof construction.
Progress continues to be slow due to other calls on my time ………………
'Petermac
Posted

Inactive Member
Max
Port Elderley
Port Elderley
Posted
Full Member
'Petermac
Posted

Site staff
Ron
NCE DCC ; 00 scale UK outline.
NCE DCC ; 00 scale UK outline.
Posted
Full Member
Did you get a local artisan to do them ?
John.
Posted

Full Member
Posted
Full Member
Yes John - there are some excellent artisans here. They're not cheap but, once you get them started, they take some beating for quality work.Those roof truss,s certainly look as if they have been made to look " old fashioned ".
Did you get a local artisan to do them ?
The new beams are treated pine (redwood I think) but the original ones were a mix of oak and chestnut, as are all the timbers on the other side of the roof behind that stud wall. We only had half the roof done because the tie beam had cracked.
The joints are also traditional DD - mortice joints pegged with oak pegs - no nails used here !!!!
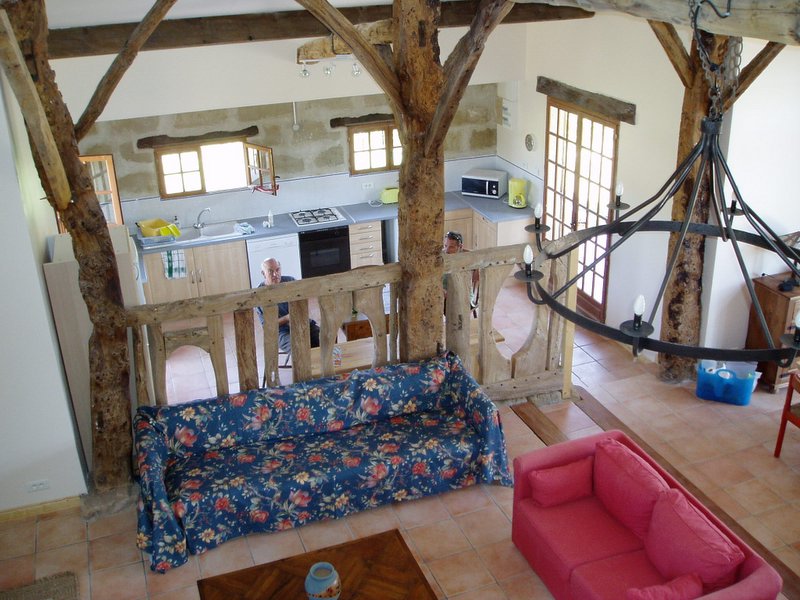
If you want to see some "interesting" old timberwork, this is part of our gite timbering (an old barn which we converted). Basically, trees with the bark stripped off and all mortice joints held with oak pegs. Look at the left hand "tree" - they obviously ran out of straight ones. If the bend had been a couple of inches more, it would have no strength whatsoever. They were clever carpenters a couple of hundred years ago !!
'Petermac
Posted

Full Member
:hi
Well that was a well kept secret Peter!. I joined YMR in November 2009 and this is the first mention of your layout since then (apart from a brief interchange with one of your pals in Jan 2010…..I guess I blinked and missed it).
I knew about the trams, the tube, the scale G (?) loco, the warehouse module and, of course, the bulk purchase of screws. I knew nothing of this…..it is (or was :???:) very impressive. I guess I will be obliged to keep checking in here to keep an eye on your progress. Without applying any pressure I would prefer not to wait another two years

Kind Regards from a rather damp Vancouver:cheers
Posted
Full Member
Posted

Legacy Member
Let's hope it's not another few years before some more pics appear…;-)
Posted
Full Member
Derek
Posted
Full Member
If you look closely at the plasterboard joints John, you can see where many of those screws ended up
. Hopefully, now I'm on the way to buiding a "home" for Maxmill Junction, all the elements you mentioned will soon find a resting place - except of course, the "G" scale Shay. That will remain for "summer excursions" in the garden.I too like long sweeping curves together with large radius points Gordon. I also love the interest created by the different levels - it was your Eastwood Town that inspired me in the first place. :thumbs
As I have the space to use "easy" grades, I thought why not ? My problem might be allowing access to those two water heaters. I wouldn't want to have to dismantle the layout to get them out and, as they are B. heavy, I couldn't lift them over it !! They are both new but only have a life of around 8 to 10 years here but that might be long enough ………. I will need to get at them to drain them occasionally - particularly if we go away in deep mid winter.
Hi Derek - good to hear from you again and I hope you enjoyed your trip to visit your son this year. The "letting season" for the gite is now over (we don't bother in winter) so I'm in the process of closing it up until spring. That's a job and a half !!! Fortunately, as we've already let most of next summer, the "Autumn Statement" increase in airport departure taxes won't really effect us for another 12 months - after that, who knows ? Anybody want to buy a converted barn ?
'Petermac
Posted
Full Member
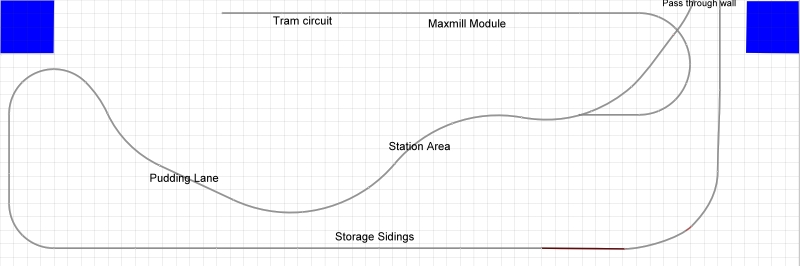
Having taken on board much of what's been advised, I've had a "doodle" with Anyrail and come up with the following idea. That's all it is at present - an idea.
I could pinch a small part of the other half of the attic for a return loop giving me a fairly large roundy-roundy whilst still allowing plenty of space for a through station, storaage sidings, Pudding Lane (for which I'll need rear access because that's where all the magic bits are ….). The branch line will climb up and over the main lines and continue on, via my own Maxmill module, to a "town" terminus served by a tram service.
Unfortunately, there is still a duck-under or lift-up but, to gain access to the rear Pudding Lane, it can't go against the wall. If I set the baseboards high enough, maybe the duck-under/lift up won't be too much of a problem - it's only to access the storage sidings :roll::roll:
The following is only cobbled together - the route shown is very much simplified and contains no track detail and is only showing a single track - I don't have time to do more at the moment ………………:oops::oops::oops:
'Petermac
Posted
Full Member
Posted
Full Member
Posted
Full Member
Whilst driving to Rotary tonight, instead of thinking about the forthcoming meeting, I was mulling over the plan. Silly me - the tram section will have to go above Pudding Lane - that's where the road is !!! Also, I'm not really sure why I opted for a return loop through the wall - I could just as easily have swung it around below the right hand water heater - it would make little difference. However, should I decide to go through the wall, that would be no problem John - SWMBO has the rest of the house !!! The attic remains my domain - except for the boxes of "used once in a blue moon" storage items…………………pl;us the odd back-up printer etc. should the other 7 break down :roll::roll::roll::roll:.
I'm extremely pushed between now and Easter but I'll try to fill in some of the missing details. I'll need to buy Anyrail bofore I go any further - I used all the 50 "trial" pieces on this plan…………:cheers
'Petermac
Posted
Full Member
This will be "Maxmill Town" station. A small industrial town terminus served by a branchline from "Maxmill Junction", the larger curved through station through which the mainline trains will pass.
Maxmill Town passenger traffic will be DMU's and 2 coach steam trains. The upper pair of tracks leading off to the right pass through the Maxmill module before descending towards Maxmill Junction.
Whilst only 1 double sided platform is shown, there will be another single sided platform at the top and posssibly the bottom also. The spurs are for shunting, coal drops and the local pilot. In order to release the loco, the coaches have to be uncoupled and shunted into the "outbound" platforms except of course, for the DMU's where the driver has to be shunted……………..

'Petermac
Posted
Full Member
Are the two longer faces at the top Arrival and Departure? If they are a tentative suggestion………you may find it an advantage to run a carriage siding off the main arrival track to the right of the top double slip ……..that way you can release the incoming loco without blocking the tracks for DMU traffic……just a thought
PS Having read the thread from the beginning (always a good idea) I now know where I had seen the water tanks before:oops::oops:
1 guest and 0 members have just viewed this.