00 Gauge - Maxmill Junction
Posted

Full Member
Petermac's Railway
Sounds like a plan Peter.Bill
:cheers
At 6'4'', Bill is a tall chap, then again, when horizontal he is rather long and people often used to trip over him! . . . and so a nickname was born :)

Posted

Full Member
I agree that less mortar will improve the relief appearance. The angled black spray should also do this but I worry that it may finish too dark.
Would it be worthwhile using light oak as the first fixing coat? The sequence would be
Talc
Light oak overall
Angled dusting black
Dab on medium oak ( and perhaps minute highlights of light oak)
In my memory it was dark, black and grimy but it wasnt monotone there were highlights and tonal variety……mind you that was East Lancashire
Posted
Full Member
Is the 7mm Slaters you are experimenting with just scrap or are you going to use it rather than Wills 4mm Random Stone?
I ask because Wills may react differently to wood dye and the Wills mortar courses are better defined and narrower and deeper than Slaters
Posted

Full Member
You do however, have a point about the potential effect of the wood dye. Rather stupidly, it hadn't occurred to me and I'd completely missed the fact that Allan had used the Wills version ……
I'll try to photograph it all tomorrow to show the difference but, before I started with the wood dye, I'd painted a panel with Jo Sonjas acrylics - a mix of linen and chestnut - in an effort to match a colour picture of some fresh cut York stone. I then randomly "dusted" that with matt black as suggested by Mr Downes.
Looking at the two methods side by side, I actually prefer the painted one to the stained version. The painted one is totally matt wheras the stained one has a very definite shine to it. It is also, as you suggested, considerably darker.
It could be that I should have used a lighter coloured stain but thought doing so would create a very pale wall. Like you, I remember them as being almost black, flecked with the lighter ginger/khaki colour where the underlying stone was still visible. Other than the fact that your side of the hill had more rain than ours and obviously used a different stone, I'd imagine the soot and grime would have been similar. The railways didn't differentiate between cotton and wool ……… :roll:
At €16 a tin, and no more stone sheets in stock, I'm not particularly keen on starting all over again but we'll see what you think when you've seen the 2 versions tomorrow ……….
'Petermac
Posted
Full Member
For a variety of reasons I am also coming to the conclusion that I may skip the dye and opt for a solid coat of medium dark sand as a base ……sprayed on. I am not ready to show samples yet but I have been testing out weathering powder in lieu of talc for mortar. I have 4 different shades I can play around with including a dirty white. Brushed into the courses it seems quite retentive.
I have an identical problem to you. Apart from worrying about getting a realistic finish I am concerned
about achieving a consistent effect over +-10 sheets and overlays (the larger area of Slaters is an advantage here). I fear its going to take a lot more time than I originally envisaged.
Posted
Full Member
Posted
Full Member
I did the same with the sea wall on Teasel. The larger stone brings out more detail and looks better.I am using the 7mm Slaters stonework John. I think, in this instance, 7mm looks better than 4mm - more solid somehow …..
Posted
Full Member
Maybe some front lighting would illustrate the sheen better but I'm not really sure it's worth going to the trouble compared with the acrylic painted version. None of these panels have any added talcum powder "mortar".
Dyed sections on the left, painted section on the right (immediately to the left of the Scalescenes brick version):
Looking straight at it:
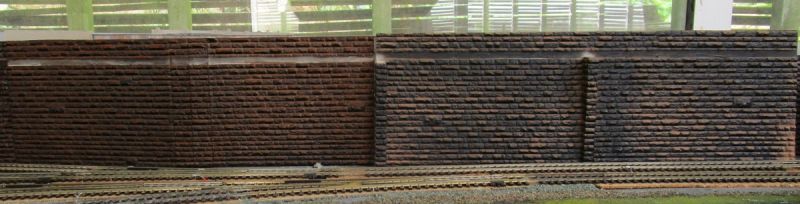
The undyed patch to the left is where a plate girder bridge will sit. The bridge itself can be seen just showing above the walling and will lead to a hidden platform :

'Petermac
Posted
Full Member
Posted

Site staff
Wasnie me, a big boy did it and ran away
"Why did you volunteer ? I didn't Sir, the other three stepped backwards"
"Why did you volunteer ? I didn't Sir, the other three stepped backwards"
Posted
Full Member
To me they both look a little brown, more like dark wood than stone?
That was concerning me Chris but York stone is a ginger/khaki colour in its clean state. I hoped the black dusting would tone the brown down but it didn't ………………

'Petermac
Posted
Full Member
The base colour is a mix of Jo Sonja's chestnut and linen - the closest I could get to the "proper" York stone colour with the paints I had in stock plus, I'm no Rembrandt !! I think the black "dusting" looks more realistic than on the other panels and the base colour isn't too dark.
I think I'll go with that one. I can hopefully overpaint the dye with acrylics, slightly lightening the base coat given the dye is quite dark.
I forgot to say Chris that I'd absolutely agree that, in this situation, 7mm plasticard looks so much better than 4mm. It doesn't look "over scale" - at least, not to me but it does have a solid look to it with clearly defined blocks. I'd use 4mm card on smaller, more detailed structures, particularly if there were windows, where this would definitely look over-scale.
'Petermac
Posted
Full Member

Posted
Full Member
Bill
:thumbs
 Last edit: by Longchap
At 6'4'', Bill is a tall chap, then again, when horizontal he is rather long and people often used to trip over him! . . . and so a nickname was born :)
Posted
Full Member
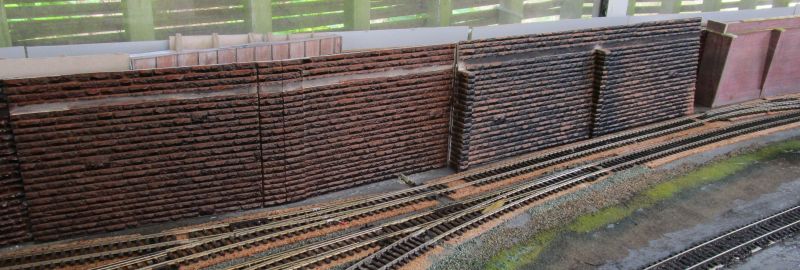
I'm starting to develop this corner of the layout :

These "sections" will be lift-off to enable access to the single track climbing to the higher level and also, to electrics hidden behind the retaining walls, parts of which are also removable, especially for access to the servo controller for the Megapoints system.
My plan is to face the right hand panel with a rock face topped by scrub land butting up to a tunnel portal at the right where the viaduct is situated and the left hand edge butting up to a large mill/factory which will sit in the corner over the light switch. The front face of this corner panel will have a scrub slope tucked in behind the retaining wall with the mill "growing" out of the scrub - essentially to blend these rigid structures into the curved retaing walls.
I'm currently pondering whether to have a large "block" of a mill covering most of that panel or to break it up into smaller units, maybe using a low relief version along the left hand wall.
The former might be a bit overpowering whilst the latter would allow for some kind of "yard" within the factory confines but I'm concerned it might look a little "toy-like".
'Petermac
Posted
Full Member
That looks very good PeterI'm currently pondering whether to have a large "block" of a mill covering most of that panel or to break it up into smaller units, maybe using a low relief version along the left hand wall.
The former might be a bit overpowering whilst the latter would allow for some kind of "yard" within the factory confines but I'm concerned it might look a little "toy-like".
I would be inclined to opt for the latter.
One option might be to make one or two ultral low relief warehouse units almost as a back scene and then some complementary but smaller 3 dimensional units in front……..gate house, water tanks, boiler house and chimney stables converted to garages etc. I think you can make very nice scene up there setting time and place
When I am uncertain about what to do with a space I either plonk a couple of not so good models or mock something up in card and leave it there for a bit while I get on with something else……..eventually I make my mind up
HTH Good Luck
Posted
Full Member
The large sections clad with the Slaters stone sheets have a base of 2mm card. Although this card base was fairly well braced, it's warped quite badly, especially at the edges.
I guess this is due to having plasticard glued to one face and nothing on the other face to balance the pull of the UHU glue - used to stick the plasticard to the cardboard.
I'm not altogether sure simply "painting" the reverse with PVA or even UHU would have prevented the warping - can anyone confirm this ?
I'm now considering a rebuild using 5mm MDF as the base. Slaters stone sheet would again form the face but I'm wondering if the MDF would still warp. I know it's often used as a carcase for buildings before being clad in plasticard. Does it still require a coating of something on the other side ?
'Petermac
Posted
Full Member
I always have problems effecting a permanent bond with card and slaters…….I use super glue now and lots of clamps. Often still needs a a second application inserted into gaps that appear
If you have space for 5mm depth then laminating two sheets of 2mm card before adding the slaters might work. Is there room for vertical buttresses front or back?
HTH
Posted
Full Member
I use ordinary UHU to stick the plasticard to the cardboard (grey board) mainly because I bought quite a few tubes in a "Pound Shop". They were all in Greek ! It works well. I too use plenty of clamps to hold everything until it's set and thus far, haven't had any problems with the bond.
I have used buttresses where there is room and in some areas, doubled up the card. Doubling the card doesn't appear to make much difference but buttresses do. The problem is, they don't go right to the edges everywhere and warping has occurred both on the unbuttressed "overhang" and also between the fitted buttresses. I therefore think it's the glue line creating a stress point.
I just thought MDF might be more resistant to warping but I could be wrong. I think some experimentation is required……..
'Petermac
Posted

Full Member
I placed a sizeable order with Slaters on Dec 1 and it's been stuck at Heathrow ever since. In fact your post has prompted me to send a follow up query, I guess for their return next week. Buying from O/S has become a fraught issue as several of us are finding.
1 guest and 0 members have just viewed this.