00 Gauge - 'Kelly Bray', nee Callington
Posted
Guest user
Build of a layout based on Callington
I've seen these layouts Gary and you are right, fantastic, along side Ben Alder etc. however, seeing your own work I would say that you belong in the premier league as well.A good eye and patience by the bucket load. Very impressive and I too can only dream of such results, meanwhile feeding the hand of Townstreet and the likes to try and achieve the most realistic effect that I can at my level.
One day I might be able to produce something equally as good, home grown but I fear that is some time away yet, but a target no less.
Keep it up……….where is that goods shed………..your slacking you know.;-)
Cheers
Toto.
Posted

Banned
Cheers, Gary.

Posted

Inactive Member
Ken
'It don't mean a thing if it ain't got that Swing'
Posted
Guest user
Looking forward to the build commencing. Keep up the good work
Toto
Posted

Inactive Member
Don't know if you have seen this site at all gary
http://www.cornwallrailwaysociety.org.uk/callington-branch.html
Posted
Banned
Cheers, Gary.
Posted
Inactive Member
Ken
'It don't mean a thing if it ain't got that Swing'
Posted
Inactive Member
I have just spent a bit of time reading your thread from start to finish, I'm not sure how I missed it but I did, maybe it was my infrequent visits on here but I should have more time from now on.
I like what you have done so far and in particular using your paper templates on the cork as I did find that mine could move when secured with tape on my cutting mat, filed away now for future reference. That roof looks great by the way and reminds me of the (painstaking) work on my carriage shed.
I see now that you've got stuck on the roof vents and those tri-angular bits, you're not alone in that but I make sure I cut slightly oversize and file to shape, I have been known to put the smallest spot of glue between them to aid this but not so much that they won't split apart, then clean them up. A bit laborious and frustrating at times to say the least, especially on those ham fisted days.
I got stuck on my roof vents for the Engine shed and though I have completed them now I was so unhappy at the time after scrapping earlier efforts I decided to leave it for a while, 6 months or more may be a bit long though. However I have enjoyed the diversion to other things and once my current building is complete I shall return to it as you will as you will to yours.
I look forward to seeing further progress on here and will spend more time keeping up with as I need to elsewhere.
Great work so far
Jim
My layout thread http://yourmodelrailway.net/view_topic.php?id=10930&forum_id=21
Buildings for Hemyock http://yourmodelrailway.net/view_topic.php?id=10931&forum_id=14
Buildings for Hemyock http://yourmodelrailway.net/view_topic.php?id=10931&forum_id=14
Posted
Banned
I'm about to tackle these triangular sections this weekend. Hopefully everything works out properly and I can post some pics towards the end of the week.
Cheers, Gary.
 Last edit: by Gary
Posted

Full Member
You have made a brilliant job of the train shed……..I attempted a similar framing project, albeit much smaller, for the Ash Shed so having experienced the tedium of constructing Trusses myself I can really appreciate what a great job you have done……and I have to say yours is far more precise and accurate :mrgreen::lol:
Good luck with the vents this weekend I am sure you will sort it!
:cheers
Posted
Banned

The engine shed is only a mock up in card. This allows me to gauge what goes where.
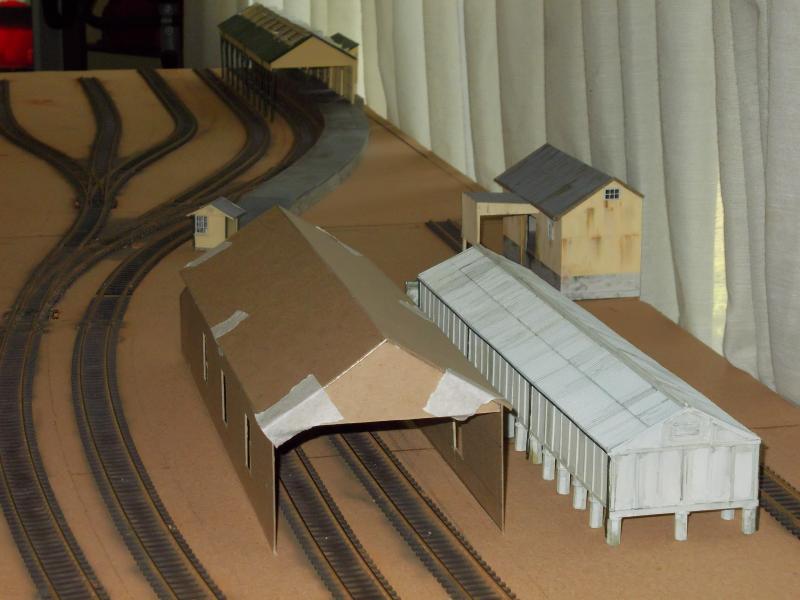
The pic below is a mock up of the scan below it. The scan is a 50% reduction of the real picture which was supplied by either a member here or from that other forum.


Still a lot of work to do… I'll be lifting some track to install the Kadee under track magnets, used for uncoupling. There will be 6 of these to go in. This will allow me to have delayed action uncoupling and no 'hand of god'. The two roads into the engine shed will be lifted and shimmied around, also shortened slightly. I will have to remove a section of sleepers to model the pits within the shed and outside the shed. Once all this is complete, maybe some ballasting can take place.
Cheers, Gary.
Posted

Site staff
Ron
NCE DCC ; 00 scale UK outline.
NCE DCC ; 00 scale UK outline.
Posted

Site staff
Please tell me, like Petermac you tidied up before you took the pictures.
Ed
Posted
Full Member
Terry
Posted
Banned
Ed - No, I didn't clean up ! My layout is a put up/pull down set up. This means the boards are always tidy, as they stand upright against a wall when not in use. I wish I had the space to keep it up all the time, but I require a clean 12' wall !
Cheers, Gary.
Posted
Banned
Yes there is Terry. The shed in the photo is the earlier shed. This was subsequently replaced by the larger shed that I have modelled. Here are two pics of the shed from each end. Again, these are 30% photos of the originals I have obtained.Looking great Gary. I notice that your model provender store is longer than that shown in the photo of the real location. Any reason for that?
Terry

You can also see another corrugated iron shed besides the provendor/goods shed, another shed I'll have to build, along with engine shed and the coaling stage.
Cheers, Gary.
Last edit: by Gary
Posted
Guest user
Thanks for posting the pictures. It looks excellent. The size of your shed is deceiving. The earlier photo's that you. Posted made it look enormous. Whilst it is still big, the latest photo's put it more in perspective. Looking at the photo's of the original, it is a job well done. You must be pleased with the outcome.
Did you have a little " test run " whilst you had it set up. Purely for engineering purposes of course. ;-)
The whole setup is coming to life and will look more and more convincing as the ballast and scenics start to evolve. Keep up the good work and once again thanks.
Cheers for now
Toto
Posted
Inactive Member
Posted
Banned

I did assume I would be able to get away with 6 magnets, but it looks like 8, maybe more. Originally I settled on 1, 2, 3, 4, 5, 6 & 8. 7 and 2 are an afterthought for better operating. The positions are numbered in accordance to their operation.
1. detatch locomotive on arrival. 2. detatch wagons/coaches. 3. detatch wagons and shunt into various sidings.
4. detach coaches after arrival to release engine in platform road for run-around. 5. detatch wagons in goods yard.
6. detatch livestock wagons etc. 7. detatch and shunt wagons to coal stage. 8. detatch loco/wagons in relief siding.
I'm actually considering 3 more at the end of the sidings marked PS1, PS2 and PS3. This way trains entering loco first can be detatched and wagons drawn backwards by the station pilot engine.
Comments welcome.
Cheers, Gary.
Posted
Guest user
As far as the extra3 go, if in doubt, put them in. That way the track is down for good.
It must take a bit of working out. The advantage of knowing real train movements.
Looking forward to seeing a demo of these once they are in place and wired etc.
Looking good anyway, crack on.
Cheers toto.
1 guest and 0 members have just viewed this.