00 Gauge - Jeff Lynn / SRman's New Layout
Posted

Full Member
Progress (or otherwise) on Jeff's new layout
Thanks, Ron, for those very kind words. So true.
Jeff Lynn,
Amateur layabout, Professional Lurker, Thread hijacker extraordinaire
Amateur layabout, Professional Lurker, Thread hijacker extraordinaire

Posted
Inactive Member
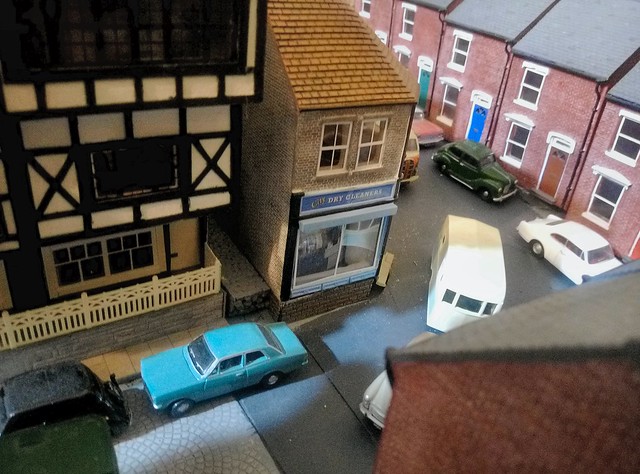
On a less sad note, that retaining wall looks awesome, as does the concrete area in front - I like the "no parking" text on the ground. :)
Posted
Full Member
The retaining walls are the Wills arches, painted and dry brushed to get that weathered and battered look, and the road textures are printed from the Scalescenes ones, but cut into strips to represent a surface that has been patched and redone several times over many years. I will be adding some weeds and dirt as well later.
Jeff Lynn,
Amateur layabout, Professional Lurker, Thread hijacker extraordinaire
Amateur layabout, Professional Lurker, Thread hijacker extraordinaire
Posted
Full Member
The Sentinel diesel hauling some milk tanks rocks and rolls a bit but I think the effect is actually quite good, if unintended. Following it is the Huntley & Palmers Peckett with a few open wagons, while on the other side a de-named Dodo passes with a few vans.
[yt]HIFdhpSKj_s[/yt]
 Last edit: by SRman
Jeff Lynn,
Amateur layabout, Professional Lurker, Thread hijacker extraordinaire
Amateur layabout, Professional Lurker, Thread hijacker extraordinaire
Posted
Full Member
I removed the printed names and numbers on the Pecketts and Sentinel using some T-Cut. I have some etched name and number plates on order, which will confirm their identities and make it easier to select the right locomotive (I am using memory at the moment!).

On the workbench, I have made a little progress with the Golden Arrow Productions unrebuilt Merchant Navy. I decided that the tender's side profile was too flat, so attacked it with various coarse and fine files. It is now much closer in profile to the cab side profile.


In spite of the evidence in the second photo, the tender and loco bodies are both painted in the same green, from the same tin!
Last edit: by SRman
Jeff Lynn,
Amateur layabout, Professional Lurker, Thread hijacker extraordinaire
Amateur layabout, Professional Lurker, Thread hijacker extraordinaire
Posted

Full Member

Posted
Full Member
I have demonstrated some, but not all of the features of the locomotive and legomanbiffo sounds. For the record, the speed was settled at step 50 (out of 126) on my NCE Pro Cab.
Sounds include the roar of the traction motor blower (I think I need more bass for this, so a larger, bass reflex speaker may be finding its way into the locomotive in the future), the two slightly different air whistle tones (F2 and F3), the marker lights (F0 - left on to give the locomotive some 'presence' in the darkness of the tunnels), directional cab lights (F19), cab door slam (F6), and the lovely compressor sound (F7).
As you can see, the LokSound v4 decoder seems to have no problems with controlling the locomotive smoothly. It was originally set for a class 350 (hence the written label visible in an earlier photo I took) but I did a reblow with 'Bif's sounds late last year, and have changed nothing in the settings except the volume (CV63).
[yt]yNl3RNeraU8[/yt]
Edit: For some reason the video is not working from here: the link is https://youtu.be/yNl3RNeraU8
2nd edit: I think it's working now, but I'll leave the hyperlink in as well.
I have noted that the low-sided wagon in front of the camera needs a wheel change, as there is a slight wobble evident from the video.
Last edit: by SRman
Jeff Lynn,
Amateur layabout, Professional Lurker, Thread hijacker extraordinaire
Amateur layabout, Professional Lurker, Thread hijacker extraordinaire
Posted

Site staff
Ed
Posted
Full Member
:cool:
Jeff Lynn,
Amateur layabout, Professional Lurker, Thread hijacker extraordinaire
Amateur layabout, Professional Lurker, Thread hijacker extraordinaire
Posted
Site staff
Ed
Posted
Full Member
There are a couple of photographs at the end of the video showing just how powerful these little engines are.
[yt]TrA7okYNIeU[/yt]
Jeff Lynn,
Amateur layabout, Professional Lurker, Thread hijacker extraordinaire
Amateur layabout, Professional Lurker, Thread hijacker extraordinaire
Posted
Full Member
I have fitted them to the three Pecketts and Private Owner pannier tank, with a few more (mainly numbers) left to go on some of the other locos. You'll notice I have gone with a theme of female names starting with "A".
Starting with Huntley & Palmers Peckett, that has become no. 4, Amelia, with a slightly different treatment to the others (mainly because I still haven't been able to bring myself to remove the lovely H & P signwriting yet). The number plate hides the letter D which acted as its fleet "number".

The 'generic' Peckett green one, ex-Dodo, has now become no. 5, Alice.

MSC green Peckett, ex-no. 11, is now no. 6, Alexandria (based on its real name at one time in the past).

The pannier tank has become no. 9 (with transfers for numbers), Ashleigh (with full-sized plates), named after my good friend Doug's daughter. Besides the fact my wife and I have a fair bit to do with Doug's children, the significance is that Ashleigh owns a GWR pannier tank on Doug's layout. I also ordered Peckett plates with the same name for Doug to use on his Peckett.

And here's one of the three Pecketts all lined up.

I will order a few more plates to add to the collection, particularly for the J94 which arrived after the original order was sent to Narrow Planet. Currently, that bears the number 10 and the name Harry. I am thinking that should become Agnes, after my wife. After all, she was the one who persuaded me to buy it and even went shares in it!
Jeff Lynn,
Amateur layabout, Professional Lurker, Thread hijacker extraordinaire
Amateur layabout, Professional Lurker, Thread hijacker extraordinaire
Posted
Full Member
I started by wiring up a 12 segment "chocolate block" connector, so that the two DCC output wires from my NCE Power Pro command station now have five extra loops each on one side of the chocolate block, allowing easy connection on the other side for dcc track, accessory and signalling take-offs.
The first use was for three of Train-Tech's new sensor signals. For the LT lines, all are 2-aspect signals. I had experimentally cleared some ballast and used the track contacts on two of these signals, but I really wanted to separate the DCC feeds to the signals. For the third one, I ran a couple of bus wires from the chocolate block at the command station end to the far end of the layout, where a smaller chocolate block (3 segments) provides connection to the signal. I snipped off the under-track connector arms as per Train-Tech's instructions, then soldered wires to the two terminals indicated. These wires were connected into the smaller chocolate block terminal.
This signal has a "feather", with five white lights showing (I know, LT tended to only have three lights - I may paint out two light lenses later). I followed he instructions for programming them as accessories, although something didn't quite match my plans: as the feather means this signal replaces a 2-headed junction signal, I intended the main signal to be #18 and the feather to be #19, matching the original track diagram I have. However, the signal decoder had other ideas and insisted on the feather being operated as #18. Not a great problem as I have two of Train-Tech's mimic switches on order to control this and a second similar signal at the other end of the LT tracks (one that was then plugged into the track). The mimic switches will also allow me to override the green aspect if a train remains in the station sections ahead.
Today, I treated the other two sensor signals to the same wiring treatment, and allocated addresses 1 and 2 to the red/green override and feather aspects, respectively (this one worked according to plan!). The remaining one is at the tunnel mouth and is still fully automatic.
Later on, I want to insert a couple of these 2-aspect signals in the tunnel sections themselves, feeding back to the previous signals in each direction. That will await a few experiments, as I am not sure they will work properly in the darkness of the tunnels - I may actually have to add a directional light on the opposite side of the track to each such signal to operate the sensors properly. We shall see!
I have snapped off a couple of photos on the mobile phone of the initial installation, showing green with feather, and red after triggering the sensor. Sorry about the lens distortion.


I am definitely happy with the results so far, even with the slight compromise in appearance caused by the visible electronics and connectors adjacent to the signal posts.
​Next I'll have to add the ladders and other detailing bits Train-Tech provide. I thought it better to get all the heavy handling out of the way first.
Jeff Lynn,
Amateur layabout, Professional Lurker, Thread hijacker extraordinaire
Amateur layabout, Professional Lurker, Thread hijacker extraordinaire
Posted
Full Member
Corner Shop Improvements - 2 by Jeffrey Lynn, on Flickr
Note that I am trying out Flickr, with a view to getting out of Photobucket. I still haven't got the hang of their menus yet, but am trying to create sub-albums within a 'Rail' category.
Jeff Lynn,
Amateur layabout, Professional Lurker, Thread hijacker extraordinaire
Amateur layabout, Professional Lurker, Thread hijacker extraordinaire
Posted

Inactive Member
Also the quality of the pics on Flickr is as good as Photobucket - without the hassles.
Max
Port Elderley
Port Elderley
Posted
Full Member
The new Hattons/Bachmann Warwell has come, and I selected the type with the bolster extensions to provide a level platform for the camera. The wheels run true (like my previous wagon) and the wagon is heavy for good stability.
 Hattons Warwell Camera Wagon - 1 cropped by Jeffrey Lynn, on Flickr
Jeff Lynn,
Amateur layabout, Professional Lurker, Thread hijacker extraordinaire
Amateur layabout, Professional Lurker, Thread hijacker extraordinaire
Posted
Full Member
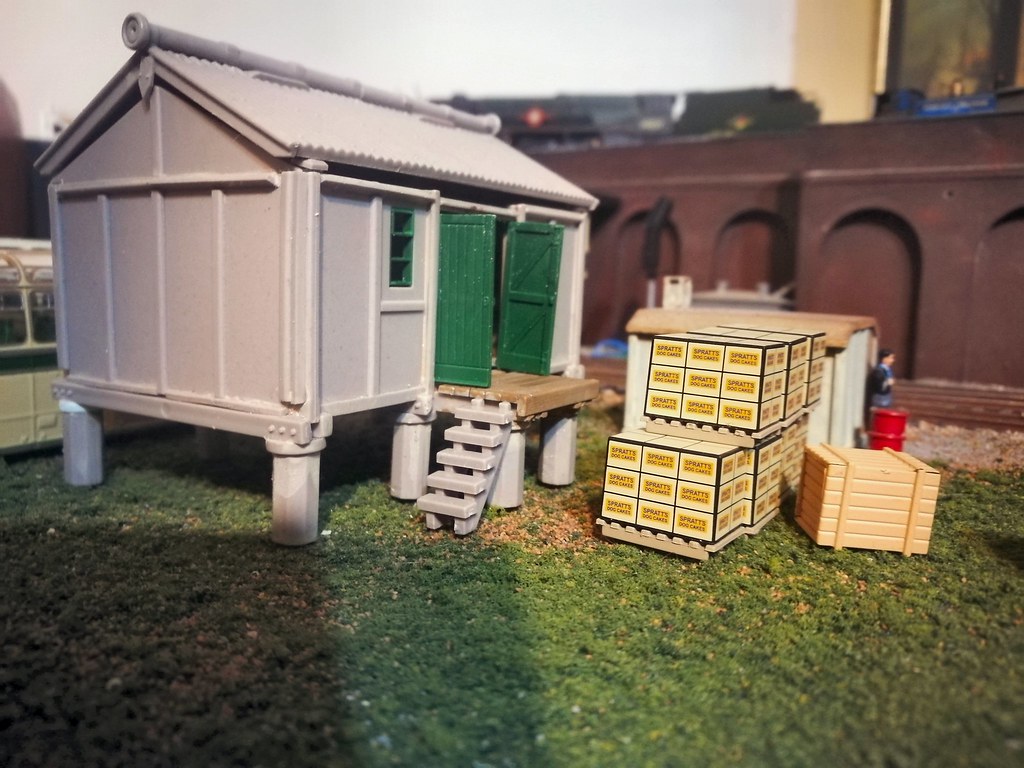
I decided to replace all the printed wooden floors and battens with Wills wood planking. Any inaccuracies in the positions of joints will not really be visible unless someone inspects the interior with a strong light and a magnifying glass. I have simplified the wall battens a bit too but, again, it won't really be visible.
There is more to do and the roof is currently just sitting perched loosely on top, but it is taking shape.
Does anyone out there have an instruction sheet they could scan in and send to me, please?
In the meantime, here are some photos of the progress. the right-hand door is hanging a little crookedly, but I might just leave it like that; the effect is actually not bad.
Jeff Lynn,
Amateur layabout, Professional Lurker, Thread hijacker extraordinaire
Amateur layabout, Professional Lurker, Thread hijacker extraordinaire
Posted
Full Member
While I have many more locomotives not shown here, the video would have been way too long if I had attempted to include even half of them. Some of you may argue that it is too long anyway … just turn it off if that's the case. :D
There is one surprise train there too, that really doesn't belong!
[yt]pdwHUC8VqB8[/yt]
Edit: for some reason the link worked then failed. Here is the url https://youtu.be/pdwHUC8VqB8
Last edit: by SRman
Jeff Lynn,
Amateur layabout, Professional Lurker, Thread hijacker extraordinaire
Amateur layabout, Professional Lurker, Thread hijacker extraordinaire
Posted
Site staff
Posted
Full Member
Jeff Lynn,
Amateur layabout, Professional Lurker, Thread hijacker extraordinaire
Amateur layabout, Professional Lurker, Thread hijacker extraordinaire
1 guest and 0 members have just viewed this.