Stu's Boxfile Layout
Posted

Full Member
(This is just my size)
Even at this early stage,this is looking really promising! I sense a Classic in the making!
Cheers,John.B.:thumbs
Cheers,John.B.:thumbs

Posted

Full Member
I have managed to successfully proved my theory of how to articulate and power the wagon turntable.
I cut a rough 7cm circle of Ian M's 3mm foamboard. In the middle, I cut a small square hole and push-fitted the top part of a small Lego rotating plate ( swiped from No 2 sons' Lego pile - I had to root through three large crates to find it !). Setting the base of the rotating plate into a sqaure hole in another piece of foamboard allows the top, circular piece to rotate with minimum friction, but enough to prevent free turning.
A bicycle spoke was then attached to top plate, to provide manual power and control.
As this was a rough mock-up, I will be re-making this at home late, using proper tools and will then post some photos. The rails will be added direct to the top plate, spaced correctly and the rest of the plate will be covered in planking - either coffee stirrers or matches or similar.
But it's going to work :cheers .
Stubby47's Bespoke Model Buildings
All photos I post are ©Stu Hilton, but are free for use by anyone.
Posted
Full Member
It also shows the coupling hook being raised, before the wagon is turned. This is done by moving a magnet under the turntable, which would happen once the loco has pushed the wagon into place.
Stu
 Last edit: by Stubby47
Stubby47's Bespoke Model Buildings
All photos I post are ©Stu Hilton, but are free for use by anyone.
Posted

Full Member
 thumbsthumbs Cool!

Posted
Guest user
Posted

Full Member
Posted
Full Member
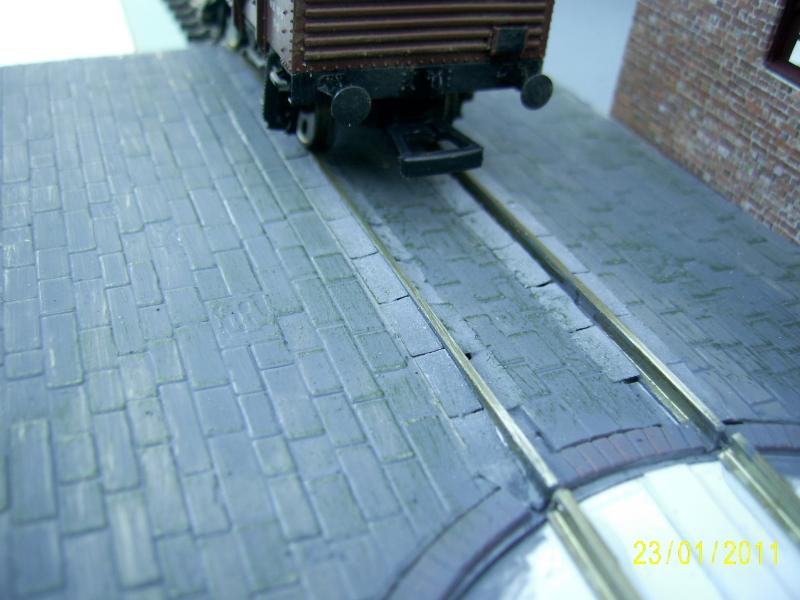
The next job will be to finish the ground works around the table, so I can add the track. I've found that I can use the Ratio / Wills window arches as a circle of edging stones. The table will have scribed styrene as a wood effect - not sure yet whether to add the other tracks at 90 deg - did tables always have crossed tracks on them ?
Of course, progress depend on what other domestic duties are conjured up for me…
Stu
Stubby47's Bespoke Model Buildings
All photos I post are ©Stu Hilton, but are free for use by anyone.
Posted
Guest user
Wagon turntable
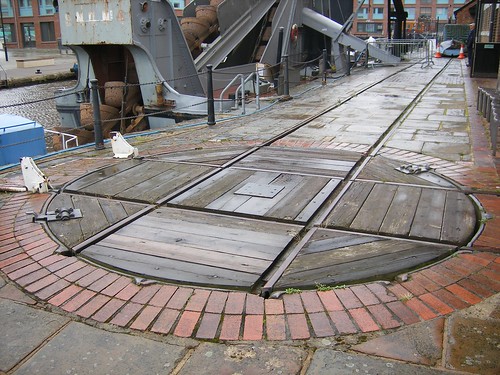
I Googled "wagon Turntable" then selected Images
Posted
Full Member
I probably will add the other tracks, but they will have to be non-working ones, as I've stuck the first pair down with no breaks in for the crossing.
Unless I use the dremel….
Cheers
Stu
Stubby47's Bespoke Model Buildings
All photos I post are ©Stu Hilton, but are free for use by anyone.
Posted
Guest user
Posted
Full Member
Stubby47's Bespoke Model Buildings
All photos I post are ©Stu Hilton, but are free for use by anyone.
Posted

Full Member
Phill
Posted
Full Member
The white edge stones are simple card punches.

Stubby47's Bespoke Model Buildings
All photos I post are ©Stu Hilton, but are free for use by anyone.
Posted
Guest user
Posted
Full Member
I'm not sure whether to use coffee stirrers as the wood base - they work out at a scale 1'3" wide, which I think is too wide. Another option is to use embossed plasticard, but this is to thin and will need packing up first.

Stubby47's Bespoke Model Buildings
All photos I post are ©Stu Hilton, but are free for use by anyone.
Posted
Guest user
You could always scribe a line down the middle making each one two planks.I'm not sure whether to use coffee stirrers as the wood base - they work out at a scale 1'3" wide, which I think is too wide.
Posted
Full Member
Thanks Ian.
Stubby47's Bespoke Model Buildings
All photos I post are ©Stu Hilton, but are free for use by anyone.
Posted
Guest user
Posted
Full Member
Stubby47's Bespoke Model Buildings
All photos I post are ©Stu Hilton, but are free for use by anyone.
Posted
Full Member
Box 2 is now coming along nicely. I've added the main building for the wagons off the turntable to be processed, with the rudiments of the roof and second floor added as well. This bit, of course, will be removeable.
I've also managed to source a suitable rod for the point control - the original wire in tube was fine for the older dead-frog point, but failed to move the new live frog variety, so something had to change.
Apologies for the odd background in these photos…


Stubby47's Bespoke Model Buildings
All photos I post are ©Stu Hilton, but are free for use by anyone.
1 guest and 0 members have just viewed this.