Stu's Boxfile Layout
Posted
#100844
(In Topic #5360)

Full Member
(This is just my size)
Hi all,As a big fan of little layouts, I could hardly refuse to enter this month's (or winter's ) challenge.
Mine will be OO, and hopefully be era independent.
What I have in mind is three boxfiles, as Alan has suggested, two for scenics and one as a fiddle yard.
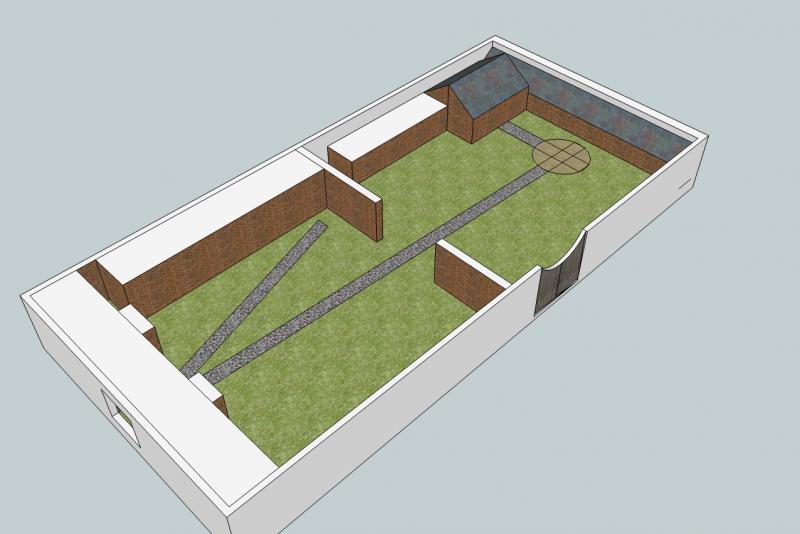
I will try to add a station, goods shed, narrow gauge transfer siding and a turntable. I'll even add a wire tree or two.
I also want to make the layout (!) extendable with other boxfiles.
I'll upload a plan later.
Stu
Stubby47's Bespoke Model Buildings
All photos I post are ©Stu Hilton, but are free for use by anyone.

Posted

Full Member
Posted
Guest user
There seems to be two identical threads on this Stu.
I have deleted the other thread
Sounds good Stu, the extending was going to be some thing that I was going to mention later, but you beat me to it :roll:
Posted
Full Member

Posted
Full Member
I've thought about extending Porth Byhan before, but the buildings didn't really suit - this one will be made more versatile.
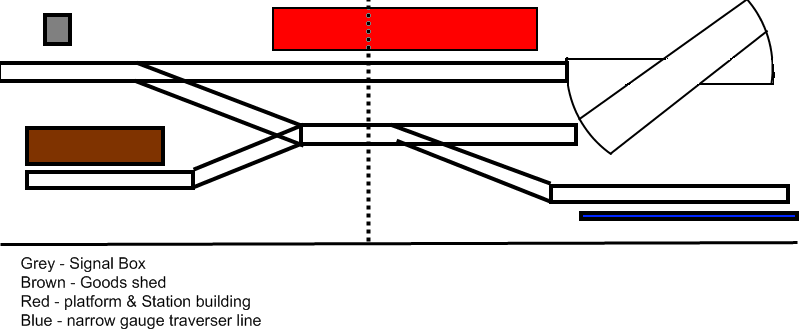
This is the proposed plan… at the moment.
 Last edit: by Stubby47
Stubby47's Bespoke Model Buildings
All photos I post are ©Stu Hilton, but are free for use by anyone.
Posted
Full Member
Stubby47's Bespoke Model Buildings
All photos I post are ©Stu Hilton, but are free for use by anyone.
Posted
Guest user
magnetic handbag clasps…
 hmm:hmm
Explain more, as I was going to use a strong glue and also a couple of small pieces of wood that would also have been glued and then use some of Peters left-over screws.
Posted

Full Member
a visit to my favourite haberdashery stall later will see the purchase of the means of connecting them - magnetic handbag clasps…
Now how do he know about these then
mutleyPhill
Posted
Full Member
Simples !
Photos later.
Stubby47's Bespoke Model Buildings
All photos I post are ©Stu Hilton, but are free for use by anyone.
Posted
Full Member
Stubby47's Bespoke Model Buildings
All photos I post are ©Stu Hilton, but are free for use by anyone.
Posted

Inactive Member
Edit:- Does it always point North?
Max
Port Elderley
Port Elderley
Posted
Full Member
A magnetic handbag is the one used by ladies when they want you to pay, as in "I can't get my purse out of my bag…"Wot I want to know is, "What is a magnetic handbag??" :shock:
Edit:- Does it always point North?
Stubby47's Bespoke Model Buildings
All photos I post are ©Stu Hilton, but are free for use by anyone.
Posted
Full Member
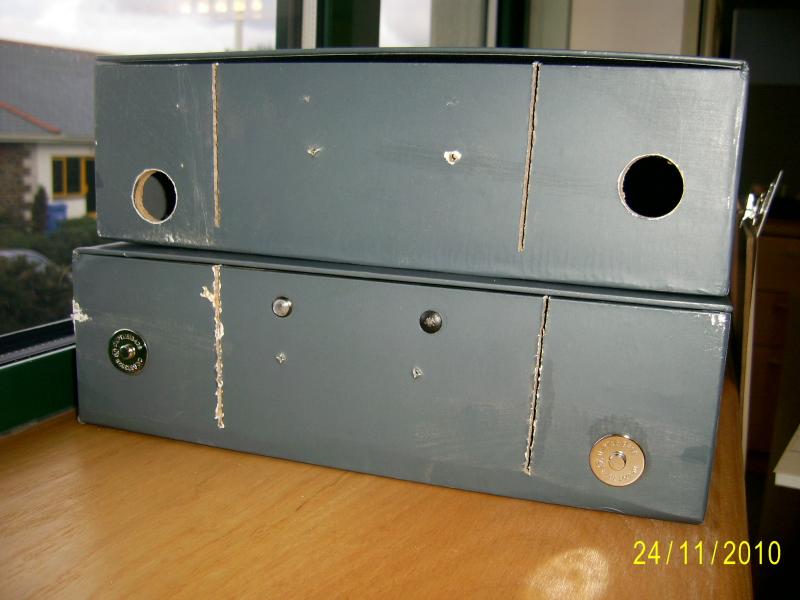
Note the two prongs at the rear of each, and the matching retainer plate.

I'll mount the thin plate with the stud on the surface of the boxside, and drill a receiving hole into which to place the magnetic bit in the side of the other boxfile side.
Hope that makes more sense now…
Last edit: by Stubby47
Stubby47's Bespoke Model Buildings
All photos I post are ©Stu Hilton, but are free for use by anyone.
Posted
Full Member
Well, I've had a play with some bits of track and found that what I wanted to do just isn't going to work. The FY is too small, and there is insufficient room to have any meaningful sized sidings.
So I'm going to build a wagon works, based on buildings from the Llanberis Lake Railway Welsh Slate Museum - see http://www.walesdirectory.co.uk/Walks/Llanberis_Lake_Walk.htm, picture No. 24.
I'll still use the three boxfiles (other anagrams are available !), one as a FY and two as scenic. I hope to have a couple of simple sidings, one with a working wagon turntable leading into a covered shed.
I'll be using Doug's method of flat buildings for part of the scence, plus the box lids will be made to close.
Hopefully…
Stubby47's Bespoke Model Buildings
All photos I post are ©Stu Hilton, but are free for use by anyone.
Posted
Full Member
Stubby47's Bespoke Model Buildings
All photos I post are ©Stu Hilton, but are free for use by anyone.
Posted
Guest user
Looks impressive to me :thumbs
Posted
Full Member
The diameter of the magnetic half is 19mm, so I drilled two 20mm holes in the end of one box. I then marked, through said holes, the circles on the end of the next box. One keeper plate was then aligned within a circle and the tab slots marked out, then the necessary slots were drilled and cut.
I then attached the two non-magnetic halves to the end of the 2nd box, using the keeper plates on the inside.
I used some of Ian M's 3mm foam/plastic sandwich card stuff and made two larger plates to fit behind the holes in the first box, then cut the tab slots for the magnetic bits.
The two magnets are strong enough to hold the 2nd box if held vertically, so will be perfectly adequate for keeping the boxes together on a table.
The extra 1mm of hole will allow me to accurately position the boxes when I glue the larger keeper plate to the inner box end.
The two magnetic halfs with backing foam/card stuff
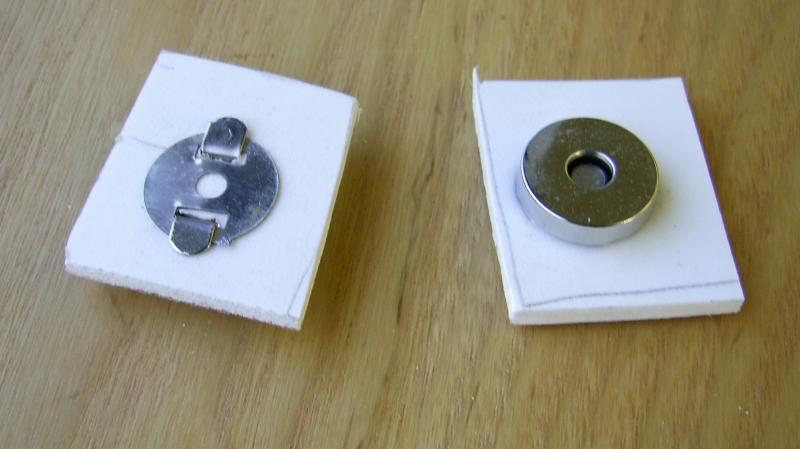
The two boxfile ends, the upper needing the magnetic halfs to be stuck in the holes, the lower showing the non-magnetic halfs fixed to the outside of the box.
Last edit: by Stubby47
Stubby47's Bespoke Model Buildings
All photos I post are ©Stu Hilton, but are free for use by anyone.
Posted
Full Member
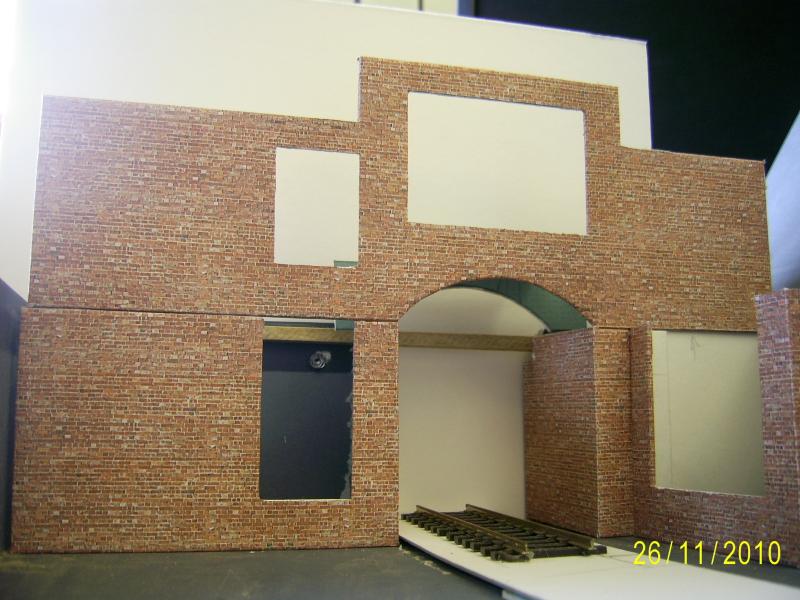
The thin strip of wood at the back is to strengthen the box side, as I've cut the side section out down to the boxfile base. The track will be laid on a 1.5mm card base, supported on 1.5mm card strips, to allow a gap for point control and wiring.
Stubby47's Bespoke Model Buildings
All photos I post are ©Stu Hilton, but are free for use by anyone.
Posted
Full Member
The front, lower section will be built conventionally, whereas the upper section will use Dooofer's warehouse/backscene method. There will be three of these sections, to cover the complete back of the layout, all detatchable to allow the lids to close.
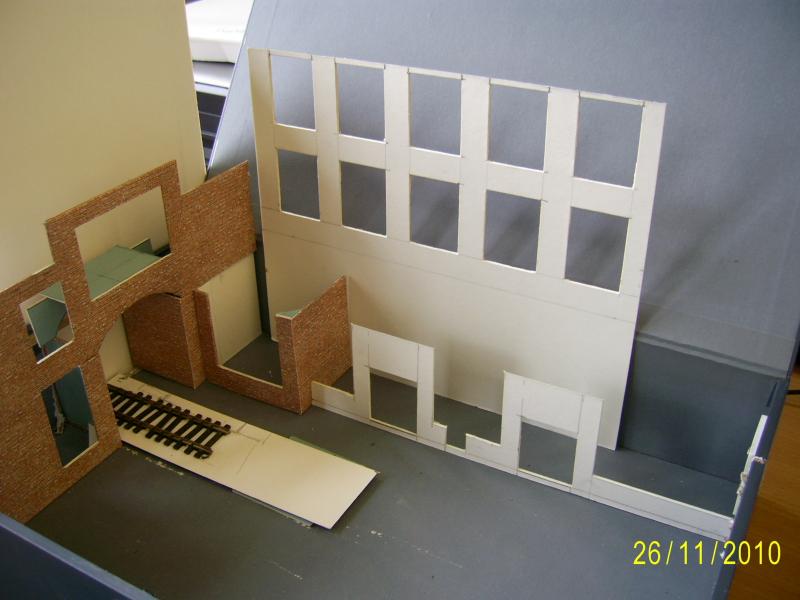
Stubby47's Bespoke Model Buildings
All photos I post are ©Stu Hilton, but are free for use by anyone.
Posted
Full Member
What are you going to do with the lids. Will they be upright as a backscene in which case how will you support them?
I've been concentrating on Much Murkle as of late but must start mine soon.
1 guest and 0 members have just viewed this.