Going large - building large layouts
Posted

Full Member
I have adopted the flat-Earth approach, mainly because of this…..

This is near Gainsborough, not far from where my imaginary line would be if the either the towns or the line had existed (neither of which actually did/do!!). The countryside is really flat so open baseboards etc would be a bit pointless. That has given me a few headaches when it comes to taking the running lines off-scene but the use of trees and buildings makes it work. Thank heavens for Iain Rice and his viewblockers!!
That said, Highmarsh sits amongst the few low hills that do exist in this part of the country, so the branch will be built using the open baseboard technique.
Barry
Shed dweller, Softie Southerner and Meglomaniac

Posted

Full Member
Michael
Posted
Full Member


On the left above is the way we have all made our tracks disappear a thousand times - a bridge/tunnel arrangement that conveniently ends the scenic section of our layout.
That's great if you can use height but layouts set in Lincolnshire, East Anglia etc etc cannot do this so Ian Rice, a modeller who based a number of his creations in Suffolk made extensive use of the "view-blocker" - see above right. The view is literally blocked by an object like a building, row of trees or embankment.
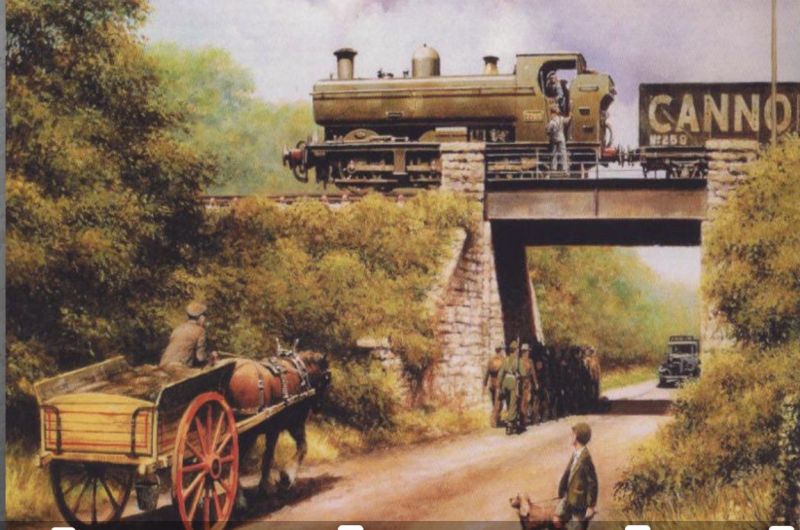
Although this is a painting, the same point applies - the train is about to go off-scene behind some trees. No bridge, no tunnel, just something to take the view of the train away.
Hope that makes sense
Barry
Shed dweller, Softie Southerner and Meglomaniac
Posted
Full Member
Michael
Posted
Full Member

To be honest, trees/nature or buildings is about it really but that is quite a wide scope. Have a look when you are next out and about - its amazing what obscures your view of ends of roads, tracks, railways etc. I take my inspiration from the lie of the land and play around with positioning to achieve what I want.
Barry
Shed dweller, Softie Southerner and Meglomaniac
Posted

Full Member
Staying on the thread Kevin.
Posted
Full Member
It became quite clear quite quickly that my huge range of various curves were going to present all sorts of issues when it came to laying out the plan on the baseboards. I had everything from 238 inches (through the Yarslow platforms) to 21 inches in the storage area. The first job this morning was to standardise the curves to fit, where possible, into the range I could cover with the Tracksetta pieces I have (18, 21, 24, 30, 36, 42, 48 and 60 inch radii).
I wanted the track through the platforms to be on as wide a sweep as possible so I made a 120 inch and 216 inch template to use. Every other curve (and combinations of curves) where modified to suit the Tracksettas or the Peco track gauge thingy that has spacers for laying parallel tracks.
At first, staring at a blank baseboard and the pile of points and the plan, I must confess to wondering where on Earth to start but I dived in with the rearmost storage track, situated at 1-inch centre from the back wall. That allowed me to draw in the lines for the storage roads themselves and, having made a large 12-degree template out of card so that I could align the pointwork properly, began to pencil in the track.
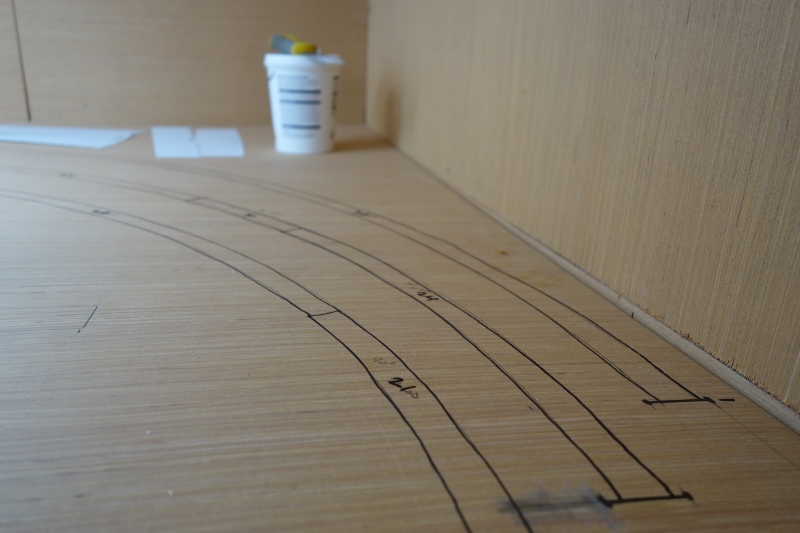
This was an extension of the track marks I made last week…..
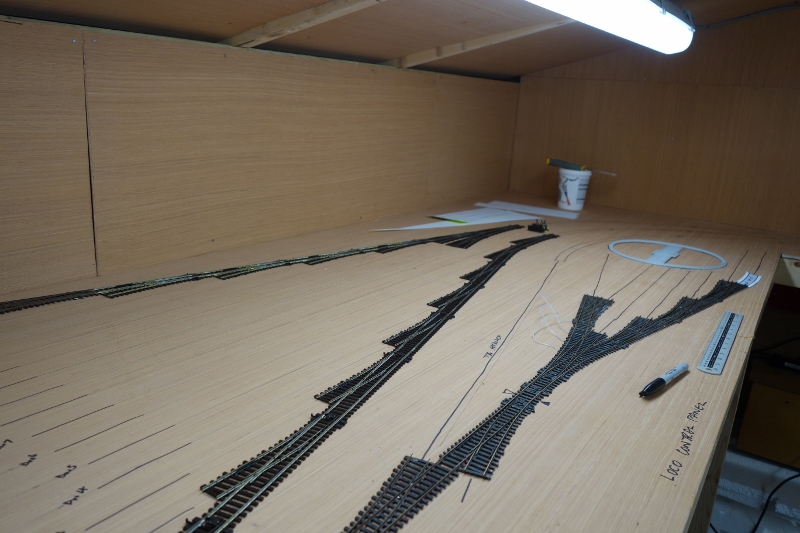
…and this is as far as I got when I stopped for the day. The pointwork is joined up but not laid yet as I have all that electrofaffing to do that goes with live frog pointwork. The power feeds were marked on to ensure I would not forget them! (see next to the Sharpie between the two points).
This is what it looks like from the other end. The drawn curve on the left is the approach to the Trinity Square storage sidings. Note that I have enough space for surface-mounted peco point motors in the majority of places. Only a few will need to be mounted under the surface and the baseboard support noggins are carefully planned to allow that.

Here is the loco storage area, seen as a loose collection of points last week. Note the paper templates for the curves! The Airfix/Dapol turntable will not be used as a turntable - the deck will lift off as a cartridge so that I can remove locos to the servicing desk or swap them out completely. Most of the Trinity Square traffic can be hauled by small engines, perhaps running tender first. That also allows me to use a short section of 21-inch radius curve on the storage approach.
Later in the week I am planning another couple of Shed-days and am expecting to get the other end of the storage roads drawn in. I can then start to cut cork strip and actually laying some track. I managed to find my soldering iron today so all that electrofaffing can be done and I can get some wires soldered to track. Thereafter, a few crocodile clips and some gaffa tape should see an engine running
:Happy :Happy :Happy
Bashing on….
Shed dweller, Softie Southerner and Meglomaniac
Posted
Full Member
Staying on the thread Kevin.
Posted
Full Member
Roger OO DC Steam
Posted
Full Member
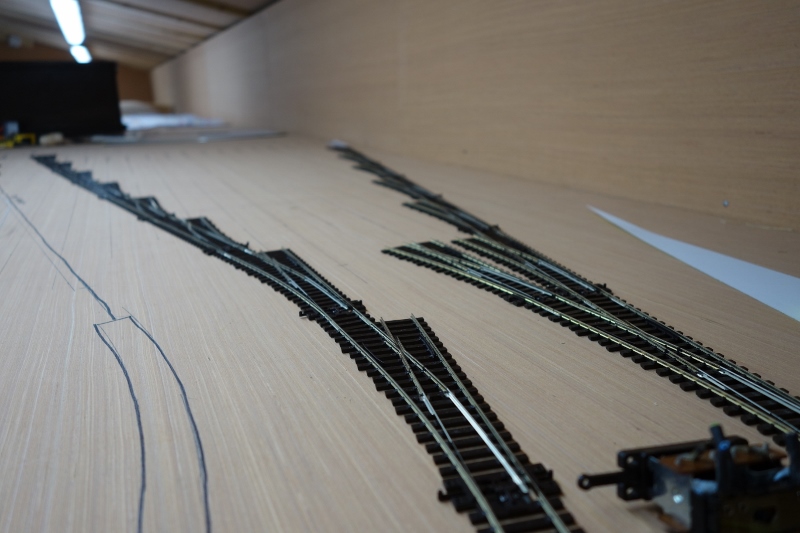
Roger - there is pencil underneath!! I went over the lines with a Sharpie to make sure I laid track on the right pencil lines - there are few where I was juggling things around!!
Barry
Shed dweller, Softie Southerner and Meglomaniac
Posted
Full Member
Posted
Full Member
Hmmm… :hmm… dinosaur?
To be honest, trees/nature or buildings is about it really but that is quite a wide scope. Have a look when you are next out and about - its amazing what obscures your view of ends of roads, tracks, railways etc. I take my inspiration from the lie of the land and play around with positioning to achieve what I want.
Barry
Dinosaur? Now you're talking!!
Super to see track going down. although green with envy at your space and boards! Still, we can all have a vicarious large layout, now Barry! It already looks super!
Michael
Posted
Full Member
Wow, you aren’t going to be short of storage!
Hi Chris
I have four storage zones;
(a) the main running loops providing 8 tracks in each direction holding a total of 34 trains
(b) 5 sidings holding the trains that will terminate at Trinity Square
© 3 sidings for trains terminating at Yarslow
(d) a train cartridge holding an infinite number of trains that will run when required - these include seasonal special workings, engineering trains, milk and pigeon trains etc. At present I have 56 trains.
There is also an area where I can hold spare and "rotation" locos
Going forward, if I want to run a cement train, I can pull those wagons from one of the E class freights and put them on a cartridge. That way, I am not limited by train numbers. EAch cartridge is 66 inches long.
Barry
Shed dweller, Softie Southerner and Meglomaniac
Posted
Full Member
Well that day has arrived and we are back on the right track…….
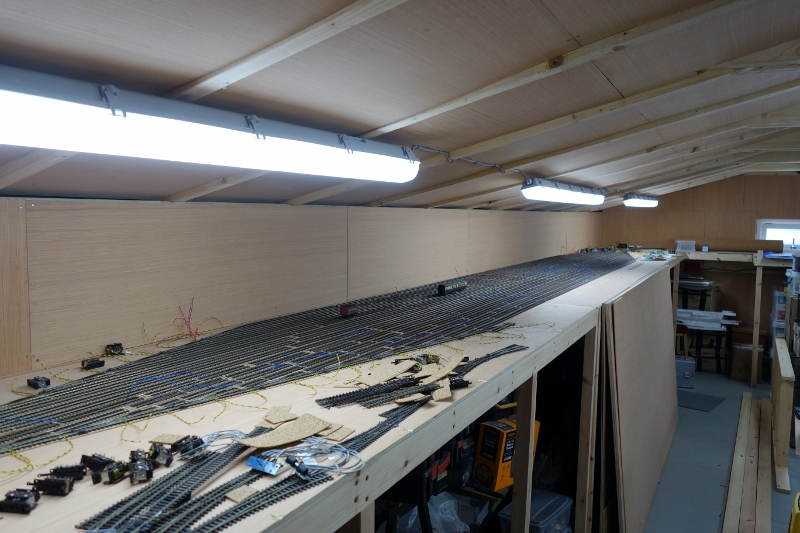
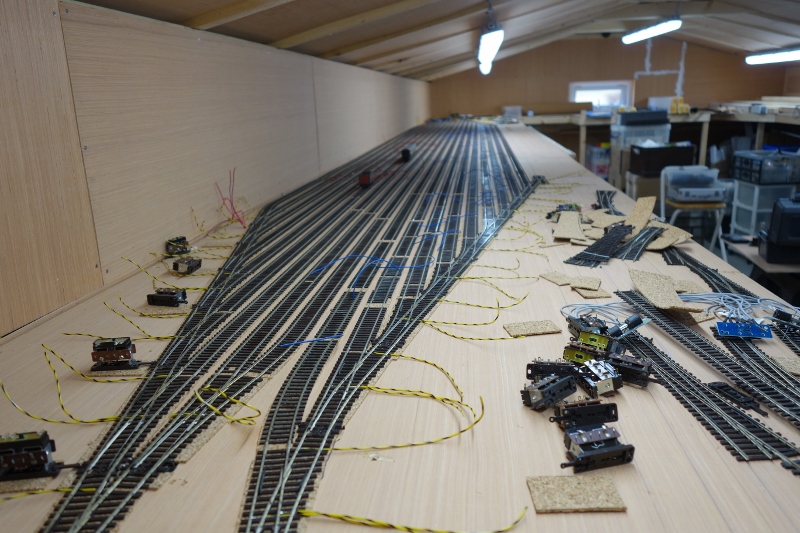
… 18 tracks to be precise! I have now laid the main line storage roads - 8 in each direction with a by-pass track around the outside of each. The Gresley coach is included to give the thing a sense of scale. The track in the foreground of the first photo will be used to fill the space on the right with a further 11 roads for the terminating trains from Trinity Square, the loco storage area (at the far end) and the cartridge in the bottom left hand corner.
The tracks are arrow-straight thanks to my chalk lines, VERY careful measuring with a home-made centre gauge (track centres here are very tight) and a 40 inch steel rule.
The wires sticking up are the feeds for the track sections. the isolator sections for locos and the slow-down zones before the isolating sections - power will be fed to a 12-inch track section via a 22 Ohm restistor to slow the trains to a gentle stop. Isolator sections are all 10-inches as determined by my Brake Tests carried out on the old layout.
In all, these yards consume about 48 sets of points and 113 yards of track - that's about 4 3/4 miles of real size track!! I have got through 4 packets of track pins (track is pinned every 6 inches or so), 8 packets of rail joiners - the list just goes on.
The vast majority of the track you see here was rescued from the previous layout, it's cartridges and a bit of left over stuff from an old railway club project. The pile of Peco point motors will be mostly surface mounted and all will have the switches fitted.
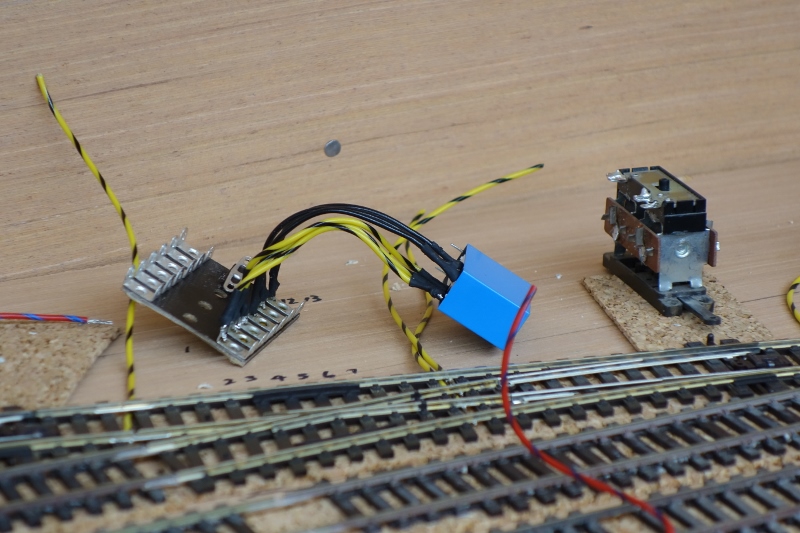
Each of the main line yard points will have one of these control boards comprising a 13-tag board and an 8-pin relay. 3 tags for the point motor wire, 4 for the relay power in/out and distribution, 3 for the mimic panel LEDs and 3 for the frog polarity changing. The yellow and black wires seen on this one are the frog polarity wires whilst
the black ones are for the LEDs. The red/blue wires seen sticking up are for the UP line feeds. Each circuit has its own colour so blue is for DOWN feeds, red for point motors etc. That way, I can keep some track on what does what.
I am hoping to complete the Trinity Square sidings next and will then dive into wiring it all up to make things work.
Bashing on……..
Shed dweller, Softie Southerner and Meglomaniac
Posted
Full Member
Staying on the thread Kevin.
Posted
Full Member
Wow, just Wow
Well that day has arrived and we are back on the right track…….
… 18 tracks to be precise! I have now laid the main line storage roads - 8 in each direction with a by-pass track around the outside of each. The Gresley coach is included to give the thing a sense of scale.
Oh, and Jealous!
Alan
Posted

Full Member
But then quietly glad I'm stay small
:cool wink
I'd never cope with that many points to manage, and all that space to keep clean,
Colin
Posted
Inactive Member
Cheers
Evan
Posted
Full Member
The sidings here are somewhat vast as they have to hold 54 trains comprising 700 vehicles and 40-odd locomotives. Its all part of my desire to have 2 of the key elements of (what I consider to be) my "perfect layout" - variety of traffic and variety of trains. Most of the train classes are represented on this secondary main line and I wanted multiples of each type.
In a couple of weeks, I hope to get the wiring advanced enough to have something running.
At the risk of blowing my own trumpet, details of my old layout, planning for this one and little "Bite Size BIts" of stuff are posted on the Yarslow Model Railway YouTube channel for those interested and with time on their hands :lol:
Barry
Shed dweller, Softie Southerner and Meglomaniac
Posted
Full Member
Thanks for you comment on my plastic cartridges/ cassettes.
Yours should be able to be modified at leisure to incorporate hinged end stops and auto current pick-up if you think worthwhile, saves a bit of time and fiddle to enjoy more operating.
Yesterday I wired in the short Loco cassette at the end of carriage cassette which can be left isolated for auto stop or switched on for Loco control.
A micro switch only allows power to the Loco cassette when the longer carriage cassette is in position preventing running Loco onto baseboard 😳
You may have noticed the remains of a turntable ( hole) in picture but decided cassette system would give more flexibility after reading your posts, thanks ðŸ‘
Going to make more short cassettes next and docking at other storage sidings this afternoon.
Barry T
1 guest and 0 members have just viewed this.