Going large - building large layouts
Posted

Full Member
To be honest, I hadn't considered lifting them up and thought that the spray glue would be ideal. I get the point, however, that if I spill my beer and want to change a tile, it might be a pain, resulting in a confession to Mrs M about activities in the shed :oops: :oops:. I have got the fridge up and running but, for now, it is populated with bottles of water. "Easing in gently" I call it :lol:
I am delighted to think that someone thinks that I know what I am doing!! Yes, I research and test a lot of things but carpet tile glue isn't one of them so I will have to rely on my flooring guy's advice. He has laid all sorts of flooring throughout the house so I am happy that he knows what he is talking about. That said, he flies for a break to Portugal on Monday and it goes on the UK Amber list on Tuesday so……….. :hmm
Bashing on…….
Shed dweller, Softie Southerner and Meglomaniac

Posted
Full Member

You can see that I am having to work around quite a lot of stuff but as the baseboard continues around the shed, the stuff in the centre will diminish and it will get easier. The last bit will be a doddle!!!
This close up was taken to test the lighting rig. I am happy with the results and the positioning of the units. I have a compact 35mm camera (Sony RX100) so can mess around with settings or just point-and-shoot. This photo is taken in basic mode with the lighting set to "daylight" to compensate for the 5800K colour of the LED tubes.
Unexpected visitors slowed me down this weekend and, having lost my footing on the pile of timber, I joined the Falling Down Club - luckily just a few scratches - very much me being an idiot rather than any underlying health issues. I've got a busy week but by the end of June I am hoping to have the rest of the framework built and be thinking about laying some track.
Bashing on……..
Shed dweller, Softie Southerner and Meglomaniac
Posted

Full Member
Staying on the thread Kevin.
Posted
Full Member
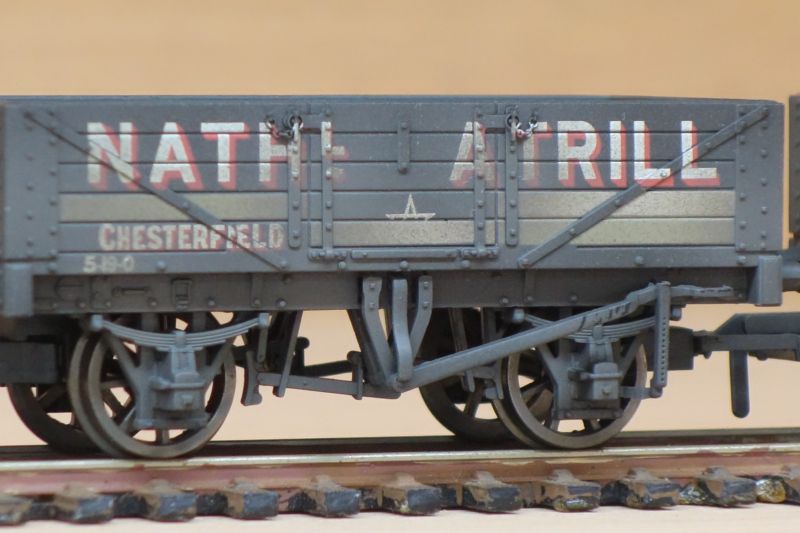
This is one of 3 in a triple "traders" set produced by Bachmann - each of the sets covers a specific geographical region. My set covers Derbyshire etc hence this wagon is Chesterfield based. Don't forget that, by the early 1960's when my layout is set, all surviving Grouping and PO wagons were "common user" and thus wandered far from their natural homes.
The wagon came in this weathered condition - I will add a bit more to it in time - a bit of brake dust and general filth to accenuate the age of the thing.
Barry
Shed dweller, Softie Southerner and Meglomaniac
Posted
Full Member


As its Sunday and I can't get the power tools out, I decided to make a few marks on the baseboard to test how the tracks will go. On the left, I have laid out the pointwork for the loco storage area serving the Trinity Square storage sidings (coloured purple on the trackplan). On the right are the end points for the 3 curves leaving the storage sidings at the UP end. The outer mark shows where the curve ends for the UP line, the centre mark is the start of the DOWN line curve and the left hand one is the start of the the curve towards the Trinity Square storage sidings.
Note with the middle mark how it's easier to correct mistakes at this stage rather than after the track has been laid.
A bit of research and playing around has revealed that I only need 1 inch outside the width of the track to allow for the swing of the longest coaches or a 4-wheeled leading bogie of a 4-6-0 or 4-4-0 locomotive. Therefore, this is the allowance made between the UP line and the lining of the shed.
Bashing on this week….
Shed dweller, Softie Southerner and Meglomaniac
Posted

Full Member
Bash on,
Bill
At 6'4'', Bill is a tall chap, then again, when horizontal he is rather long and people often used to trip over him! . . . and so a nickname was born :)
Posted

Full Member
Posted
Full Member


The first photo shows how small it is when compared with a Bachmann van and the second shows, what I thought was an issue, the height of the coupling. It was only when I investigated further that I realised that I had the truck upside down and that the camera sits on top of the platform rather than inside the well.
The truck is 3D printed with a single coupling and metal wheels. The camera has a 2GB SD card which can hold about 30 minutes of video. Downloading onto the laptop is easy using the standard USB cable they supply although videos are created in .avi format and require converting through Microsoft Video Editor into mp4. (Video Editor is bundled free with Windows 10 and possibly with earlier versons of Windows as well. Its easy to use).
Video quality is OK (not 1080p) but the test came out alright. The instructions suggest maximum light on the subject in question - always a sure fire way of increasing quality! When I get a chance I will take some shots in the shed and post them for consideration.
Overall I would give a 9/10 - (1) at £22, its a great price, (2) its a piece of cake to use for video and photos although the instructions don't tell you how to shoot photos, its quite intuitive, (3) downloading is actually easier than my Soni digital camera but (4) the avi is a nuisance but not an issue and (5) higher resolution would be nice but, come on!, it's £22 and less than 1 inch square!!!
Barry
Shed dweller, Softie Southerner and Meglomaniac
Posted

Full Member
I just ordered a camera like that on-line two days ago so it's good to hear you're happy with yours. Mine is coming at budget shipping rates (strapped to the leg of a pigeon?) from China so will be here later in July :shock:
From the specs and pics the one I ordered looks remarkably like the ones being offered by the modelling trade but was at an on-line price; no 3D wagon included with mine but it will easily fit on a simple conflat which I was thinking might itself be a tad low.
Will report in due course.
BTW I recommend you download the free program "Handbrake" to first convert AVI. files (and MOV. files etc.) to something more useful i.e. MP4. You get options to choose your compression rate.
For example I had a 2 minute - 243MB AVI file out of my 12 yr old Canon IXUS that reduced to a 26MB MP4 file with no loss of detail. Without that first step I couldn't video edit either.
 Last edit: by Colin W
Posted
Full Member
I will have a look at that
Barry
Shed dweller, Softie Southerner and Meglomaniac
Posted

Full Member
That looks a very interesting little camera set-up. I have a key-ring camera which does an acceptable job - given sufficient light ! As you so rightly say, light is the key with video……………..
'Petermac
Posted
Full Member
since it's drifting off topic, I've sent you a PM with some comments about using the CamCar camera.
Colin
Posted
Full Member

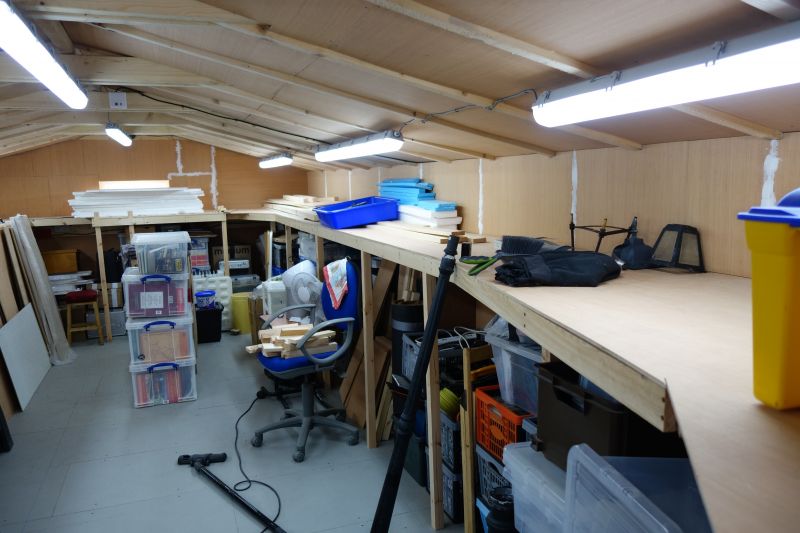
Here is the shed looking tidier than it has for some time!! The baseboards and tops are now installed (tops not fixed down yet) for the storage sidings (top picture) and the station side (bottom picture). The "stump" at the far end will become the peninsular containing the branch and Trinity Square station, coming down to within a few feet of the camera.
Completion of these baseboards has given me the chance to tidy up the storage underneath the railway. It all looks a bit busy but the whole of the area underneath the layout on the far wall and everything down the right hand side beyond the office chair will disappear because its all layout related. The 4 crates of books and then stuff piled up behind them (rolling stock mostly) will also find a new home.
The gap in the legs just beyond the blue chair will be my workbench and I have reserved a bit of 22mm plywood as a top. I will build shelves for storage of tools etc when the time comes.
I am running a bit short on timber for the central peninsular and will need to order some more 3" x 1" as well a couple of sheets of 9mm plywood. Whilst I am waiting for that to come, I will get to work cutting up the cork sheeting (I have 3 rolls 10m x 1m x 2mm) and start planning the storage roads. I have a chalk-line which will allow me to produce straight lines 20 feet long. These will become the centre-lines for the tracks and I will lay cork strip either side of that line onto which the track will be pinned. The baseboard noggins have been carefully planned to avoid point motors although most of the storage-area points will be worked by surface-mounted motors (there are only a dozen or so where there is not enough space between tracks to do that).
Bashing on……..
Shed dweller, Softie Southerner and Meglomaniac
Posted

Site staff
Cheers
Matt
Wasnie me, a big boy did it and ran away
"Why did you volunteer ? I didn't Sir, the other three stepped backwards"
"Why did you volunteer ? I didn't Sir, the other three stepped backwards"
Posted
Full Member
Using a chalk line for your straights is a stroke of genius - why didn't I think of that ? I used a spirit level, which was great up to a metre long, whilst my chalk line sat in a drawer gathering dust - or whatever chalk does when it's not on duty …….

'Petermac
Posted
Full Member
Posted
Full Member
I read somewhere ages ago (and have mentioned before on here somewhere) that the length of your train should be 1/3rd of the visual space you present it in. That means, with 26 feet, my trains should be about 8ft 8in long.
104 inches gives you (a) loco + 25 wagons + brake or (b) loco + 8 coaches + tail van.
In such an environment, 12 coach trains look too big and a 10 wagons freight looks short. I am fortunate in that my local club test track (now available again) is about 26 feet long so I have tested this theory and am certainly a fan.
Yarslow sits on a secondary main line so no A4's or Pacifics rushing about although I will have V2's and a few 2-8-0's on freights. The closest I get to a Class A passenger train is an Inter District working behind a B1.
Barry
Shed dweller, Softie Southerner and Meglomaniac
Posted
Full Member
Well I break that rule frequently!!!1/3rd of the visual space you present it in.
Posted
Full Member
Shed dweller, Softie Southerner and Meglomaniac
Posted
Full Member
Roger
Roger OO DC Steam
1 guest and 0 members have just viewed this.