Going large - building large layouts
Posted

Full Member
Hi Graham.Hi Barry. I like your idea of the desk/work bench. What is the height of you base boards please?Cheers
Graham
My baseboard tops are 48 inches above ground level. This gives a good duck-under at the door, good operating height and enough of a backscene depth before the roof (5ft at the side of the shed).
The desk fits nicely underneath the baseboard with my office chair on its lowest setting. Storage is also a big feature of this shed - I refuse to put stuff in the house loft and like to keep the garage clear so under the baseboard, provision has been made for the garden furniture cushions, camping equipment, tools, etc alongside the storage boxes for rolling stock and all that "stuff" I have accumulated ahead of building the layout. The more I progress, the less "stuff" I have stored so its a great incentive to bash on!!
Barry
Shed dweller, Softie Southerner and Meglomaniac

Posted

Full Member
Many thanks again.
Cheers
Graham
Graham Long
Engineers do it by design.
Engineers do it by design.
Posted

Full Member
I suspect Yarslow will look wonderful when the scenics start to appear.
Michael
Posted
Full Member
Always good to have something to inspire you and to aim at…….
Shed dweller, Softie Southerner and Meglomaniac
Posted

Full Member
Staying on the thread Kevin.
Posted

Site staff
Hi Barry I have been looking for the subscribe and bell 🔔 symbol yet again, but I still cannot find them, all the same excellent progress, I will keep watching. Best wishes Kevin
Hi Kevin if you click on the 'watch on Youtube' it will take you there. You should then see the ' Subscribe' and 'Like' buttons. If you are then watching it fullscreen just click on the small square in the bottom right corner of the video which puts it back into windows mode within Youtube which should meen you see the buttons.
Also below the 'Like' button you will see the Yarslow link ? Clicking this will take you to Barry's homepage. At the top you will then see ' videos' click on this and you will see a list of all the videos Barry has done.
WARNING !! Time WILL disappear mysteriously if you do this :thumbs
Cheers
Matt
Wasnie me, a big boy did it and ran away
"Why did you volunteer ? I didn't Sir, the other three stepped backwards"
"Why did you volunteer ? I didn't Sir, the other three stepped backwards"
Posted
Full Member
Staying on the thread Kevin.
Posted
Full Member
Watching YouTube videos does not cost money although for some, it means they earn money - I don't.
You can daisy-chain extnsion leads but be aware that a normal wall socket can only handle 13 amps so if you plug a few heaters into one, it will get warm and that could be dangerous.
As a rule of thumb (in the UK), a Kilowatt of power will draw 4 amps - a 2 kilowatt heater will therefore draw 8 amps. Two of them in one socket is not good but each one in a separate socket is fine.
Extension leads normally come with a fuse so if you overload them, the fuse goes. Again, this is usually a 13amp fuse so the rules as above apply.
Daisy chained extension leads are perfectly safe BUT can be a trip hazard.
If you are in any doubt over electrics, ask an expert or Citizens Advice.
Barry
(Post career retrained Qualified electrician now retired)
Shed dweller, Softie Southerner and Meglomaniac
Posted
Full Member
 Last edit: by Passed Driver
Staying on the thread Kevin.
Posted
Full Member
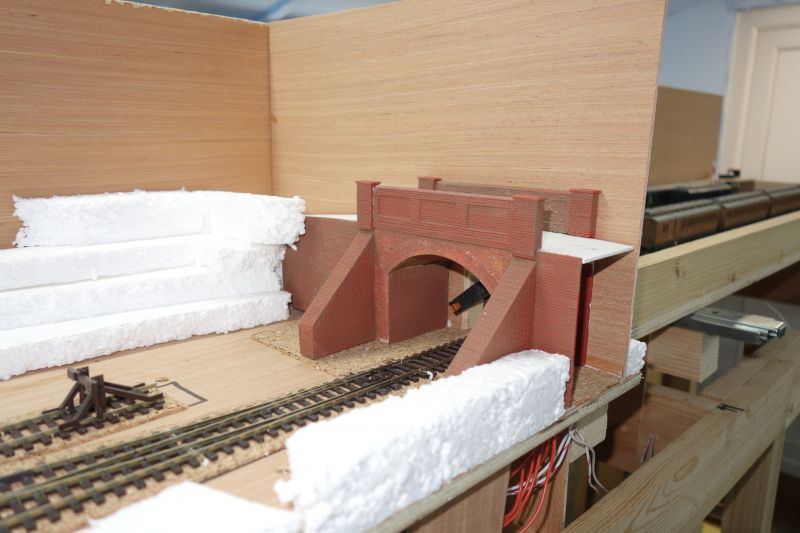
This week I set about producing a bridge to hide the exit from Blowick Lane to the traverser. I started with a few Wills bridge kit bits as templates but the more I looked through my spares box, the more bits I found until I found enough to make this. The polystyrene will be cut to shape next. Backscenes have now been added for the length of the branch and across the Blowick Lane/traverser divide.
I started with this uncredited photo found on t'internet.
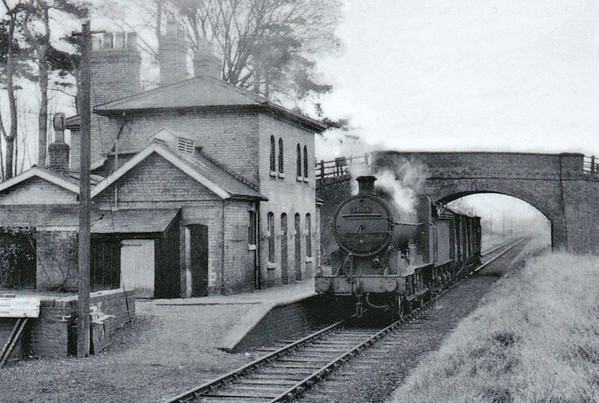
Note that this is an occupation crossing on flat ground, hence the heavy butresses which I have replicated. The crossing either side of the bridge will be protected by fences as here. I am not sure where this station is but the loco looks like a J6 which would put it in LNER country.
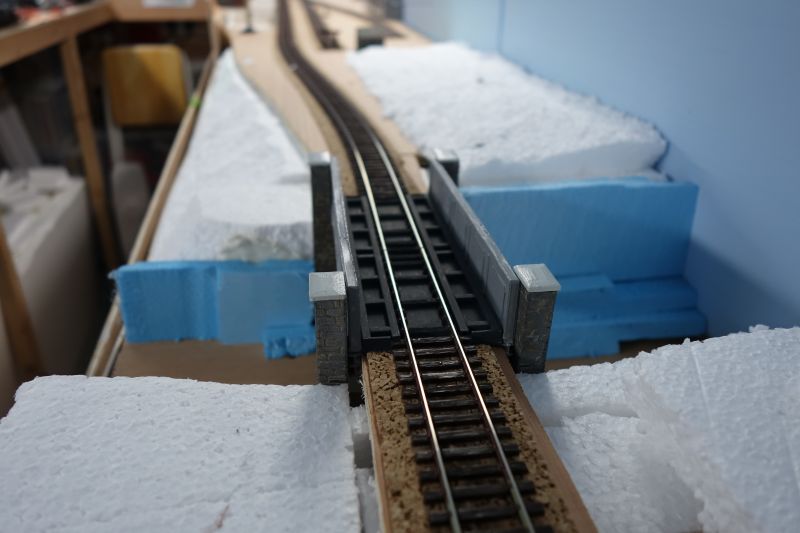
I have also done some more work on the branch bridge where I cut most of the track sleepers away and added some Plastruct girders. The PW Inspector would not be happy with a rail joint on the bridge! At this stage, the bridge parapets are balanced on and the "rocks" have yet to be formed from the blue foam. The rails have since been painted (Humbrol 113) right along the branch and once the Blowick Lane bridge is set in, a textured coating will be added/painted brown/green.
At the workbench, I have cut a Dapol engine shed kit in half to make a warehouse and have started to make a loading shed with canopy over the tracks. The base is 40thou plastic card with a stone effect face (to match the main platform) and a top made from left-over planked sheet from the Wills occupation crossing kit. The Metcalfe boiler house on the far end will be replaced with a scratchbuild version sitting on a larger footprint. The loading gauge is a Peco/Merit model modified to reflect the simple NER type.
Bashing on…….
Shed dweller, Softie Southerner and Meglomaniac
Posted

Full Member
You are cracking on at a very swift pace- I am very impressed.
The bridge looks just right as a "wing", I have always liked those Wills kits. Will you be able to resist the temptation to put a bus on it?

The Dapol kit bash looks equally impressive. I like the varied roof lines you are beginning to develop on the back scene.
Best wishes
Posted
Full Member
As I start to add scenery, I continue testing and have found some irritating operational issues - there is a strange short-circuit in the Master Cab Control Panel when controllers are set to one specific combination. Hard as I try, I cannot find it so I will have to set aside a day to sort it out.

I have also undertaken a review of the trains in storage - mostly as I start the construction of the cartridges. I have been reading Steve Banks heavily - he is the go-to source for much information on LNER passenger tains. As a result, I have decided to add a "WSX" (Monday-Friday) Express passenger train in each direction that will be a 5 or 6-set. The SO versions will be the same formations but with added carriages to make up an 8-coach train. This is very "LNER" (and other lines too I suspect) and add a more realistic flavour to the passenger workings. To make room for these, I have dropped a couple of Unfitted Freight workings. In re-distributing the wagons that ran on these trains, I have been able to create a third south-bound coal train behind a 2-8-0. This means that about 1/3rd of all southbound traffic is coal
I am still happy with the number of freight trains available and this, of course has cut down on the need to buy more wagons, albeit at the expense of needing another few coaches. I could, at a later date, model some more "modern" trains [1962-ish] of block workings - I have a number of cement wagons for example. I must remember that I am only modelling a secondary line so there should not be lots of C Class express freights (I already have Fish, Horse Box and Milk trains).
Bashing on..
Shed dweller, Softie Southerner and Meglomaniac
Posted
Full Member
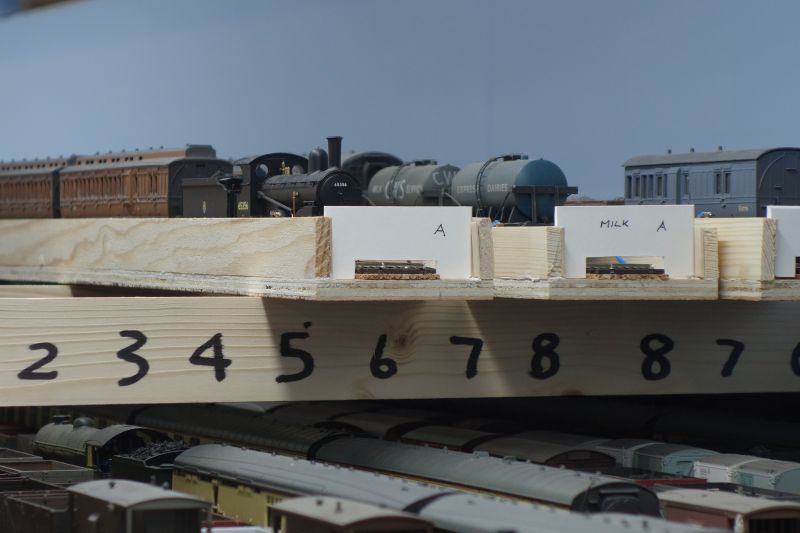
The new cartridges are slim-line versions of the old ones used previously. 9mm ply from the baseboard form the bases with pine stripwood as sides. Card doors are used again with tracks wired to small screws on top of the sides at each end. You can just see the blue connecting wire and the screw sticking up in front of the grey Engineering coach on the right.
The 3 cartridges I made to test working theories are all 48 inches long - great for the Milk and ballast trains but too long for the "Boys" train. I will make a shorter version and use this one for another purpose (hence the lack of train description on the end door).

Here is simple method of powering the cartridges. Rails are connected to the brass poles and the poles to the cartridges using croc clips. I need to make a safety barrier between the poles as I have already run a train into storage and (nearly) off the end of this track into the abyss!!!
The sidings behind the cartridge hold the Parcels train and the Trinity Square Vans Trip working. The 3 short sidings squeezed in behind them are for the Wythnesney passenger and freight workings (2-coach and 6-wagons only)
Last edit: by Barry Miltenburg
Shed dweller, Softie Southerner and Meglomaniac
Posted
Full Member
Staying on the thread Kevin.
Posted
Full Member
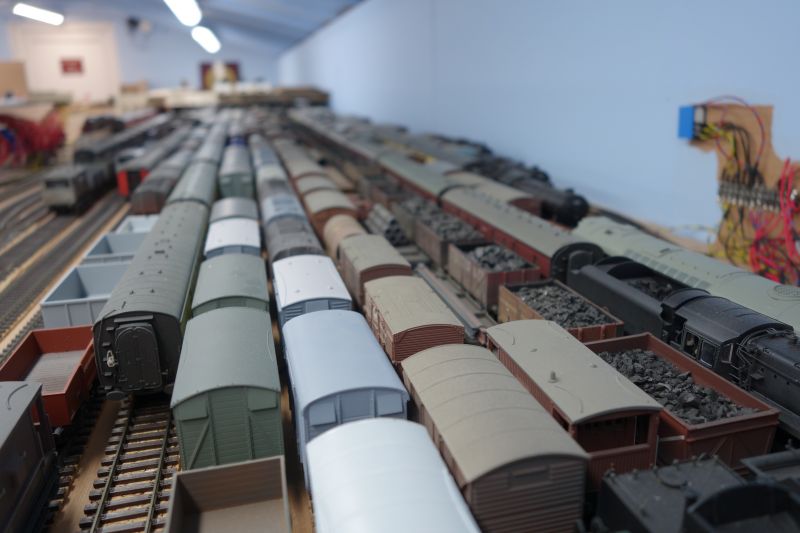
My layouts have all progressed incrementally - this one is a bigger version of the last one - so the majority of the freight stock ran on the old layout in a weathered state. I did a few pieces on weathering with an air-brush as a thread on here (post 26 onwards of my Yarslow thread in the Personal Layout section) illustrating the "Wagon Project" where I weathered some 300 wagons.
I have acquired a load more for this bigger project and have another 200 wagons or so to weather but I find it a bit of fun once you get into it so I will wait for the summer months and sit on the patio doing it with a cold beer!!
I have also got a load of coaches to do but as they went through a wash plant on a regular basis (or at least got a hand-clean once in a while), there is less to do on each vehicle but each needs more attention/rain streaks etc. As yet, I have not ventured close to the loco fleet but will have to pluck up the courage at some point. I have a number of "retired" engines (old Hornby train-set stuff) to practice on!!
Luckily, there is a lot of published material on weathering, plenty of people to copy/follow and more than a couple of chaps on here who know what they are doing, so I have no excuses for making a rick of it!!!
Barry
Shed dweller, Softie Southerner and Meglomaniac
Posted

Full Member
'Petermac
Posted
Full Member
Staying on the thread Kevin.
Posted
Full Member
"Weathering with a cold beer" - maybe I should re-visit my weathering projects …… :roll:
Peter - its a bit like ballasting with Classic FM. Some things just seem to go together
Shed dweller, Softie Southerner and Meglomaniac
Posted
Full Member

'Petermac
Posted
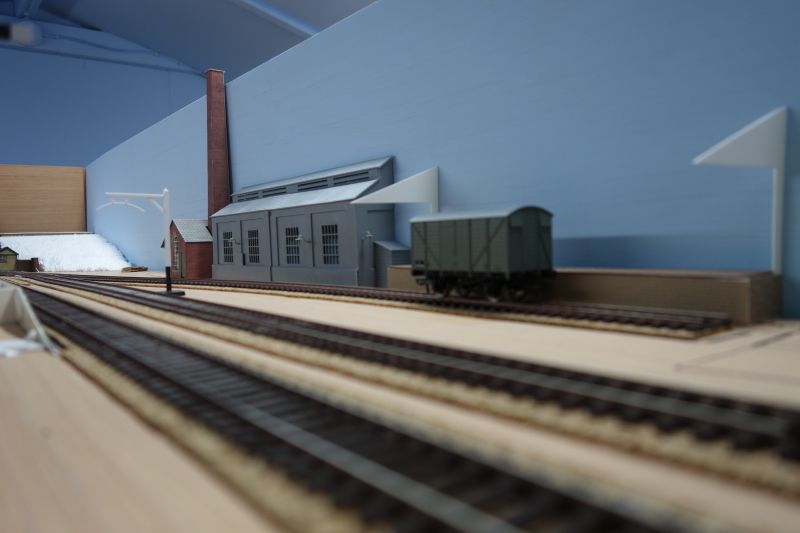
Full Member
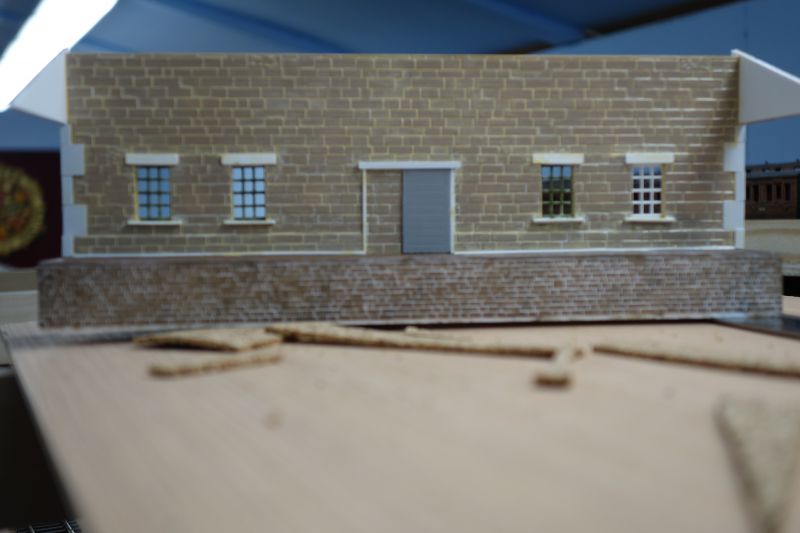
This is the factory loading shed. The building itself is stone-built, sitting on a brick platform. The platform matches the warehouse and the story goes that the original loading shed burned down so was replaced in stone back in the day. The windows are from the spares box whilst the headers and cills are 40thou plastic card strip. The sliding door came from the spares box as well whilst the door frame and cover for the runner are simply plastruct. Corner stone Quoins are just 10thou card.
The mortar colour for the main building is more yellow than white - actually its BR cream - a Railmatch colour that looked about right. The stone will be a yellow/blue colour. The roof is being tiled with Slaters tile card and I have made some brackets to use as the central supports. I will post more pics when the painting and roof are complete.
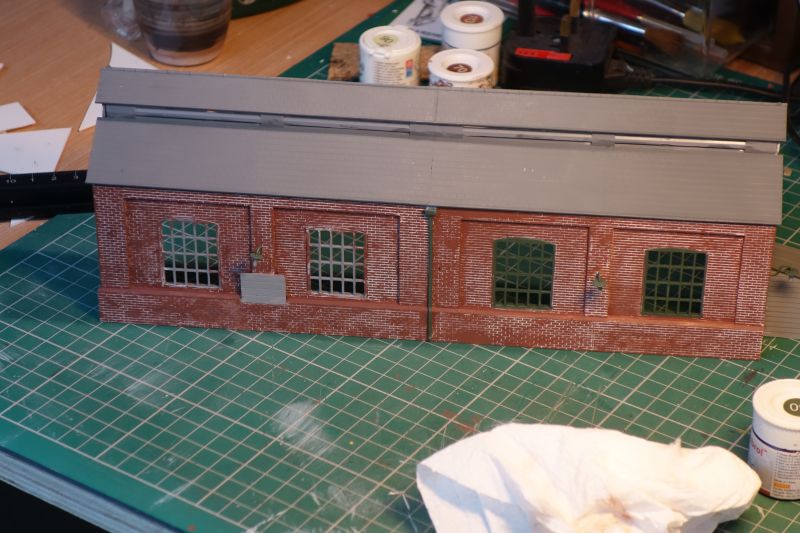
This is the Dapol engine shed built as a warehouse. The right hand side has had the brick colour enhanced and the windows painted whilst the left hand side is yet to be done. The roof has had its first coat of slate paint although the louvres are yet to be treated.

Finally, the boiler house. This is a large version of the Metcalf boiler house. The body is picture-framing mounting card. Windows come from the spares box and maybe the Wills window pack. The arch-top window was marked out around a centre line and then cut out with care. The door and window position match the Metcalf original although the chimney (square on the original) will be a Wills boiler chimney from the "Factory fittings" pack. The building will be covered in brick embossed plastic card in due course,
Note that the ground has been covered in Polyripple Course and painted with brown emulsion. The gritty lumps in the Polyripple can be sanded out if they interfere with the building footprint, or where you need a road. [There is a Polyripple Smooth but I ran out!!]. Most of this will be covered with scatter and static grass eventually so the weird looking texture matters not.
The backscene has been given a couple of coats of blue and I will be reaching for the airbrush soon to to provide clouds - I have been looking very closely at various layouts, trying to find what I like and working out how to produce it.
Bashing on…………
Shed dweller, Softie Southerner and Meglomaniac
1 guest and 0 members have just viewed this.