An inexpensive and simple method for Manual Point Control.
Posted
#150679
(In Topic #8359)

Inactive Member
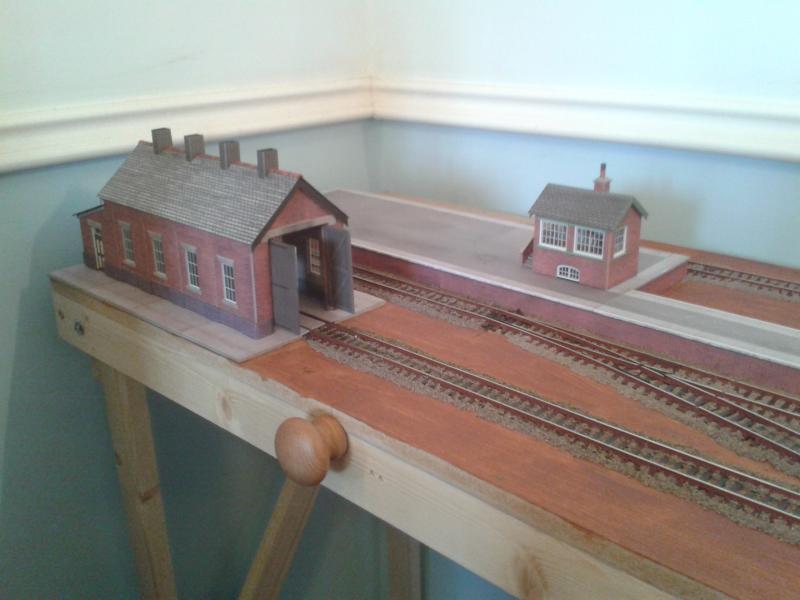
As created for my Coombe Hinton "N" layout.
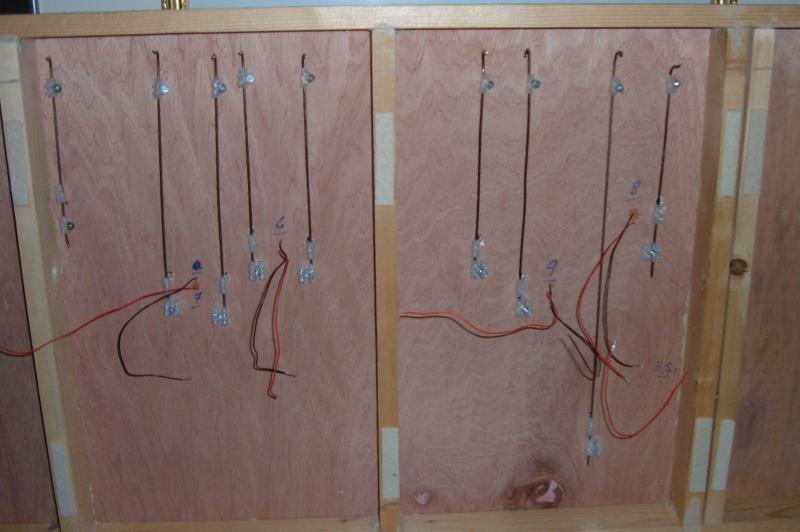
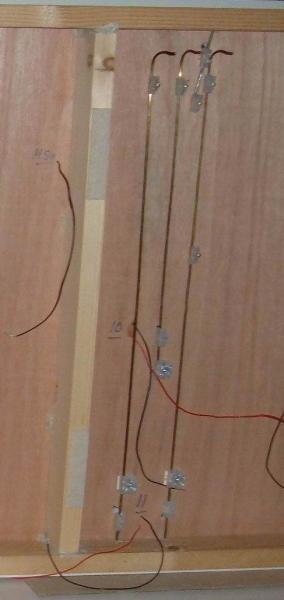
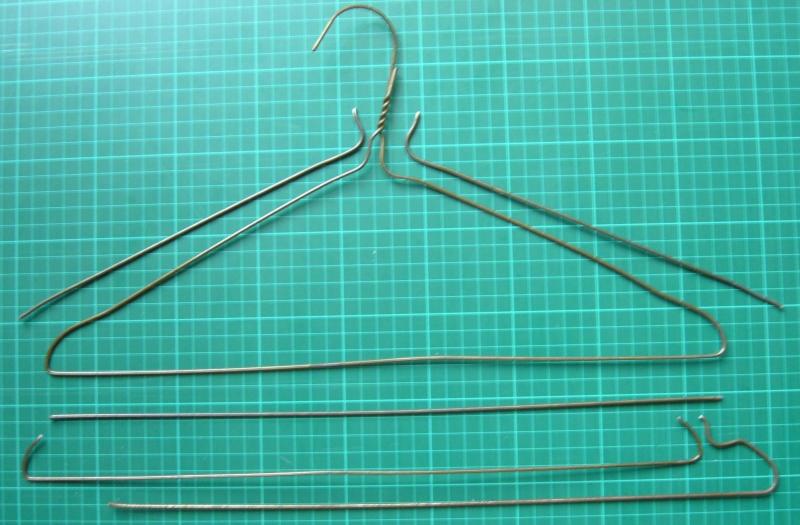
I've now completed all 21 of my manual point controls based on Sol's method but incorporating some ideas of my own, i.e. whereas Sol used piano wire (EDIT: checking back I found he used cycle spokes) I have used old wire coathangers (usually found in dry cleaners or charity shops).Check out the photos below and you'll see that I'm able to put the baseboard on it's side for access and as I made it to overlap the cupboard upon which it rests by 50mm this enables me to have the controls underneath and out of sight. Each point requires a hole being drilled through the baseboard of a size to allow the point rod to be moved from underneath.
The wire is shortened by cutting to the size required (or lengthened by straightening out the whole coat hanger and removing all the bends by hammering flat) and is run through the wire connectors, the top and bottom ones being screwed to the baseboard and a moveable one which has a paper clip section - cut off to about 15/20mm on each angle of an L bend - which is inserted into the connector along with the length of c/h wire. The fiddly part is inserting the piece of paper clip into the point rod hole and then tightening the two screws 100% whilst holding it in position as close to the point hole as is possible. Once this is done the top and bottom connectors can be fixed in their final positions and the point should operate smoothly - of course do not tighten their screws onto the c'h wire as nothing will work!!!!!
I found in a couple of places that the bottom fixed connector had to be above the actual paper clipped one as it was too close to the baseboard edge, however I then drilled a 10mm depth hole in the framework into which the c/h wire was able to slot in and move up and down thus effecting a nice smooth movement. Ok, here's some photos:-

Hope I have made this clear but if not please ask away.
Ken.
 Last edit: by Ken
'It don't mean a thing if it ain't got that Swing'

Posted

Full Member
I presume you operate these by reaching under the front baseboard edge but there's a couple of things I don't understand.
1. What stops you pulling the C/H wire out of the bottom choc. block or is there a retaining bend or stop on the bottom end ?
2. You don't seem to have any omega loops in there. What stops you over pulling or over pushing the rod and distorting either the point rod wire or, heaven forbid, the point blades themselves ?
I'm surprised a paper clip will go through an "N" Gauge point tie bar ………:shock:
'Petermac
Posted
Inactive Member
Hope this helps,Peter, just 2 fingers and a thumb which go nicely around the (bent) handle and it operates with a gentle click backwards and forwards. The bit of paper clip being springy works in a similar way to an omega loop and with the action being so positive it's an absolute joy to use. The bottom choc. block is there merely for guidance to allow the wire to move freely up and down (and to stop the wire moving outwards which would result in the paper clip springing away from it's position - how do I know this?!!! :roll: ) and it's the central one - which operates the point with the paper clip which is screwed in tightly to said choc. block - that holds it to the correct position. Another "safety factor" is that the hole in the baseboard only allows the paper clip to make the correct amount of movement so it's essential do drill this just so. I found that 3 different sizes of paper clip go easily into the tie bar hole, the difficult thing is getting it to go through the choc. block with the thickish c/h wire but again it's just experimenting with the different types of block, clips and wire.
Ken.
'It don't mean a thing if it ain't got that Swing'
Posted
Full Member
Many thanks. The grey matter is currently mulling with a picture of Maxmill Junction on the fringes (I've just looked at the cost of Tortoise motors :shock::shock:)………………………:hmm
'Petermac
Posted

Site staff
Ron
NCE DCC ; 00 scale UK outline.
NCE DCC ; 00 scale UK outline.
Posted

Full Member
Nice work.
Posted
Full Member
I should not read things when a) my back is very sore to the point I cannot move much and b) I am straight out tired but do you have to fold the paper clip at all? What does it look like at the point end under your board, I take it you virtually have to drill a slot for it to work?
I must admit I do like the use of the connectors as guides…
Cheers
Trevor
Posted

Legacy Member
Posted
Inactive Member
Yes Trevor, you straighten out the paper clip, then bend it - or use one of it's existing bends - into a rightangle and cut it to size: for "N" scale each 'arm' is about 15mm long but of course one 'arm' may have to be longer depending on the depth of your baseboard. I haven't got to this stage yet but the bit poking above the point control will have to be cut off and the rest of it painted black.………do you have to fold the paper clip at all? What does it look like at the point end under your board, I take it you virtually have to drill a slot for it to work?
I must admit I do like the use of the connectors as guides…
Yes drill a slot by placing the point temporily in position then push a pin or similar object through the tiebar hole into the baseboard then move the tiebar and push the pin in again, remove the point and then use a small drill bit to drill through the baseboard at these 2 marks. The drill holes almost merge but I used a small file to open out the slot; when this is done put the point back into position and put a bit of paper clip into the TOP of the tiebar and waggle it backwards and forwards to see if it works properly, if not just file out a bit more of the baseboard hole. Once all the points have been treated in this fashion and the point permanently place in position check the holes from underneath the baseboard as I found that all of them had to be carefully drilled into again from underneath with a larger bit to accomodate the paperclip movement.
It really does work superbly and another thing I did was to use double chocblock connectors so that the 2 empty holes could be utilised for the adjacent point wiring connections. I love using "found" materials and I'm quite pleased with the results of what I think is a rather unique way of point control (as a musician I hope I'm allowed to blow my own trumpet!). ;-) :roll: :oops:
Ken.
Last edit: by Ken
'It don't mean a thing if it ain't got that Swing'
Posted

Full Member
Staying on the thread Kevin.
Posted
Full Member
http://yourmodelrailway.net/view_topic.php?id=12285&forum_id=21&page=1
I used wooden doorknobs on the end of the coathangers…
Terry
Last edit: by col.stephens
Posted
Inactive Member
Actually Terry my posting on this was a year or so before you did your one so perhaps I should be Lightning instead of Thunder!!!!! ;-) Either way it really doesn't matter; if either method helps someone that's what counts.Sorry to steal your thunder Ken, but I have already used this method using wire coathangers and terminal block connectors on the layout shown here:
http://yourmodelrailway.net/view_topic.php?id=12285&forum_id=21&page=1
I used wooden doorknobs on the end of the coathangers…
Terry
Ken
'It don't mean a thing if it ain't got that Swing'
Posted

Full Member
Thanks
Ron
Proper Preparation makes for Perfect Performance!!
http://yourmodelrailway.net/view_topic.php?id=13331&forum_id=21
http://yourmodelrailway.net/view_topic.php?id=13331&forum_id=21
Posted

Site staff
Rather depends on your budget Kevin.Hi All Please excuse my ignorance, due to a lack of knowledge on the subject, but I thought with D C C the points were worked automatically. And the operator just sat back with a cuppa?? Passed Driver
Ed
Posted
Full Member
[user=711]col.stephens[/user] wrote:Actually Terry my posting on this was a year or so before you did your one so perhaps I should be Lightning instead of Thunder!!!!! ;-) Either way it really doesn't matter; if either method helps someone that's what counts.Sorry to steal your thunder Ken, but I have already used this method using wire coathangers and terminal block connectors on the layout shown here:
http://yourmodelrailway.net/view_topic.php?id=12285&forum_id=21&page=1
I used wooden doorknobs on the end of the coathangers…
Terry
Ken
Apologies Ken, I didn't notice the original posting date.:oops: I take my hat off to you. I wish that I had seen your original post as I didn't think of using paper clips and used brass wire instead, as that was all I had to hand. It works but the brass wire is prone to bend out of shape as it is too soft.
Terry
Last edit: by col.stephens
Posted
Inactive Member
Have a look at the 2nd picture Ron and if possible zoom in to the right of No.7 where you can just see the paper clip wire slotting down into the connector. For a full how-to see my posting of 2nd March 2013 (scroll up 6 above this one).Ken, did you take any photo's of the area under the point, how you joined the CH with the paperclip??
Thanks
Ron
It's quite simple to do and I suggest you try a dummy run using an old scrap of wood etc. Hope this helps.
Ken.
'It don't mean a thing if it ain't got that Swing'
1 guest and 0 members have just viewed this.