LMS Stove R
Posted
#177735
(In Topic #10064)

Full Member
This is getting silly
OK, so I've wanted a Stove R forever. I have a thing about 6 wheeled vehicles so this is an essential "cop". When the Dapol/Hornby/Ian Allen model came out a couple of years ago I happily grabbed two, one in BR guise and the other LMS. At the time I was dabbling in early 1960's BR and wanted a milk train having already got a bunch of milk tanks (also 6 wheeled).The issues with this Dapol model have been well documented and, of course my BR version was unhappy. I was also unhappy because the wheels were 12mm instead 14mm and the brake shoes were miles away from the wheels. The van also wouldn't stay on the track.
In this case, I modified the works fairly extensively and got it to a state where it looked reasonable and ran reliably. I discuss what I did here:
http://bmrcm.org/stove-r-from-hornby-magazine-and-dapol
The LMS model has a well executed body and excellently rendered lining and lettering. I had hoped that I could use the body as is while focusing on the underframe for EM gauge. Alas, this was not to be because for whatever reason Dapol chose to put the central lining above the handrails instead of through them:
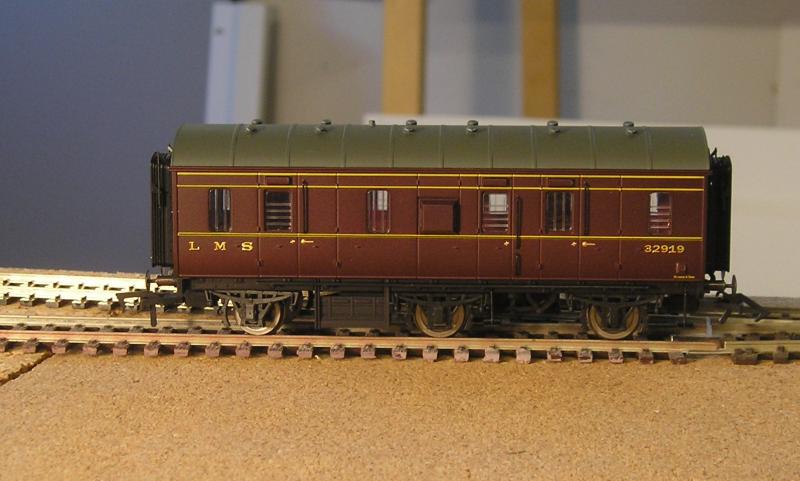
It really is a crying shame (as I've said before) because Dapol must have access to all the books I have (and more) and there is not one picture showing the lining in the above position (I rather hoped there was), so, really no excuse.
 I went through a period of navel gazing and tooth sucking before finally resolving that this won't do. I removed the paint and lettering with a fiberglass pen
  .
.I'll document my second go at this (told you it was getting silly). My first go involved a Brassmaster's Cleminson chassis kit which all worked well enough until I tried it with axleboxes attached - then it all went pear shaped because the axleboxes tended to foul as they moved over the solebars :shock:.
However, I did some trials and found that with the outside axles locked and a sliding center axle, the underframe could work.
This is a huge disappointment of course but "never give up". The cleminson chassis was put to one side for another project and I started again.
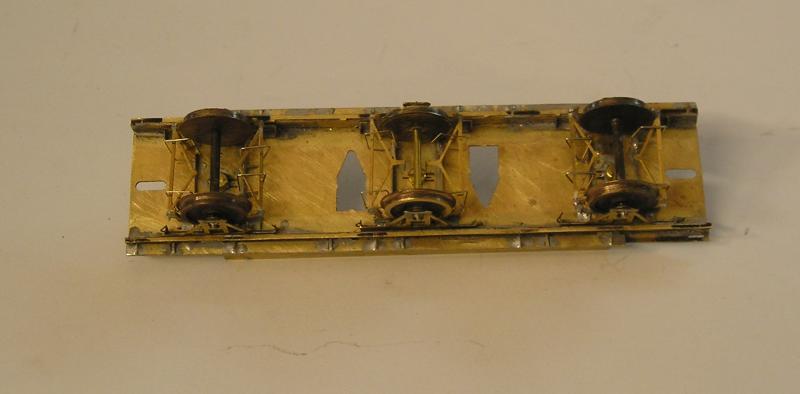
This time I used a Comet 4/6 wheel underframe kit:

This comes out as this:

For W irons I went for Bill Bedford sprung units.
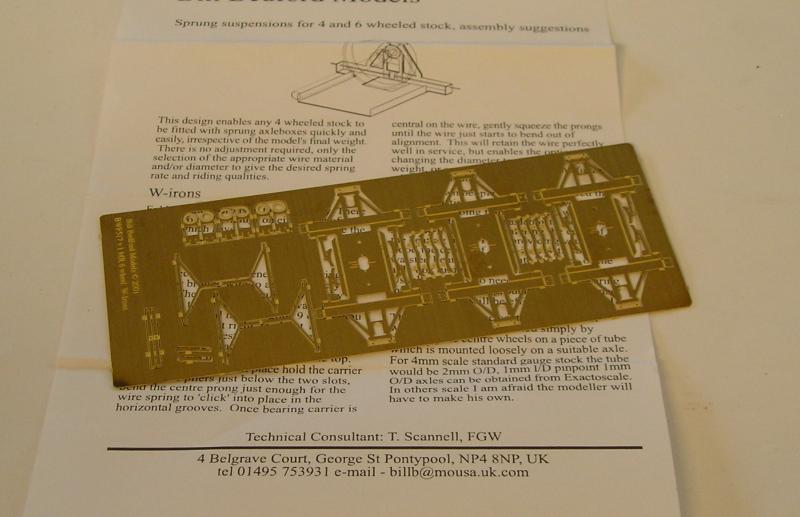
These work well but are a fiddle to assemble.
I found some that had already been made up but, for some reason that escapes me, the brakes had been cut off.
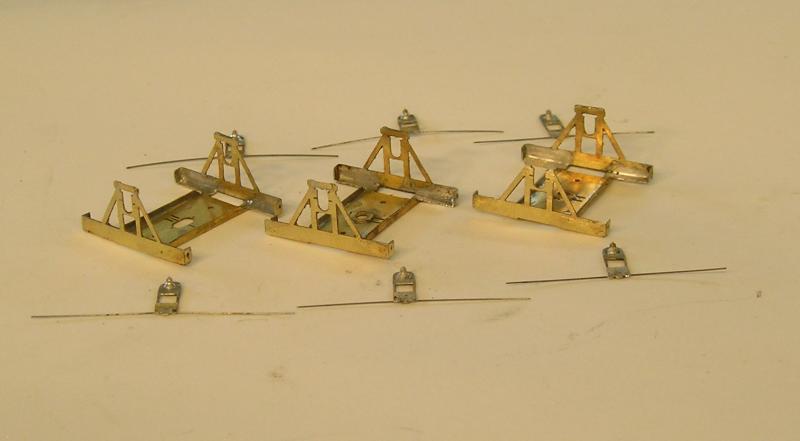
You will note that the bearing carriers have a spring wire that threads through holes in the bottom corners of the W irons.
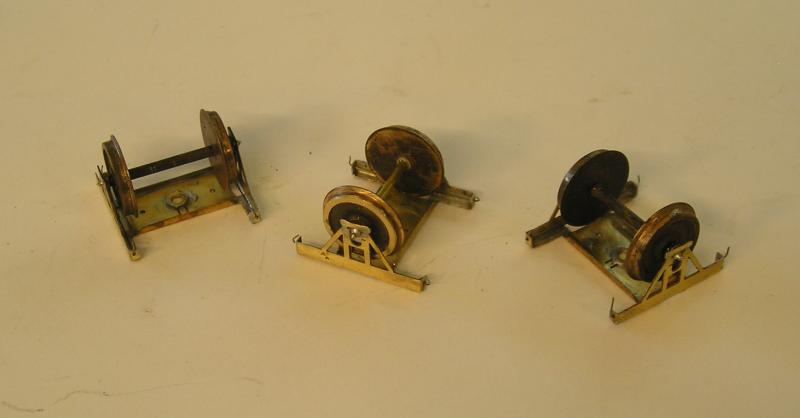
I used Bachmann 14mm wheels for this build, but reworked them to the EM spec.
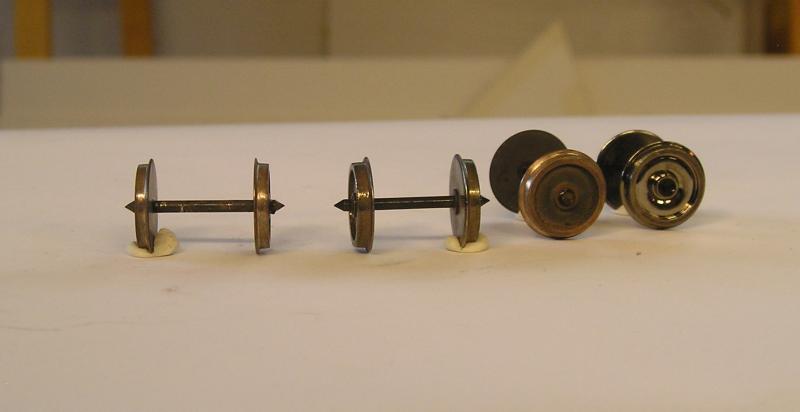
I think the difference is pretty clear in this picture.
Now I mentioned "sliding center axle" earlier. You may well be asking "what's that"? This lets the wheels freely move from side to side to compensate for curves.
What you need is to find a length of brass tubing that is ideally 2mm in diameter with an ID of 1mm ish. Well, I couldn't so I improvised.
I had some brass tube of ~ 1.5mm dia and an ID that was near enough 0.032" ( just shy of 1mm). (I did find some tubing of 2.38mm dia which was too large to go into the 2mm ID bush. I also know from experience that trying to ream these plastic bushes doesn't work well. The plastic is such that the reamer doesn't so much cut (as it should) but deform the bushing. This leaves you with an eccentric wheel.)
So, I left that overnight for my grey cells to mull over and, sure enough, the answer came to me. What I needed was to replace the bush with plastic that reamer will cut, ie Evergreen. 0.100" evergreen rod is slop fit in the wheel but secures well with cyano. I then, carefully, drilled a 0.020" hole in the center of the rod, enlarging to 0.032" while trying to keep things square by squinting at it. I finally opened the hole with reamer to 2mm which then let me insert the axle. I was astounded to discover that things came out concentric if a tad wobbly (fixed by tweaking). :pathead
Here's what you get:

You can see the cosmetic brass tube axle. The actual axle (sticking out) is 0.032" steel wire (as used in Cobalt point motors) with a sort of a pinpoint ground on each end. It's length is 26mm to fit in the pinpoint bearings. The other thing I wanted to do was maximize the amount of slide so I filed the front of the wheel from 2.3mm to 2mm.
The next task was to complete the axle units by adding brakes:
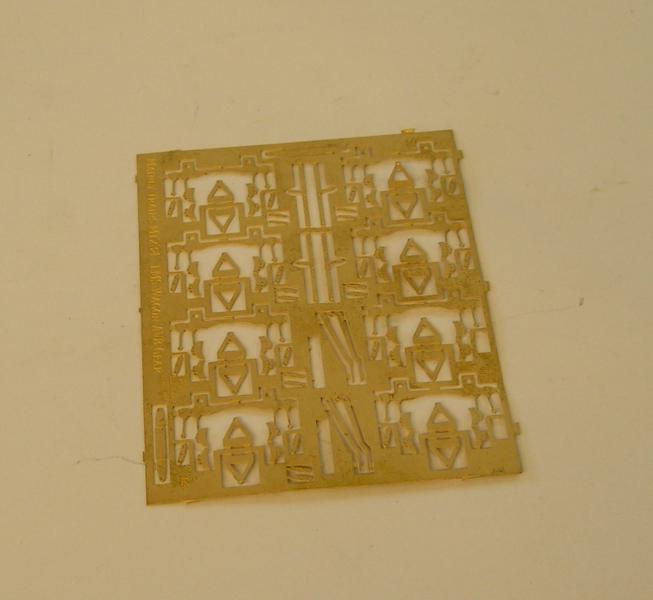
This is a Mainly Trains etch designed by Iain Rice.
The brakes fold up to produce this:
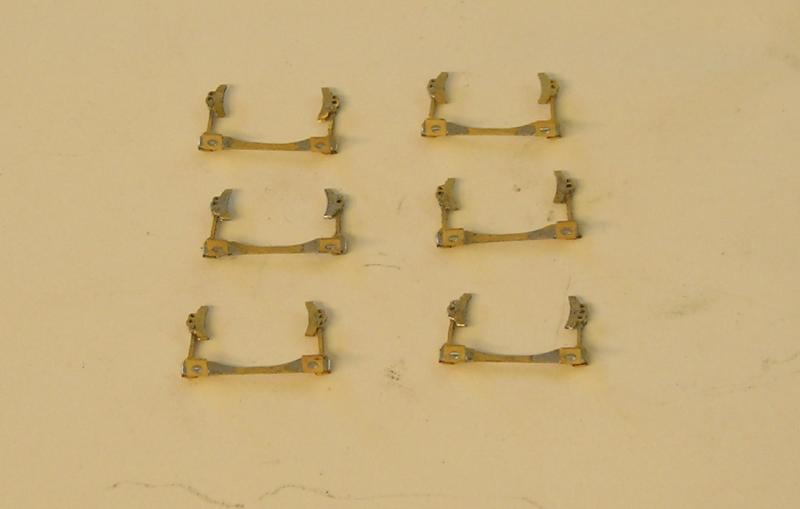
These are fitted (awkwardly) by using the mounted wheels as a location jig and soldering the tabs to the W irons, thusly:

I also added cosmetic yokes (with the middle bit cut away) from Bill's fret.
I then laboriously added safety loops:
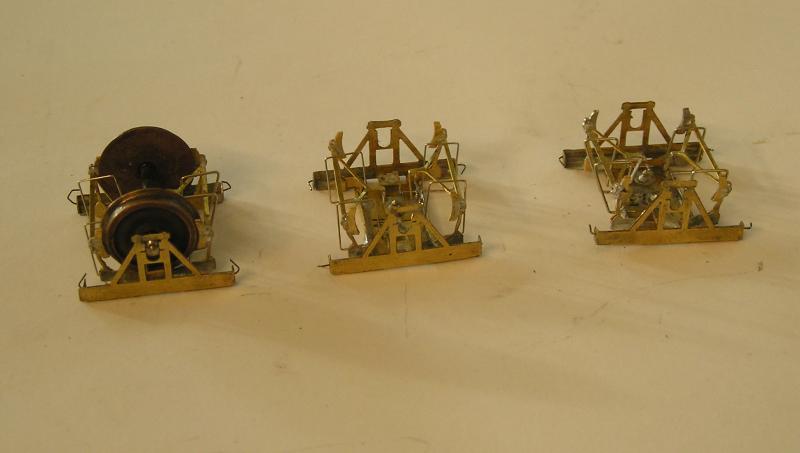
This was fine NS wire soldered into holes that I drilled in the base of the W irons. Looking very busy now.
I added stepboards yesterday. The Dapol model is wrong here again, having stepboards of 3/4 length of the solebars with gaps at either end. From my pictures and drawings, these should be 7/8 the length of the solebar with gaps at only one end diagonally opposed to each other:

Fixing stepboards is a tricky business because you need to get them as straight as you can. My approach:
- I made a jig from scrap brass that just fit in the solebar channel. I then drilled a 0.020" hole in the jig at the position I wanted the stepboard supports.
- Determine the locations of the supports along the length of the solebars. I use a black marker and scriber for this - easier to see.
- Using your drill and the jig, mark the holes where you want the supports. You can now drill through using the marked holes to locate the drill.
- Next do the same on the other side, making the holes directly opposite.
- Thread wire of your choice through the holes on both sides. This will provide support for your stepboards. Solder them in place.
- Fix the stepboards to the supports with solder. Squint down their length and tweak until things are as straight as you get them. You can trim the excess wire from the stepboards but leave the wire in the middle of the underframe alone!
- Fix the opposite side stepboards, trim.
- Once the boards are secure and straight, remove the redundant wire from the center of the underframe.
This morning was the moment of truth. I enlarged the holes for 8BA and soldered nuts to the inside of the underframe. I then attached the axle units to the underframe. The underframe was then tested on the track - it worked!
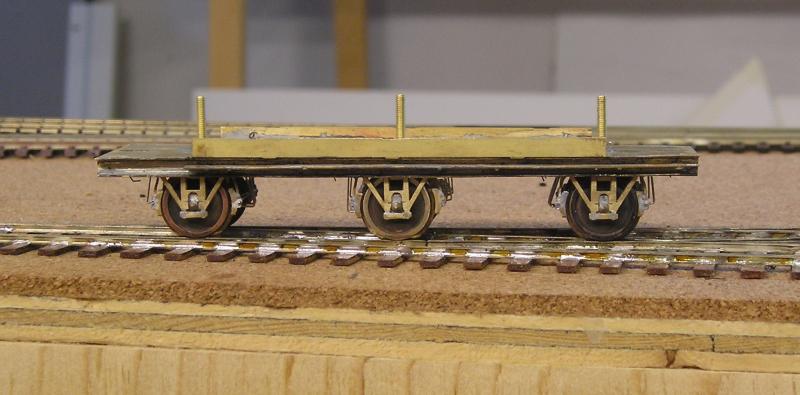
I had to do some tweaks with the brakes to get the wheels free running. I left the outer axle units loose so they could swivel. This is only very slight because there's not a lot of room between the W iron and solebar.
Now, on to the detailing.
John
 Last edit: by Brossard
John

Posted
Full Member
Posted
Full Member
I've become a fan of Bill's stuff, well designed and works well.
General comment: I forgot to indicate my references:
1) Historic Carriage Drawings Vol 3, NPCS by Peter Tatlow. There's a 4mm drawing that I've found very useful along with photos.
2) LMS Journal #31. There's an article by Essery about Palethorpes vans and a reproduction of a works drawing showing the brake arrangement - something that can be difficult to find.
3) LMS Coaches by Jenkinson and Essery
John
Last edit: by Brossard
John
Posted
Full Member

From normal viewing angles, you can tell it's there.

The complicated bit is around the vac cylinder. There's a second set of vee hangers, to the left, for the mechanism that reverses the direction of pull for the rightmost brakes. The main crank has two holes with the center hole acting on the brake rods for the center and leftmost brakes.
I soldered vee hangers to the base of the axle units to receive the pull rods - this is, of course a simplification and the rods are just stuck in.
John
Last edit: by Brossard
John
Posted
Full Member
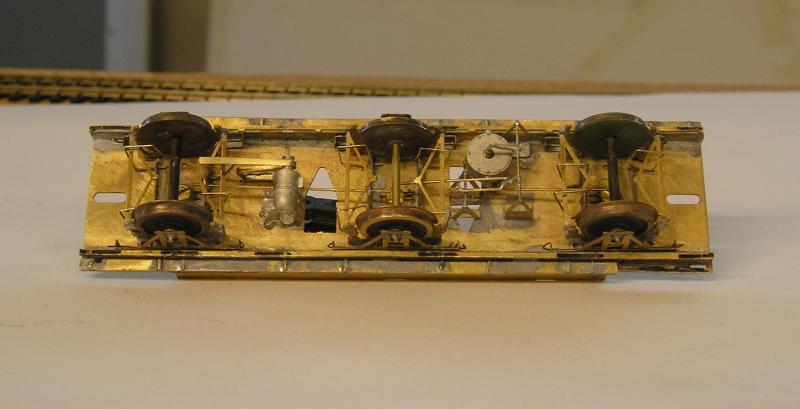
I took the picture before washing so there's a bit of a mess of paste flux. The 70C solder is a bit blobby too (I pre-tinned the brass with 145C solder). The belt is a strip of scrap fret soldered to the floor of the van.
I find that with all this mass of metal I need to increase my soldering iron heat to around 360C to get things working. If you plan to do things like this (and can avoid getting committed), a variable temp. iron is a good investment. Mine also gives a tip temp. readout.
John
Last edit: by Brossard
John
Posted
Full Member
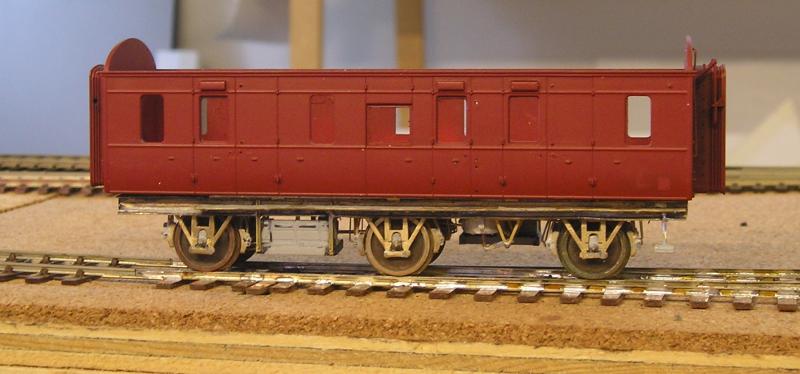
I thought I'd put the body on to see how things stand. Pretty good but I think I have a bit more fettling to get the body to sit just so.
I replaced the plastic moulded angles on the battery boxes with brass angle. Not because the plastic was particularly bad, but because the extensions got broken in the course of my mucking about.

The voltage regulator has to be glued on. It fits between the struts of the wide step (made from scraps of brass and wire). The small steps are from the Comet fret.
John
Last edit: by Brossard
John
Posted
Full Member
I spent yesterday trying to satisfactorily paint the body but ended up stripping what I had done due to silly mistakes. I re primed it and have just put on the first coat of maroon.
I'll post pictures when things look more presentable.
John
John
Posted
Full Member
Trouble is, no matter what I did, the colour kept drying with a browny tinge. I finally concluded that this was due to the transparency of the Badger paint. I could do one of two things:
1) Give the body a white undercoat and then try the Badger or
2) Use the proper stuff from Railmatch. Trouble is, Railmatch is enamel and I really don't like airbrushing with that.
So, I bit the bullet and gave the van body a bath in IPA and after a short time the old acrylic paint came away nicely. There was some scraping (with a toothpick) to do but I eventually got it down to bare plastic (a lot of the old primer got rubbed off as well).
So, a couple fresh coats of red oxide primer were applied.
Yesterday, I took a deep breath and got out my airbrush and the Railmatch. I had bought myself a tin of Testor's Enamel Thinner last week, in anticipation of having to do something like this. I poured a small amount of paint into a foil tart tin and then, using a pipette, added thinner. I quickly got what I felt was the right consistency (runny), put that in the pot and hey, presto, got my first coat of paint on.
This morning, I wanted to do a second coat of paint. However, I ran into trouble with the airbrush air valve sticking and not delivering air. I think the problem stems from me using Lacquer Thinner to clean the airbrush. It is horrendous stuff but it will remove pretty much anything. I think what happened is that the thinner got to hidden areas in the airbrush and loosened years of grunge. I had to spend around an hour messing around cleaning orifices thoroughly. This included disassembling the air valve (something I hadn't done for years) and giving a clean. Finally, I got things flowing and got my second coat on. I think that's where I'll leave the painting. I will give it a coat of gloss or semi gloss varnish in preparation for transfers.
Airbrushes are a handy tool, but they can be a blasted nuisance as well.
John
John
Posted

Full Member
That's why mine is still in it's box having been used, I think, only twice …………. I want to paint, not clean airbrushes.………………………………………………………………
Airbrushes are a handy tool, but they can be a blasted nuisance as well.
John
It's not the spraying, it's the darned cleaning and, unless you have several models to spray with the same colour, I suspect they're (the airbrushes) probably best left in the box ……:roll::roll:
'Petermac
Posted
Full Member
I think Railmatch do aerosols, but getting them shipped overseas is probably a non-starter these days.
You used to be able to get reasonable matches with car paint from the aftermarket automotive places. These days, most car paint is metallic.
John
John
Posted
Full Member
I spent much of yesterday doing this and, while the lettering worked out fine, the lining not so much.
I'm using HMRS/PC Pressfix transfers. These are probably the best for accuracy, but I think that a carrier film would help to keep the lines straight. The transfer sheet is tacky and supposed to stick to the model so it can be positioned prior to soaking in water. I was sort of able to do this on the central line and, after about a minute, the backing will slide off. The trick is to pull the backing away smoothly and in the direction of the line. Even so, I still had to tease the line a bit.
The thin yellow lines at the top are a nightmare. I had to do them in segments because the ventilators are in the way. I'm on the second round now and things are looking a bit better. The penny dropped and I applied the two rows of line at one go realizing that the lines are at the correct distance apart on the sheet. There's still a lot of teasing to do.
Still working at it, letting the lines dry a bit before applying new ones.
John
Last edit: by Brossard
John
Posted
Full Member
However, I finally realized that things would never look the way I think they should.
So, off came the paint and I started again.This is all very frustrating of course, but having invested all this effort I think I should go "all in" and get it done right.
John
Last edit: by Brossard
John
Posted

Inactive Member
I've torn down my new shelf layout several times - including starting with new base boards the time before last.
If it's not right; it's not right.

Max
Port Elderley
Port Elderley
Posted
Full Member
I airbrushed a coat of Crimson Lake this morning, thankfully no problems. I'll do a second coat later.
Speaking of doing things right, as I was re-assembling the van the other day, I had planned to re-use the glazing. However, looking at it with my critical eye, I decided it was unacceptable for 2 reasons:
- It really is very thick and
- The security bars look very naff indeed.
I made some plastic strip frames onto which I glued brass bars. I've painted these black.
I had resigned myself to non flush glazing using Evergreen 0.005" clear.
However, yesterday as I was looking at Shawplan (for windows for ex Airfix suburbans and old Bachmann Period I coaches), I noticed there's a pack for the Stove R :doublethumb. I'll order this. As a result, progress will be delayed until these arrive.
http://www.shawplan.com/extreme_coachandunit_Laserglaze_4mm.html
You'll note that there are useful packs for a lot of the old models from the 80's. Most of these models had accurate bodies, being let down by lousy glazing and crude underframes. The underframes can be fixed by the addition of Comet co0mponents.
John
Last edit: by Brossard
John
Posted
Full Member
What a PITA John but, as Max said, if it's not right, it never will be and those tiny faults you spotted will play on your nerves for the life of the vehicle. However, I'm not too sure I'd have been determined enough to have another go - I suspoect I'd have looked at it with half closed eyes ………….
:oops:
'Petermac
Posted
Full Member
I console myself that this is all a learning experience. One of these days I'll be knocking these out in an afternoon.
John
John
Posted
Full Member
The van has been successfully painted and transfers will have to be done soon.
John
John
Posted
Full Member

This is a shot with the main parts dry fitted.
Just waiting for windows now. I made frames for the security bars so those are ready to go.
John
Last edit: by Brossard
John
Posted
Full Member
John
Last edit: by Brossard
John
Posted
Legacy Member
reg
1 guest and 0 members have just viewed this.