LMS Pull Push Coaches
Posted

Full Member
Finally!
Right, so everything stripped down today. I gave the underframe and bogies a final wash. They plus the roof have been primed.I'm prepping the body which involved masking the windows with strips of 0.020" and 0.010" slid into the glazing pockets. Apart from masking, it gave me a chance to find out if there were any obstructions and there were lots. I don't want to be doing that after painting - a recipe for disaster.

John
 Last edit: by Brossard
John

Posted
Full Member
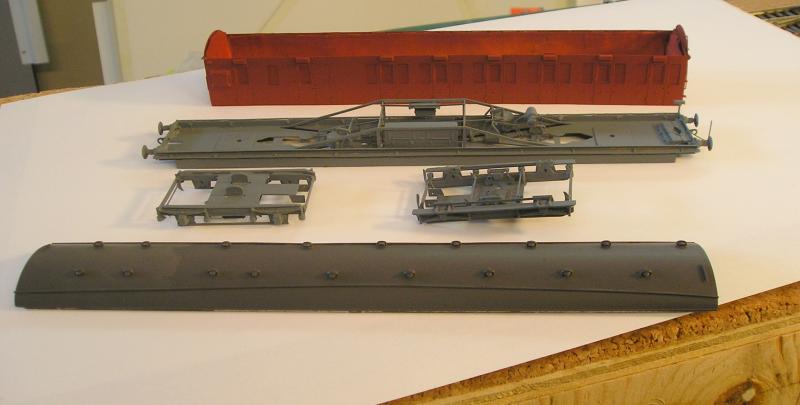
The roof is actually finished in a PollyS UP Dark Grey.
John
Last edit: by Brossard
John
Posted
Full Member
John
John
Posted
Full Member
I've been working on the lining :shock:. I've made a PowerPoint file and been painstakingly drawing the lining for the panels and doors. It's very much along the lines of the LSWR coaches, only this time, I'll have a bash with the white transfer paper.
My first step was to scan the coach sides as JPEG, then crop and straighten using Google's Picasa. Next I transferred the JPEG to my Powerpoint file. I needed to have the scanned sides the same size as the actual coach and this ended up as trial and error.
Then it was a matter of drawing black and yellow lines to see what worked best. I also made a crimson background, matching it to the scanned coach. I will need this when the transfers are applied to the coach.
I found that the contrast with the coloured coach side was poor so I tried an unpainted coach side and that worked better.
I found that the way to go was to make panels - and there are a lot of them! I had to re-do and adjust these as I went and got my head around the subtle shapes. Each panel is offered up to the coach side to ensure it is the right size.
My brain hurts!

John
John
Posted

Full Member
I am however, pleased that you also have problems getting a scan to the "actual size". I've been cheating by trying to scan a Kingsway card kit but I just can't get it to print at the correct size.

By "panels", do you mean Powerpoint panels or panels to fix to the coach ? If the former, doesn't Powerpoint allow you to repeat the first design ? (I've never actually used it myself although it's on this PC somewhere) :roll::roll:
'Petermac
Posted
Full Member
I've scanned card kits before (those that come free in Hornby magazine for example) and don't recall size issues. When I do that though, I make them PDF. Perhaps making things JPEG is where the problem lies.
I guess I haven't shown any pictures of the finished thing. I did do a search finding nothing on the prototype, but did find some examples of Larry Goddard's work:
http://www.ebay.com.au/itm/DAVID-LAWRENCE-SCALE-MODELS-LARRY-GODDARD-D-S-KIT-BUILT-LMS-COACH-RAKE-x3-ew-/220982528425
Something to strive for. :roll:
You can see what I mean by panels surrounding windows and doors as well as the coach itself. Now, many of these are the same, so I can copy and paste. However, a fair number are different and are made by modifying existing panels.
Having spent the time doing this, subsequent coaches will be much quicker and easier.
John
John
Posted
Full Member
Those Lawrence/Goddard offerings look very good indeed but then, so does yours. :pathead Are you going to market it at a similar price …………:shock::shock::shock: I could buy a whole RTR train for trhe price of each coach listed there.
It would seem this is your "dry run" ready for the second one - isn't there a saying about gluttons and punishment somewhere………..:roll::roll:

The more I read this thread, the more I wonder if I could make any kind of sense of doing some bogies for those odd kit built Gresleys I won on the Bay. There must be a huge sense of satisfaction when it all comes together. When I've got a moment, I'll take a photo of them to see if anyone can identify the manufacturer - there's no visible name on the outside.
Re the scanning, I'm not sure my scanner offers me a PDF option - I'll check. Actually - yes it does - I'll try that and see if it prints to the right size. Thanks for the tip ;-)
'Petermac
Posted
Full Member
This is the first Comet kit I`ve done, so it is a learning curve. I expect the next one(s) will go quicker.
I made a test print of the lining:
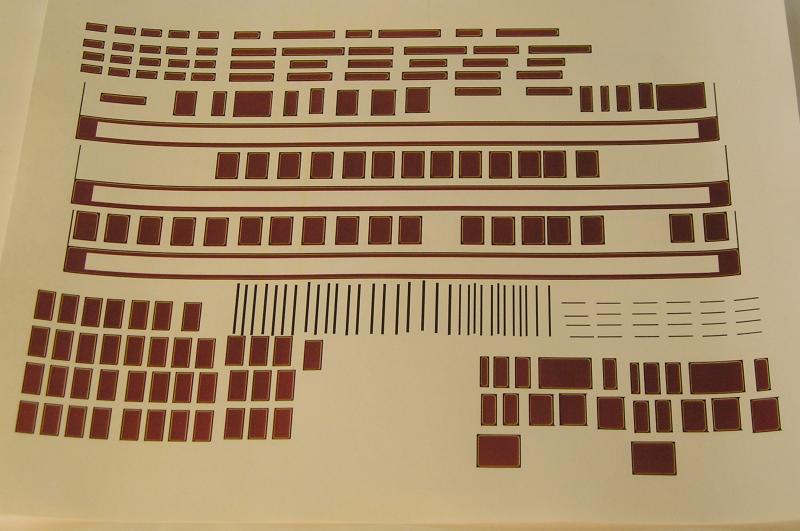
The sheet is 8.5" x 11" so you can see how small those panels are and how fine the lines. It all looks quite good. Next we'll see how my printer handles the transfer sheet.
Why not create a thread on those coaches of yours? We can all muck in to give you advice then - good, bad or indifferent.
John
John
Posted
Full Member
While waiting for paint to dry, I thought I'd start on the all 3rd non-driving trailer. First up were the bogies. These aren't particularly difficult, but I thought I'd share one annoyance and how I dealt with it. When assembled, the wheels are quite difficult to get in. It is possible at the early stages but gets more difficult when the cast sides are installed. The final assembly is very rigid with very little scope for spreading the sides for wheel installation.

I used flanged bearings and probably should have used the non flanged type. However, I like that the flange gives a positive position. The picture shows that I filed the flange flush with the bogie side and added a slight bevel to the lower half of the bearing. I also used a sharp edged file to put a notch in the bearing. Now, the wheelset is a push fit in the bearings with a satisfying "click".
John
Last edit: by Brossard
John
Posted
Full Member
'Petermac
Posted
Full Member
John
John
Posted
Full Member


Mostly things look good. I missed the roof edges - no big deal. The roof isn't sitting as well as I would like - I think the interior wall is interfering so that needs some fettling.
I fitted a half stepboard to the non-driving end bogie and got rid of the footstep from the solebar. This is in line with period I and II practice.
Not easy to see but I fitted a pipe under the LHS footboard for, I think, the regulator vacuum. It connects to the RHS standpipe.
John
Last edit: by Brossard
John
Posted

Inactive Member
I have to ask. ;-) Do you have any plans for lighting?
Max
Port Elderley
Port Elderley
Posted
Full Member
John
John
Posted

Banned
One question for you… Could a Dapol LMS 57' Non Corridor Brake Third be used as a base for a Push/pull coach ??
I realise the frames, truss rods and battery boxes etc would need modifying and new bogies, but I wouldn't mind having a go at a conversion.
Cheers, Gary.
Posted
Full Member
So, in answer to your question, no they can't - at least not if you want to be accurate. It's a shame really because that is probably what I would have done.
There are no other RTR non corridor LMS coaches out there either - a glaring hole that none of the manufacturers seem to want to fill.
John
John
Posted
Banned
I had read with interest on that other forum regarding why no manufacturer wants to touch them. I can't see why not though, I'm sure they would sell. If Hornby can produce the Southern variants of the two car Push/Pull and sell as they do (R4534A, R4534B & R4534C), I would most certainly purchase a LMS/BR one if they came out as a RTR model. I may just have to settle on the Southern variant, but an LMS/BR would be a great addition to the plank… ;-)
Cheers, Gary.
Posted
Full Member
I've said before that the hobby is poorly served on the coaching side. Bachmann just released their LMS inspection saloon. This a great looking model and, of course, I've ordered one. It does seem odd to me though, that instead of this esoteric vehicle, resources might have been better spent on a NC coach model.
John
John
Posted
Full Member
I was a bit concerned the top, coloured layer might flake off, as it did the first time I tried the white base transfer paper. However, I used Testor's spray transfer sheet coating (you could use Glosscote I suppose) and found that there is no flaking - phew! :roll:
I think, in principle, the method will work. However, getting transfers around the raised door vents, proved to be a problem. First of all, I made them a bit on the large side and there was a ridge of glue around the edges. I tried cutting the transfer into four sides but I quickly discovered that I would never get the lining square and lined up with the others doing this.
So, I removed the vents (without hacking my thumb this time) and I will repaint the sides to cover up the damage to the paint.
I will make the vents smaller this time round and stick them on after the lining transfer is on.
I got 4 white transfer sheets yesterday.
Learning all the time….
John
John
Posted
Full Member
We'll have to stand by for more info.
All the announcements and froth:
http://www.rmweb.co.uk/community/index.php?/topic/92766-news-from-warley-2014/
John
John
1 guest and 0 members have just viewed this.