Cutting and Shutting a Bachmann Cattle Van
Posted

Full Member
To get an accurate length vehicle
It's been some while since I reported in. This is because I rebuilt part of the model and was working on the underframe.:roll:The state of play today:
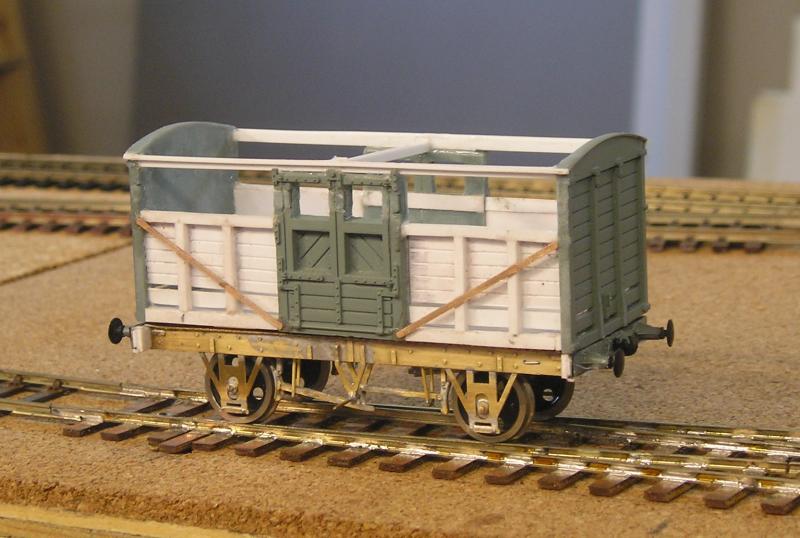
Starting from the top, I decided that a full length top beam would be better than trying to piece it together. The only difficulty was carving the center section in order to save the strapping. There's a detail strip to replicate what appears under the roof.
After thinking about the underframe fit and doing further measuring, I decided to add 1mm to one side. I had originally built the two sides of slightly different length and was prepared to live with that but for the sake of a more comfortable fit to the u/f I redid it.
Having finished building the main body, I made the diagonals with 1mm phosphor bronze strip stuck with cyano.
Despite the Bill Bedford u/f being a close match to the D1661, I discovered two disappointing aspects. The first was that there are no buffer beam overlays (more on that later) and the brakes of the clasp type, typical of a later diagram of van.
I had got myself some of Bill's 10' WB brake gear at the same time as I got these u/fs. I was able to extend the length of the brakes by 4mm to suit my 11' WB, but not an easy job.:pathead
Reading up on D1661, most vans were manually braked, although there were a few that had AVB. Also there is no hard and fast rule about wheels - the picture of the van I will copy has 3 hole disc wheels - those on the model are Exactoscale.
Apart from that the u/f is very good. There's a slight incline on my test track and the wagon insists on rolling along it of it's own accord. I raised it slight to take the pic.
I used a Bachmann 10' WB u/f as a donor for the buffer beam. This represents a steel beam so I packed the ends to simulate the thicker wooden one on the van. I'll use the axleboxes and springs from this u/f as well.
Getting all the pieces to line up is a great trial and on more than one occasion I've cut through a beam in order to re-glue it.
I've ordered some wagon detailing parts from Mainly Trains to make reinstating rivetted/bolted detail easier for the future.
On the whole I've rather enjoyed this, but it is an onerous process.
John
 Last edit: by Brossard
John

Posted
Full Member
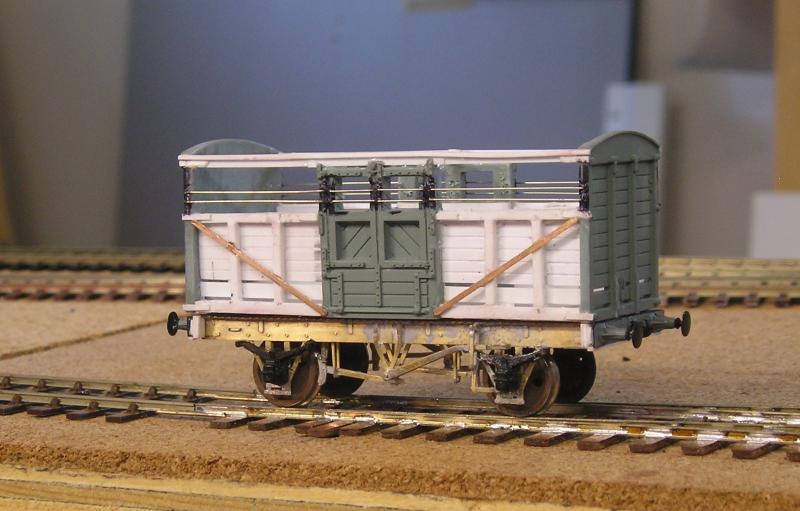
I got the bars on with some difficulty (not much about this was easy), but I'm fairly happy. I used 0.031" NS wire. My hole drilling accuracy isn't great. Where I got it right, the wires got right angle bends and were stuck into the holes securing with cyano. Where I didn't, I simply glued the free end to the upright with cyano.:pathead
I also reinstated the strapping with 0.010 x 0.040" strip. Not very pretty, hopefully after the bolt heads are on and paint applied, it will look better.
Also got the axleboxes on - these from a Bachmann 10' WB u/f. I did a fair bit of carving to get just the box and spring. I then realized I had made a dumb mistake and not made the solebar double thickness (it supposedly being wood) - there was an extra piece of brass in the kit that I couldn't figure out - now I know .:It's a no no Can't fix it now without tearing the whole thing apart.
Brake handles and ratchets were a trial. The handles were designed for Morton so one was wrong handed. I managed to modify it by cutting and resoldering. The ratchet was a fiddle, not least because the springs stick out too far. I filed a groove in the spring so that the ratchet sat better.
John
Last edit: by Brossard
John
Posted

Full Member
There is a picture of what looks one of these behind a Precursor at Leamington (Avenue) circa 1936 (oblique shot of the engine, the cattle van is there by accident). [Leamington (Avenue) Station - Locomotives: Ex-LNWR 2P 'Precursor Tank' No 6826 is standing at platform two at the head of a goods train with a cattle wagon immediately behind the bunker].
You've certainly captured the essence and substance of the wagon with these modifications. Certainly motivated me to get on with a couple of cut-and-shuts that have been on the bench for more than 6 months.
Nigel
©Nigel C. Phillips
Posted
Full Member
I'm really happy that you are inspired by this build. I don't think I've done it before and, I must say, there is a certain satisfaction to being able to craft something. Every step seems to be a problem needing a solution.
John
John
Posted
Full Member
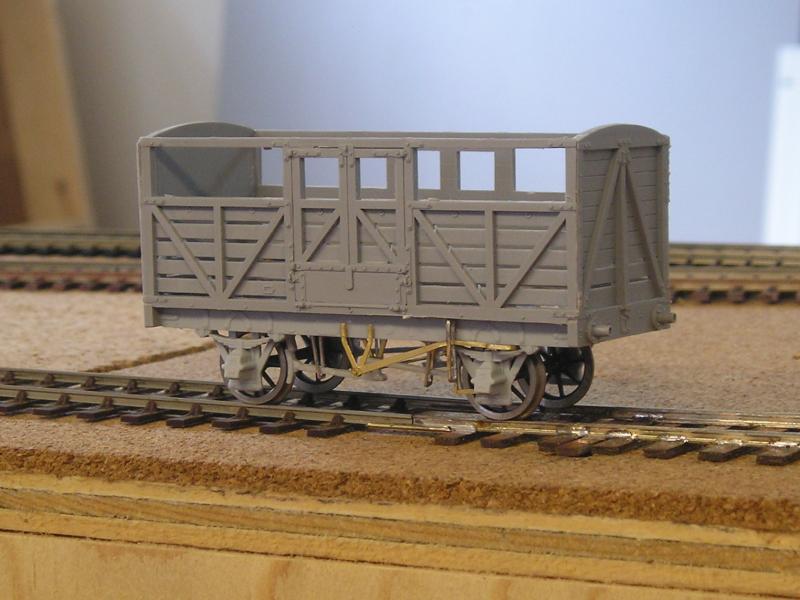
A very good model in general. The van body parts fit well. I used Exactoscale wheels again, spoked this time.
You'll note the bits of brass. I find plastic kit brakegear to be crude and in this case the plastic brake handle broke. I have all sorts of brake bits in stock, available from Mainly Trains and Eileen's Emporium.
I can now finish both vans more or less together.
John
Last edit: by Brossard
John
Posted

Inactive Member
I'm looking forward to the paint job.
Max
Port Elderley
Port Elderley
Posted
Full Member
Today was the modelling two step again.
Last night with half my mind on the telly and the other half on modelling problems, I came to the conclusion that the thin solebars simply won't do.
This morning, with a deep breath I took my soldering iron to the underframe and tore it apart. Delaminating the overlay wasn't too bad (these are very thin and can easily be wrecked). It was a matter of applying heat, forcing a xacto chisel blade under the overlay and prising it apart.
I ended up laminating two additional layers of brass to the original solebar by "sweating" the strips on and then re soldering the overlay. I got the thickness to the same as on the Slater's kit. My springs are still a bit on the thick side.
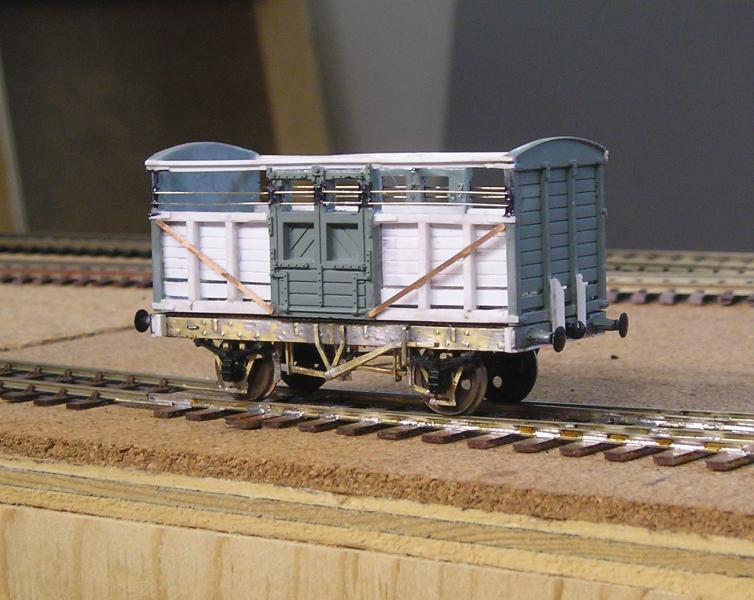
I also made some angle from strips of Evergreen. the piece against the van end is 0.060 x 0.030" while the angled bit is 0.040 x 0.020". This gives a uniform looking angle. While playing around with drilling holes today I managed to damage a couple of them. I've made some new ones for installation tomorrow.
I'm not happy with the plastic strip strapping, so I think I'll wait for the Mainly Trains wagon detailing etch.
John
Last edit: by Brossard
John
Posted

Full Member
Watching you guys build these kits makes me realise how much better they are even that today's superb RTR offerings. Maybe one day, I'll pluck up the courage and have a go at something simple myself …………..:hmm I really like the idea of sprung axles ……..;-)
'Petermac
Posted
Full Member
Even the Slater's kit, as good as it is, benefits from a few embellishments.
Springing isn't essential, it's me making work for myself, but it does make the wagon roll nicely and is much more effective than compensation IMO. I've just ordered a bunch more of Bill's kits from Eileen's.
The Slater's van is rigid and rolls well also. You do need to ensure that the wagon is square.
John
John
Posted
Full Member
The Slater's van, on the other hand, looks very good and I completed construction today:

Ready for some gloss varnish and transfers.
John
Last edit: by Brossard
John
Posted

Site staff
Regards
Alan
Born beside the mighty GWR.
Alan
Born beside the mighty GWR.
Posted
Full Member
Looking really good John - and you'd never know it was composite materials ………….:pathead
'Petermac
Posted
Legacy Member
reg
Posted
Full Member
John
John
Posted
Full Member
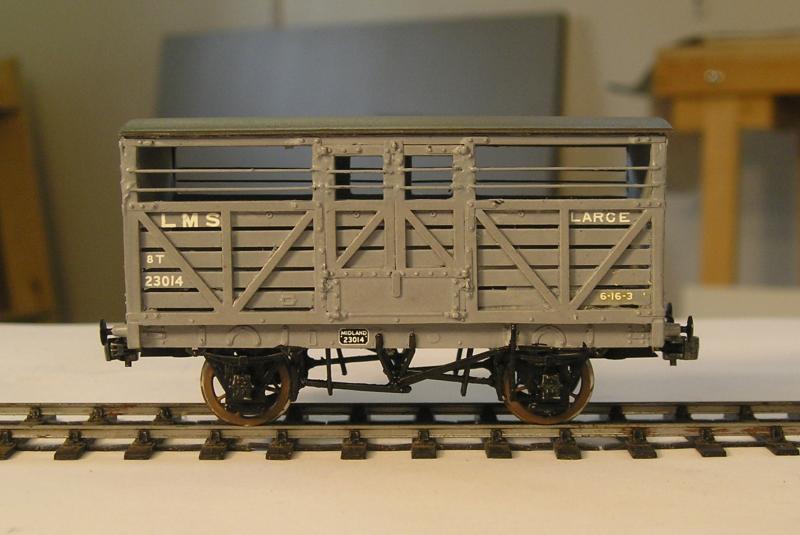
Slater's, unlike most kit makers, do supply a transfer sheet. These are Pressfix type and no matter how hard I try the letters seem to go all ahoo and I spend a lot of time herding them with a toothpick. If the Tare looks different it's because I used a different transfer sheet - Fox I think.
John
Last edit: by Brossard
John
Posted
Full Member
 thumbs
It looks "solid" - is it heavy or will you need to add some extra weight ?
'Petermac
Posted
Full Member
John
John
Posted
Legacy Member
reg
Posted
Full Member
John
John
Posted
Full Member
John
John
1 guest and 0 members have just viewed this.