Weathering Tip
Posted
#174268
(In Topic #9838)
Guest user
Any hints & tips for a beginner
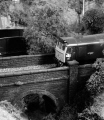
Even though I am fairly new to this hobby, I am keen to add some 'realism' by trying out some weathering. Initially I intend to start with scenery and buildings and maybe eventually move on to locos. I am looking at starting with some things I don't mind experimenting with - a bridge (it's going to be a wood / plastic mix hand made - maybe a bit ambitious), a second hand resin engine shed and some plastic fencing.I have taken a flyer by purchasing some powders but before I start I am looking for any hints and tips that members can pass on. I'm sure there are others out there who have taken the plunge as a novice weatherer!!!
Posted
Full Member

Posted

Site staff
http://yourmodelrailway.net/view_topic.php?id=787&forum_id=46
are many threads, etc relating to weathering which will help out.
Ron
NCE DCC ; 00 scale UK outline.
NCE DCC ; 00 scale UK outline.
Posted

Full Member
Some observations from my experience over the past few years using weathering powders:
From my reading and research really dirty/rusty/weathered locomotives were only found towards the end of steam in the UK. Those locomotives that had lime/rust/oil and hadn't been washed or cleaned for months were waiting failure and then the scrap yard. There were issues with some of the early diesels such as the Warships and Westerns where poor paint jobs combined with staffing cuts (cleaners) meant peeling paint and rust, along with a lot of track dirt and oil stains. To a large extent it depended on the shed foreman. My daughter got me a great little book for Christmas detailing the exploits of a group who in the 1960's would go around sprucing up steam engines the night before their final run. Dirty yes, neglected no.
Don't try and do a full weathering using powders alone. Spray paint or brush first, use powders for highlighting.
Have a dedicated area for weathering. Nearly all weathering powders are finely ground minerals based on various shades of iron oxides. They are abrasive, keep them away from gears, motors, etc.
Use a good set of brushes, and only use them for weathering. Good quality powders are expensive (the GIGO principle applies here).
Wear a face mask and gloves, the powders will get into your lungs and the rest of the house unless there is good external ventilation. I rigged an exhaust fan to the outside after questions were raised about red colored dust throughout the house.
Sealing powders with flat varnish will change the color, experiment first.
Dark grey or soot black works well on ventilation grills.
Keep rust to logical areas, use various shades (dark red through light orange).
Keep lime to where water would be leaking.
Carriages (coaches) usually had cleanish sides, highlight seams and creavices that the washing brooms would miss. The ends, gangways and roofs were usually filthy.
PO wagons pre-WW2 were kept reasonably clean - they were adverts for the company who owned them. Ex-PO wagons post-WW2 were usually filthy until scrapped.
Pre-WW1 mainline stock was usually immaculate (cleaned everyday), branchline stock clean but usually showing track dust and soot (cleaned every week). Cabs/footplates were clean. Coal was sprayed with water to keep dust down, same for the cab floor.
Immaculate engines were seen after a major overhaul, or when on a special, so a very light weathering of the engine with track dust below the running plate is all that's required. I take the wheels off to do this, otherwise powder gets in the mechanism.
I've had one engine done professionally, with a bit of patience you can do better. Having a photograph of what you want is essential. Brossard (John) did a Warship for me some years ago based on a photograph, superb.
Nigel
©Nigel C. Phillips
Posted
Full Member
Terry
Posted
Full Member
usually applies to computer processing. Garbage In Garbage Out.
Enter incorrect data and the resulting output will be incorrect too.
Increasingly in general use- what you get out depends on the quality of what you put in.
Posted
Full Member
Terry
Posted
Full Member
Cheap weathering powders are more like grit, the expensive ones tend to be a lot finer (and more problematic re dust contamination). Ball milling is how they're produced (which is not expensive), it's the pigment quality and purity more than anything that defines the price.
Bottom line is that a little powder goes a long way, and it's worthwhile investing in decent materials and brushes (sable for preference). Cheap powder will abrade the surface, evident when the powders are washed off. More expensive, finer powders result in scratches that are not visible (the analogy would be #100 grit paper vs #1000 grit paper).
Nigel
Period. Hmm. "Middle English periode, from Middle French, from Medieval Latin, Latin, & Greek; Medieval Latin periodus period of time, punctuation mark, from Latin & Greek; Latin, rhetorical period, from Greek periodos circuit, period of time, rhetorical period, from peri- + hodos way. First Known Use: circa 1530". "Full stop" appears to have developed from "period", not the other way around.
I'm quite comfortable with "going forward" (which is not the same as "in the future"), "12 through 3", "24/7", etc., although the use of "period" and "full stop" (which I heard last week in the UK, as "that's it. Full stop!") as emphasis to define closure is rather redundant.
©Nigel C. Phillips
Posted

Site staff
Posted
Full Member
All of which is off-topic.
Nigel
©Nigel C. Phillips
Posted

Full Member
Merlin, try tea stain for your wood work, works well, just leave the tea bag in longer for a darker stain, also add a little liquid boot polish to make a dark stain [brown or black]. Hope this helps. Jeff.Even though I am fairly new to this hobby, I am keen to add some 'realism' by trying out some weathering. Initially I intend to start with scenery and buildings and maybe eventually move on to locos. I am looking at starting with some things I don't mind experimenting with - a bridge (it's going to be a wood / plastic mix hand made - maybe a bit ambitious), a second hand resin engine shed and some plastic fencing.
I have taken a flyer by purchasing some powders but before I start I am looking for any hints and tips that members can pass on. I'm sure there are others out there who have taken the plunge as a novice weatherer!!!
jeffjgale@gmail.com

www.willowcreekrr.net
www.willowcreekrr.net
Posted
Full Member
Terry
 Last edit: by col.stephens
Posted
Full Member
One thing I forgot to mention (and I was just doing some, which reminded me) is to combine weathering powders with dry brushing. This highlights any rust (use a metallic acrylic paint, Tamiya do a nice range). Try also a thin wash of paint followed immediately by judicious powdering. I load the brush with powder, paint and then tap the brush very gently from a height of about 3-4 inches. Described in many places is a slurry of powder and paint. Useful for accumulated grime in corners and crevices.
And another thing I forgot to mention is don't practise on that brand new model. Get a junk/cheap/ model from a local show/boot sale/ and use that. Or do what I did, and get a Dapol locomotive kit. An evenings work and you have a model for practicing on. If it looks good, it can always be parked on a siding waiting for a tow to the scrap yard with its rods on the running plate.
Nigel
©Nigel C. Phillips
Posted
Full Member
jeffjgale@gmail.com
www.willowcreekrr.net
www.willowcreekrr.net
Posted
Guest user
Posted

Full Member
I have some pictures of weathered wagons in my thread: http://yourmodelrailway.net/view_topic.php?id=14578&forum_id=150&page=4
I discuss my methods. Weathering is very subjective and is probably in the eye of the beholder.
John
John
Posted

Full Member
Regarding terminology, "full stop" is ollld. That goes back to the telegraph days!

1 guest and 0 members have just viewed this.