Plaster of Paris
Posted
#189131
(In Topic #10590)

Full Member
Speeding it up!
As a life long user of Plaster of Paris, (I'm a dental technician!) I noted in a thread I read yesterday about the time plaster takes to set.To speed up the setting time add salt (tablespoon) to the water before mixing and use room temp. water.
(To slow it down, add vinegar!)
Hope this is of help to someone in the future! :)
Cheers
Ron
Proper Preparation makes for Perfect Performance!!
http://yourmodelrailway.net/view_topic.php?id=13331&forum_id=21
http://yourmodelrailway.net/view_topic.php?id=13331&forum_id=21

Posted
Guest user
If I can find a chunk left from the old ripped out layout I'll post a picture look
Just to çlarify ..it was cast in aprox 6" lengths with buttress pieces cast to fit between each section…….Not one 4ft length.

Cheers
Matt
Posted

Full Member
D
'You may share the labours of the great, but you will not share the spoil…' Aesop's Fables
"Beer is proof that God loves us and wants us to be happy" - Benjamin Franklin
In the land of the slap-dash and implausible, mediocrity is king
"Beer is proof that God loves us and wants us to be happy" - Benjamin Franklin
In the land of the slap-dash and implausible, mediocrity is king
Posted

Full Member
Cheers MIKE
I'm like my avatar - a local ruin!
I'm like my avatar - a local ruin!
Posted

Full Member
Just need to be very thoroughly mixed…
Posted

Full Member
It's very concentrated and one container goes a long way.
Good tip with the salt and the vinegar…. and of course, always mix in a clean bucket/bowl/old ice cream container that doesn't have any dried residue from the previous batch left in it.
Marty
Posted

Site staff
It's too cold at the moment, but when I can finally get out in the garage to continue the embankment I'd like to try a bit of vinegar to slow down the setting.
Is there any specific ratio water to vinegar, or is it a case of normal water to plaster mix and add a bit of vinegar?
Ed
Posted
Full Member
Proper Preparation makes for Perfect Performance!!
http://yourmodelrailway.net/view_topic.php?id=13331&forum_id=21
http://yourmodelrailway.net/view_topic.php?id=13331&forum_id=21
Posted
Site staff
Ed
Posted
Guest user
Managed to find a couple of pieces I made years ago from a plastasine mould marked out with an old plastic sandbag gun emplacement wall from a childs toy soldier game these pieces were only trials and i never finnished colouring or weathering them as i changed the size of the mould to suit the area it was for, but they show what can be done very cheaply if you have a large area to do . they are only about 6mm thick and surprisingly robust ( these pieces have been thrown around in a box with other stuff for the last 12 years ) these were just plain white grout and a couple have had a first wash of coulour but no more , as i mentioned you could use one of the coloured grouts being closer to your intended finnish coulour
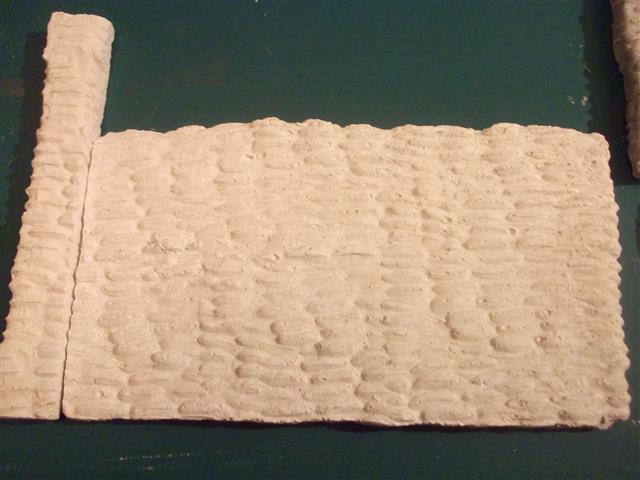
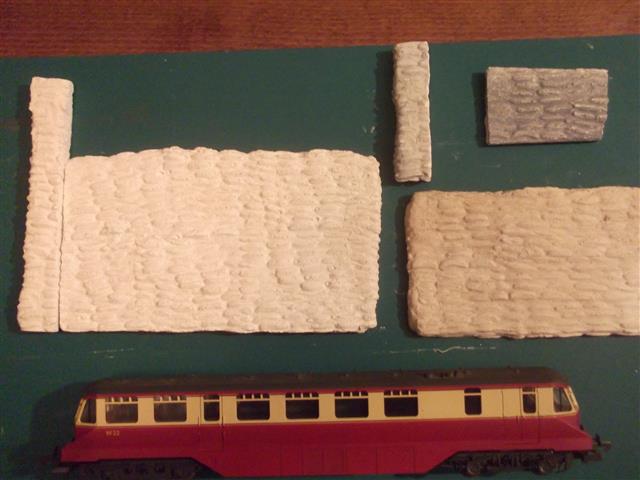

train is just to give an idea of scale (oo)
Cheers
Matt
Posted
Full Member
My only experiments with PoP (mould a heradic device above a gatehouse) were a disaster, not encouraged by dropping the bag on the kitchen floor (my, doesn't it go a long way.
.)
Wht ratio of powder to water works best?
Doug
'You may share the labours of the great, but you will not share the spoil…' Aesop's Fables
"Beer is proof that God loves us and wants us to be happy" - Benjamin Franklin
In the land of the slap-dash and implausible, mediocrity is king
"Beer is proof that God loves us and wants us to be happy" - Benjamin Franklin
In the land of the slap-dash and implausible, mediocrity is king
Posted

Full Member
For the few "castings" I've done - the odd rock mould and a bit of "Linka" stuff, I use what's sold here in France as "modelling plaster". It's specifically designed for moulding the ornate cornices around ceilings found on "older" properties.
Sold either in the DIY outlets or builder's merchants (depending on quantity required), it sets up reasonably quickly and is much tougher than P of P.
I'm sure there's a similar product availalbe in UK without having to resort to the massively overpriced "casting plasters" sold specifically for the job by the craft outlets.
'Petermac
Posted
Guest user
As for the ratio. Its hard to say , for grouting you mix it at various ratios depending on whether you want a stiff mix to go in a wider joint or a loose mix to grout mosaics…so best bet is to just experiment, you want a slightly sloppy mix so that you can "tap it down ". To settle the mix fully in the mould and remove air bubbles..but not too runny that it has no strength, so get yourself any small plastic containers you can preferably with a bit of texture in the bottom, mix your grout, artex, ceiling coving plaster, P of P etc and pour it in..let it set and then turn it out and see what sort of definition you get, good texture, no air bubbles etc. Just do very small batches until your getting the results you want and you will come up with your best mix. Then you can start using your proper mould..the reason for using these types of plaster / grout is because the are a finer powder, mould to texture very well and have quite good strength, those I've shown are only about 8-10mm thick and surprisingly robust. The pieces I cast to make up a 4ft retaining wall were stuck to a plywood backing..unfortunately it was built in to the baseboard and was destroyed when the whole thing had to be removed from the loft
Hope this helps !
Cheers
Matt
Posted
Guest user
Cheers
Matt
Posted
Full Member
'You may share the labours of the great, but you will not share the spoil…' Aesop's Fables
"Beer is proof that God loves us and wants us to be happy" - Benjamin Franklin
In the land of the slap-dash and implausible, mediocrity is king
"Beer is proof that God loves us and wants us to be happy" - Benjamin Franklin
In the land of the slap-dash and implausible, mediocrity is king
Posted

Full Member
Paul
Posted

Legacy Member
:thumbs;-):cool:
my webcam link 6.19.184.67:8080
1 guest and 0 members have just viewed this.