Photo Stacking Experiments
Posted
#224700
(In Topic #12258)

Full Member
Here are some of my experiments using a couple of timber and ore wagons
Using a Canon 350D, first I used the manual point of focus setting for the following shots. They were then stacked using CombineZP.


Unfortunately there are only 5 manual focus points on the horizontal plane (there are only 3 in the vertical plane) and for some reason I cannot seem to select the one on the extreme left (unless it is selected but the LED has died). This means that some of it is out of focus.
The last photo is taken using the cameras Auto Depth of field function and then 6 shots stacked.

It has turned out to be the best of all of them.
Regards Rob

Posted

Full Member
cheers
Marty
Posted
Full Member
Yes, it's very easy to use. The only downside that I have found, is that it occasionally crashes but you can reopen it and re-do the previous task without much issue - I am running it on Windows 10 and I have only ever run it on Win10 so I can't say whether the crashing is some instability in the product or the fact that it's running on Win 10 that causes the problem. When I say occasionally I mean occasionally not every time I use it.
Regards Rob
Posted

Full Member
It really does make a big difference, especially with close-ups where depth of field is both very narrow and critical. :thumbs
'Petermac
Posted

Inactive Member
For every photo I post, I take around 20 shots, moving the focus ring one notch at a time.
Then I download the string on to the computer and, using Fastsone editor, I select the two shots closest and farthest away. I make a note of these two numbers and open Helicon 6.
I open the folder with the 20 shots in it and click on the first number and then Shift/click on the last number. That selects the seven or eight shots between. Then I click on Render.
The rendering process takes about 10 seconds.
Then I click on Save and identify the photo as aaaaa
Then I go back to the Faststone folder, drag the aaaaa into Pictures, click on Pictures and delete the folder.
Then I rename the photo, open it and crop. Then resize to 800 x 600
Then I launch Irfan and open the photo and do one Sharpen. That cleans up the losses from the resizing.
Helicon is not free, but it's very stable and is updated regularly.
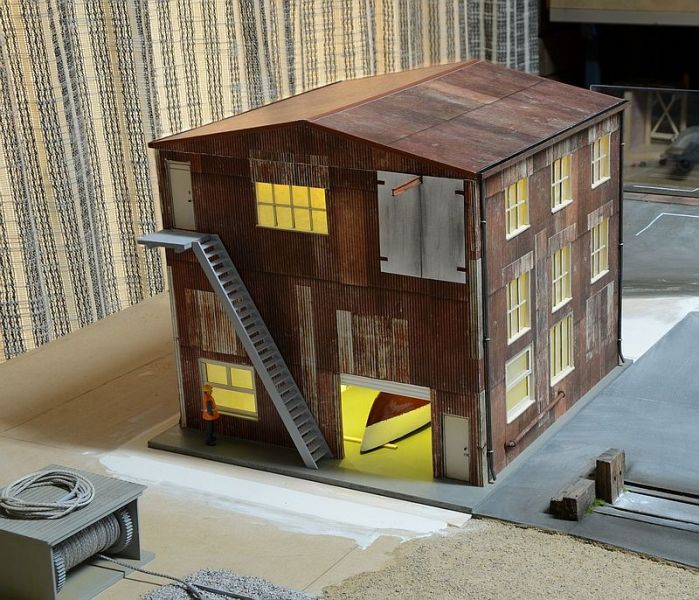
In this photo I started my string with an in focus point just past the back of the building and ended with the rail and ballast in focus.
Max
Port Elderley
Port Elderley
1 guest and 0 members have just viewed this.