HINTS AND TIPS - THE FOLLOW ON
Posted
Full Member
Using Rail Rusting Pens
by Peter Schumacher
When using Floquil's (at time of writing) new Rail rusting pens…remember to have a solvent soaked rag on hand,to immediately remove the paint from the rail head…try doing about a foot at a time.. then clean the railhead and continue.

Posted
Full Member
Train Direction and Detection
by Ben Girdler
I attach the anode of a red LED to the cathode of a green LED and then attach the other ends together. I put a 800 ohm resister on one end (series)and attach them to a track.
When the train travels one direction, the green LED lights. When traveling in the other direction, the red LED lights.
A NOTE FROM TREVOR
This could be confusing for a couple of members so the circuit diagram is shown here
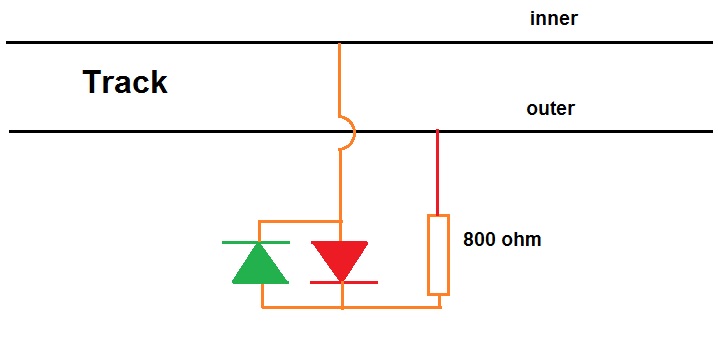
When the right hand rail is positive, your loco should be moving "forwards".
When the loco is moving right to left "forwards", the inner rail would be positive. The positive path would be from the inner rail to the Red Diode, through the 800 ohm resistor and back to the negative in the outer.
When the loco is moving left to right "forwards", the outer rail would be positive. The positive path would be from the outer rail through the 800 ohm resistor to the Green Diode, and back to the negative in the inner.
 Last edit: by xdford
Posted
Full Member
Filling gaps in plaster castings
by Ed Foley
When I need to place a small amount of plaster/caulk/spackle I'll take a sandwich bag and place about a tablespoon of your material into a corner of the bag, twist the opening shut then clip off a tiny corner of the bag. Now you have a mini cake decorating bag and you can squeeze the paste into the cracks, working it in a little with wood skewers or another handy scenery tool, artists mini-palette knives. Having the plaster or spackle in the bag helps keep it from drying out too quickly.
Once the fill begins to set I lightly mist it with water and brush it slightly with a stiff brush to remove the excess.
If you have a really tough crack to hide just "grow" a vine or some ivy up the wall in that spot.
Posted
Full Member
Saving Time when adding wires to a bus
by Nick Orwin
When I make any soldered joint, I add heat shrink tubing to protecting the bare joints including on layout wires …. yes i have seen staggered wiring & insulation tape used but heat shrink tubing costs pennies whereas tape can come off or dry out & wires can be bunched up on odd occasions bringing them together.
On layout wires I cut several pieces & slip on the bus wires for future use add my wire insulate with the shrink leaving a few points where other wires can be added easily.
Last edit: by xdford
Posted
Full Member
Protecting Wheel Bearings when spraying
by Cameron Dalziel
When painting I use old axles inserted where the axles normally sit. This stops bearings being filled with paint particularly when the vehicle is being sprayed. I rest the axles on a wooden block narrower than the wheelspace which enables me to spray under the underframe.
Posted
Full Member
Protecting Card Buildings
by Trevor Wright
I always spray card kits, whether they be bought or downloaded, with matt varnish before assembly. It makes it easy to wipe off any excess glue without damaging the printed face and makes it easy to give them a quick wipe over with a damp cloth if they get dusty on the layout.
Posted
Full Member
Reinforcement of Card Buildings
by Alan Peters
I reinforce walls and roofs mainly with the wooden coffee stirrers that many fast food outlets use. I started building card buildings many years ago and have used balsa, lollipop sticks, foamboard and even plastic sprue for reinforcement as well.
Posted
Full Member
Cleaning Residue from models
by Max Wright
I am often required to remove tape adhesive residue at work. I find eucalyptus oil works really well.
Hints & Tips No.1695
Supporting Flat Car loads
by Lewis Flaherty
I always had trouble with things i sat on a flat car vibrating off the car.
Then one day a plumber left about a 1" ball of plumbers putty after doing a plumbing job at my house, I played with it and then the idea struck me.
On small loads for the ho layout I just made a very small ball about the size of a bb and stuck it on the bottom of the wheel or on the bottom of a stack of lumber in several places and pressed the load down mashing the putty flat, therefore making it invisible when the train goes by. You can wipe it off with a rag and it never stains the car or the load. You can use it over and over too.
When I used Hot Wheels and Matchbox cars for loads, it is ideal on the bottom of the wheels.
Last edit: by xdford
Posted
Full Member
Lineside Fencing
by John Stellini
I use white plastic tile spacers for fencing just cut 1 piece off so it leaves a Tee shape, make small hole & put them in it makes good white fencing for a range of field spacings. For smaller scales, you could cut off all four legs and use them as fence posts
Posted
Full Member
Making Cobblestone Type Edifices on Buildings
by Scott Laidlaw
Go to an art/craft store and buy a bag of the cheapest decorative gravel (or even some new aquarium gravel, natural red is common) and apply hobby-tack to a building, wait for it to become tacky, and shake on the gravel. It instantly looks like a cobble-stone building.
Posted
Full Member
Superelevation
by Brian Sullivan
When laying curved track, lay a row of matches (used of course) around the outer edge of the curve just under the sleepers, this will give a good camber on your curves just like real life and will mean you can run trains faster through curved sections. Just lay the curved track (without fixing down), draw a pencil line around the edge of the sleepers, remove track and glue matches on the inside of the pencil line. fix track on top of this and ballast in the normal way. Result is a better looking curved track, trains will also lean slightly into the curve. However with typical model railway radii, it is at best difficult to do this in curved station areas.
Posted
Full Member
Using Hotmelt Glue with Tortoise Point Motors
by Mike Lehmann
I often used to fiddle around for up to an hour trying to get the four screws that can use the slots on the Tortoise baseplate to attach it upside down (or maybe right side up?) under the roadbed.
Now I just heat up the hot glue gun, apply a gob onto the baseplate and quickly hoist it into position. It helps to have the position needed clearly marked so you can squirm it into the right spot. Careful of any napalm-like drips, but after a few you start to recognize how big a gob is needed and it gets a little safer.
So, waiting for the glue to heat is about the most tedious part of the 10 minutes needed to attach a Tortoise now. If one needs moved, carefully break it free. I have had no problems with them coming loose.
Posted
Full Member
Protecting LED Lighting Circuits
by Geoff Roberts
If you are powering a bunch of LED's from an AC source or an old controller, feed all of your LED power through a single 1N4002 diode connected to the forward positive terminal at the controller output. You can then connect up to 100 LEDs each with 1K ohm resistors to this diode parallelling from the Diode. Turning the controller into reverse will then have no affect. Also if you accidentally connect an LED the wrong way round, you will not blow it up.
Posted
Full Member
LED Diffusion
by Doug Dickson
I have found the light emitted by the standard 3mm dome ended led is quite directions less, focusing about 2 inches away. By filing the dome of the LED (but not too deep) flat on the plastic case, the light cast seems to spread out more suitably for an interior application.
Posted
Full Member
If you have trouble with derailments on Peco Points…
by Several Modellers
You need to get down to track level and run the loco very slowly through the turnout. Look very carefully at the wheels to try and ascertain exactly where the derailment is happening and which wheel or wheels are affected. You should be able to see the first lift of the wheel away from the track and looking closely will give you a better understanding of which element of the track or which wheel is at fault.
Curved points are notorious for derailments. I believe this is due to slack clearances. It is necessary to closely observe what is actually happening, but it is likely the wheel is hitting the crossing (frog) nose.
You can get a small flat jewellers file and run through the frog and other areas to remove any odd sharpness 's and smooth out the flow of flange through rail .I also get a flat sheet of fine wet a dry and sand down the top and bottom of the whole unit to smooth it all down and get it sitting right.
Posted
Full Member
Sources of Hand Rail wire
by Mike Boyden
having seen the prices some places try to charge for thin wire, (like £1.85 for 2 metres of "handrail" 0.33mm) I suggest finding a supplier of wire (and thread) for people doing craft work in beads, this site for example has wire down to 0.2mm and sell in 50g reels, a reel of 0.2mm diameter wire contains 179metres, a 0.315mm reel carries 72.1 metres, prices for 50g reels are around £3
Posted
Full Member
Stops in Blind areas
by Kevin Beasley
Having a prototypical stop in a Roundhouse/ Engine shed is nice where in many cases the rail just “endsâ€, but you should also consider running engines into the engine house and stopping them. If you cannot see the stop, then you might overrun the track.
I have a dead-end subway station where I cannot see the end of the track. I have detection and LEDs to let me know when I am there, but there is also a block of foam rubber to stop the trains without damage if they bump the end.
Posted
Full Member
Using Hot Glue to hold Styrene for roads
by Bob Farrell
I tried the hot glue on a 36" long section of .040" styrene roadway today and it works great. The road is down solid and don't think it is going anywhere. This is about as fast as using latex caulk only I didn't have to keep weight on it. I would say it is about equal to the latex caulk in effort as well.
Posted
Full Member
Recycling Plastic Packaging
by Andy Vines
Look for plastic packaging that has the number 6 re-cycle logo as these are styrene… plus you get to eat the goodies!
(A note from Trevor – A quick rummage of my fridge here in Australia yielded only level 5 styrene containers which I have used for small roof sections, disks for searchlight signals (see my website) and temporary signals and small detail pieces. Some goods may come in the better quality containers in this country anyway but I have not found them yet.)
Posted
Full Member
Recycling (Some) Envelopes
by Andy Vines
Check the inside of envelopes as you will find some have nice printing that can be used as wallpaper or floor tiles. And as an addenda, Nothing goes in the bin at our house until suitability for modelling has been checked (A note from Trevor – Same here!!!… well not much goes unchecked anyway…)
1 guest and 0 members have just viewed this.