Sundeala or MDF?
Posted
#26068
(In Topic #1846)
Guest user

Some advice please. I will start building my baseboards soon and am undecided whether to use Sundeala or MDF. Reading various articles on the site sundeala is lighter and can be easily pinned into but if you are landscaping, and possibly using various heights, on most of the layout, is it a waste of money as sundeala is three time more cost that MDF. My initial thoughts was to use MDF for the base and sundeala should I build height (like Jeff has used in his brewery layout). If I do that the the track will run on MDF and sundeala. Is that a real problem?
Secondly whichever I use, would I need to seal either board before starting landscaping and laying track? and if so what would you recommend?
Thanks
Colin
Posted

Full Member
You've posed an interesting question there and, as you've already said, you'll realise there's no "right" or "wrong" material for baseboards.
Sundeala is undoubtedly one of the best available but, like everything, it's not perfect. You pays your money and takes your choice !! It is very expensive but it's soft and light.
Add up the pro's and con's of each product (like a balance sheet) and make your decision based on those factors - neither would be wrong, nor right it would simply be "your" choice.
I use chipboard, others use ply, yet others MDF and Sundeala - all with great success.
With regard to running track on both MDF and Sundeala - no problem so long as the joint is made properly. MDF would be noisier but with an overall cork underlay and no pins, that noise seems to disappear. MDF - depending on the thickness, may need less underframe support (or the same - it is brittle).
If you use an "open-top" framework, you would only need the trackbed where the track goes although this might mean you waste the curved off-cuts in either material.
With regard to sealing the boards - this is recommended for 2 reasons :
1. It keeps the damp out (if that's a problem) and
2. Sealing with a "ground-base" colour, would give you something to build your scenic works on.
My choice would be, if you can afford it, go for the sundeala - in the end, I think you'd have less draw-backs than with the other material but the whole structure would be more expensive - tops and the extra framework necessary.
Hope that helps but read the experience of others as well.
'Petermac

Posted
Guest user
and 12mm chipboard for the rest,as for pins most recomend sticking the track
down not pinning,i think sundeala was mainly used for exhibitions as it is lighter
for transporting but it does need more bracing too.
;-):lol::lol::lol::lol::cool:
Posted
Guest user
Petermac really has explained things very well in his post i dont think anybody will dispute sundaela is the best but it comes down to cost really.
Also it depends how much you will need to buy if your layout baseboard is going to be 8 ft x 2 ft sundeala costs are not that bad but if your were talking an are 20ft x 10ft it would be extremely expensive.
i think some people dont bother with underlay with sundaela.
Myself i use ply the not marine grade just standard ply 12 mm stuff i use underlay under tracks so other than track pins it does not come into contact with the wood.
Again concerning underlay there are many ways of doing that
cheers Brian.W
Posted
Guest user
Posted
Guest user
I've used Sundeala on my latest layout (not for the first time) and I'm very happy with it.
Sundeala … Nice easy board to pin track to, cut holes in and the least noisy solid base available. Needs exra bracing (but not excessively much) and needs to be painted to seal (I've used brown emulsion) before doing scenic work. Also the most expensive alternative.
Plywood … Widely used for exhibition (portable) layouts. Can be used for both the surface and the bracing and is virtually unmovable when properly constructed. "Cheap as chips". Hard to pin (Every track pin will need a pilot hole drilled), cut holes into and noisy. I still would paint the surface as the first job.
So, Sundeala is the "easy but expensive" way and Plywood the "economic choice". If you don't want to spend out on Sundeala, I'd use ply, paint the surface with emulsion to seal, cover the whole thing with cork tiles and lay my track on a second layer of cork (Cut from tiles). You'll do away with excessive noise, have a good track underlay and have a layer of cork you can cut channels in for scenic work. I've even seen layout wiring lain in these channels.
If you need any more (more detailed ) advice, just ask away.
Posted
Guest user
I guess if your layout is to be portable then weight certainly becomes a consideration but otherwise go with whatever you are happiest with.
Posted

Legacy Member
Posted

Inactive Member
Needles to say I'm going to need a lot of info on controllers, track and everything else for that matter so be prepared for a barrage of "how do I……….." etc!!!:roll:
Ken.
'It don't mean a thing if it ain't got that Swing'
Posted
Guest user
Posted
Guest user
The owner has used 5mm cork to cover and the the more standard 3mm cork tiles for track underlay. Much of the wiring common return is laid in a channel cut tight to the track bed, the 3mm cork underlay then being cut a little wider than the actual track itself. This has given the eventual ballasting a slightly wider, but less acute, shoulder, which looks really good.
Hope that helps.
Posted

Full Member
 lol::lol::lol::lol::lol:
Phill
Posted
Guest user
PS TO NEW MEMBERS … this is an "old forum" joke, I think from version 1 or 2 of the Barchester forum, so apologies for not making sense to you.
Posted

Full Member
See my Newcastle Emlyn Layout or Pentrecourt Halt threads for more info.
If using MDF remember to protect your lungs when cutting it. The fine particles go everywhere and the bonding agent was once carcenogenic.
Posted
Guest user
I am sure you could get 50 different answers from this forum & they are all correct as each layout circumstance is different.
Posted

Inactive Member
I have both home and exhibition layouts ( Ron often helps me at exhibitions). My modules are constructed with 35/50mm Styrofoam base and clad in 6mm MDF. This makes a very light but strong module.
Over the yrs I have found that MDF is not affected by moisture any more than chipboard, ply etc. All types of timber should be sealed with some sort of paint, I use a cheap exterior acrylic paint.
As has been said before, we use what we are used to and comfortable with.
Ians
Any DCC is better than no DCC
Posted
Guest user
As a virtual non poster on this web site and the 'Warning' note received from Bob today!!! I guess its time to but keyboard to PC and make a comment..
Over the many years I have been modelling I have found the following which may? be of use to others…
Chipboard (12mm). Quite a hard surface. Track pins are rather hard to drive into it and wood screws often fail to grip fully. Heavy weight if used on portable layouts.
MDF (9 or 12mm) Very hard surface, Track pins have to normally have a pre drilled pilot hole or they will bend over. Often takes wood screws ok but not into end grain. Extra care must be taken when cutting/sanding this sheet - Ideally cut outside and always wear a face mask. Is quite prone to absorb moisture and to then start to de laminate. However, this can be prevented with an all over coating of either PVA, paint or varnish etc.
Ply (6, 9 & 12mm) Perhaps my choice! I use 9mm WBP Ply for my layouts now. Not the marine grade, but this can be used where storage may result in condensation or dampness (Neither of which are ideal for model railways really!)Ply cuts easily. Track pins are again hard to drive in without bending (Peco type) but a fine pre drilled hole overcomes this. Thicker sizes take wood screws ok.
Sundeala board (9mm) I have used this board many times in the past and now have moved away from it due to its high cost. It takes tack pins easily. Cuts a little harder than other sheet materials and has one large problem that it will over time sag if not supported fully underneath (See framing comments later). It cant easily be plained or sanded to shape like all the previous sheeting boards can as it tend to tear.
Softboard (9 or 12mm). Leave well alone. Only suitable for pin boards or similar use.
Hardboard (4mm) Again not suitable for model railway baseboard at all.
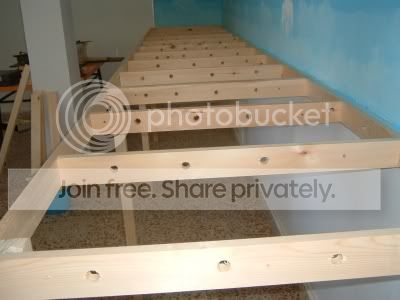
Framing… Its vital that all supporting timber used is of reasonable quality and as straight as practicable. Condition timber before use by unwrapping it (if it is supplied in a plastic wrapper) and leave in the room where the model railway is to be constructed for at least 48 hours. Use as a minimum ideally 2 x 1 inch (21 x 44mm) PSE narrow edge up to the baseboard. There is no need for a degree in carpentry to manufacture a frame. Simple Butt joints are all that's needed. . All you really need to make the framing is a mitre block, tenon or panel saw and an electric drill/screwdriver which makes life easier! PVA woodworking glue and suitable length 4mm wood screws. Use the mitre block to ensure all timber ends are cut square. Then within the distance of the timbers width at the end of the long timber drill two by 4mm clearance holes. Next apply some PVA to the end of other timber to be jointed and then screw the two parts together. Joint 1 completed :lol: Continue with the other three ends until you have a rectangle or square shape as needed for the overall baseboard size. Infill between the outer framing with internal timbers. I recommend a grid pattern of no more than 15inches (400mm) in all directions and 12inchs (300mm) if using Sundeala board. Tip before gluing and pinning down the top board drill a series of 15 to 20mm dia holes in all the cross timbers about 1/3 the way down from the top edge of the timber. These holes, once the top board is in place are used for wiring between grid section.
Posted
Legacy Member
Posted
Full Member
Flashbang gave a clear, concise breakdown of how to make the frame and Bob's photo shows just such a frame - very well made - in place.
The thing to watch out for when making your initial outer frame (before fitting the cross-members) is to ensure that not only is it the right shape - rectangle, square. triangle, romboid or whatever - is that it is FLAT. i.e. there is no warp in it. That's not quite as easy as it sounds unless you've got a large flat bench to build it on. Once screwed and glued, you'll never get rid of any in-built warp. Believe me - I know !!!! :oops::oops::oops:
'Petermac
Posted
Guest user
We use this method at Newport MRC and it's very sucessful. Strong, reasonably light and warp free.
1 guest and 0 members have just viewed this.