Pictures for Streetscapes
Posted
Full Member
Request for material from Members
Hi Brian (and everyone else),Thought I would include this for everyone as I was watching the series "Kingdom" tonight ( we recorded it through the day) and I was taken by the view of the pub. There are a number of images of the town as well that might be useful for the tasks we are doing so far!
the greyhound inn swaffham - Recherche Google
Regards
Trevor

Posted

Inactive Member
Thanks for the link…..that`s a wee ripper of a little scene there……..perfect perspective I think.
I`ll paste the link again so it`s easier to get to.
https://www.google.com.au/search?q=the+greyhound+inn+swaffham&biw=1600&bih=775&source=lnms&tbm=isch&sa=X&ei=NtUWVPW6JJa78gWsg4D4BA&ved=0CAcQ_AUoAg=X&ei=NtUWVPW6JJa78gWsg4D4BA&ved=0CAcQ_AUoAg
:cheers Gormo
By the way…here`s an edit in the form of the latest background and download link.
https://www.dropbox.com/s/4690rqvr3ycd2vx/safron%20walden%20grey%20paving.jpg?dl=0
Goodnight All
 Last edit: by gormo
"Anyone who claims to have never made a mistake, never made anything!!"
https://sites.google.com/site/greatchesterfordmodelrailway/home
https://sites.google.com/site/greatchesterfordmodelrailway/home
Posted

Full Member
https://www.google.co.uk/search?q=square+%26+compass+worth+matravers+images&biw=1280&bih=600&tbm=isch&tbo=u&source=univ&sa=X&ei=bO0WVK7ODYXX7AbR_4CwDw&ved=0CCAQsAQ
Last edit: by Dorsetmike
Cheers MIKE
I'm like my avatar - a local ruin!
I'm like my avatar - a local ruin!
Posted
Inactive Member
Thanks for the pics Mike….I imagine it would be very easy to spend a lazy afternoon in that pub…..very nice.!!
Now folks…..Trevor has been asking some questions about Photofiltre in regards to changing perspective. I`ve offered to do a tutorial for him and anyone else who would like to look in….please do.
So here we go.
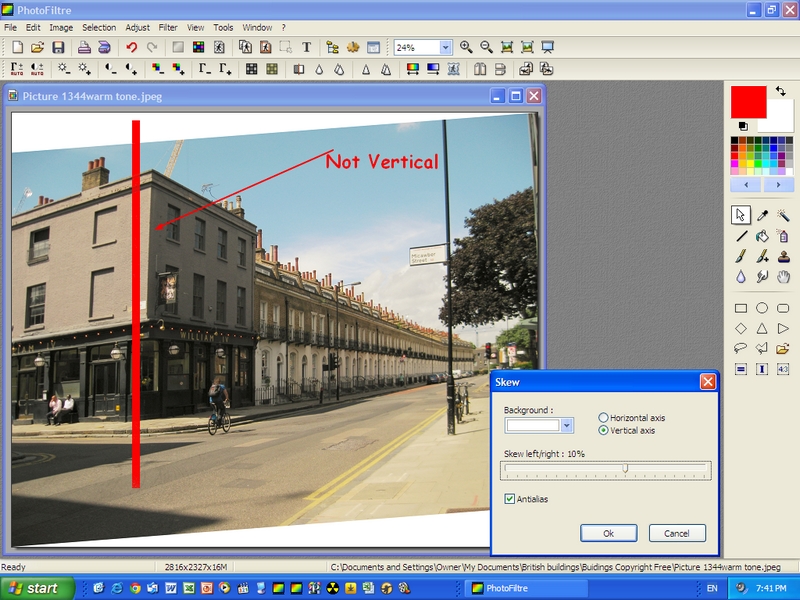
This is a picture taken in London last year. As you can see it`s a reasonably level street passing the terraces. We are going to turn this level street into a slight hill. Bear in mind that, if this street were originally a hill, we could make a reasonable attempt to flatten it out.
The point that will be most obvious in terms of perspective is the reference point. The corner of the building. The corner of the building should be a close as possible to vertical once adjustments have been made and all other lines should slope away from this point to the horizon. We are going to raise the right hand side of the image by using the Skew tool. To do this, left click on Image in the top menu and then left click on Skew. The Skew control box will open. The Skew control box has a slider for adjustment and the option to adjust either the Horizontal or Vertical axis. If you left click once ,directly on top of the slider ,you can then use the right or left arrow keys to move the slider in 1% increments.

Now you can set the adjustment to whatever you like, but to control the adjustment and ease the picture into what you would like, it`s probably best to increment 1 or 2% at a time. Set the adjustment and left click OK. If you wish to increase again by the same increment, open the Skew box again. Your previous setting will still be there, so you can just click OK again to adjust by the same amount.
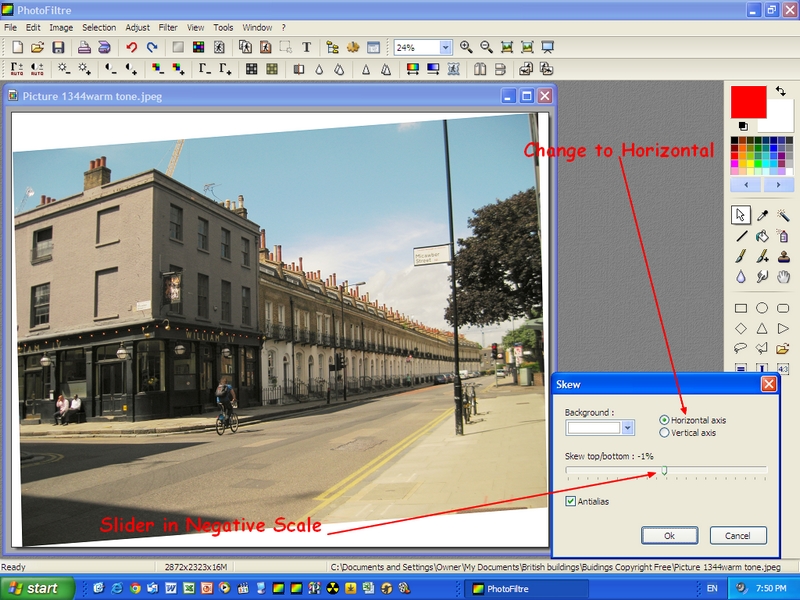
Our example below has lifted by 10% on the right hand side and consequently distorted the corner of the building. The person on the push bike will have to pedal a bit harder now.
To correct the corner of the building, we now change to the Horizontal axis adjustment within the Skew tool. The set up is just the same as mentioned above re the slider etc. and you can see the slider has been set to the negative side of the scale to encourage the top corner of the building to move left back towards the vertical plane.
If you set the slider to the wrong side and the picture moves in the wrong direction, just click on the Undo arrow in the top menu. This will restore the picture to it`s former setting allowing you to start again in the right direction.
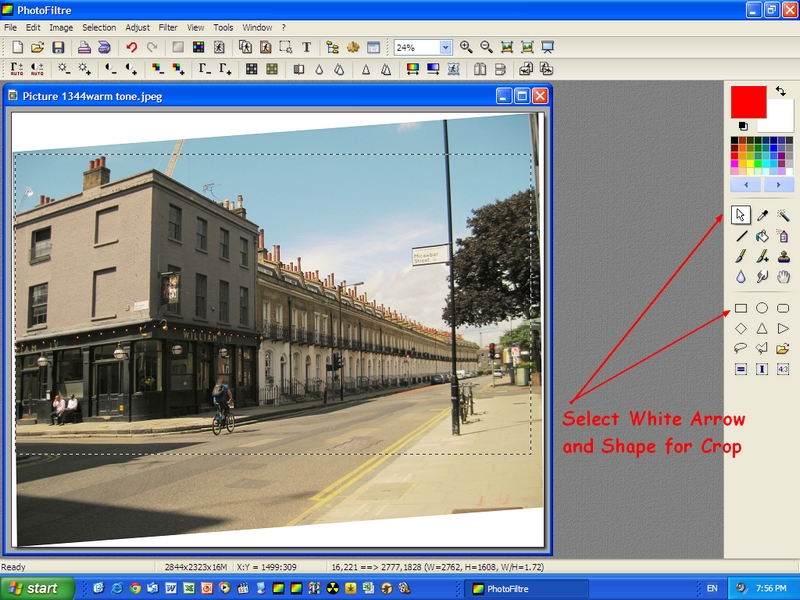
Once you are happy with the look of the picture, it can be cropped to further improve the look of it. You don`t have to crop it, you could use the Clone tool and fill the white areas…it`s up to you?
To Crop, left click on the white arrow and then select the shape of the crop. I have chosen a rectangle in this case. The rectangle is the default setting, however if you have used other shapes in your editing you may have to reset it.
Move the cursor over the picture to the point where you wish to start cropping.
Then left click and hold down and drag the Crop box into the shape and size you want on the picture. The shape can be further adjusted once you release the mouse button. Move the cursor to the edge of the box and arrows will appear, allowing you to modify the shape by clicking and dragging once more.
To activate the Crop, move the cursor to any part inside the crop box. Right click to open a sub menu. On the sub menu, left click on Crop and this will activate the cropping process.
You can also reverse the image if you wish to slot it into a scene. Select Image from the top menu and then select Flip Horizontal.
For the purposes of this exercise I have put the two views into one picture below.
You may notice that the corner of my building is not perfectly vertical. I did not want to distort the left hand side of the pic any further so I compromised the vertical. This is all purely personal preference but at least you have the tools here to make those choices. The interesting thing about the reversed picture, is that the corner of the building looks closer to vertical to my eye. Maybe I should put my glasses on??? or maybe it`s an optical illusion caused by the shadows.
Things like the black pole can be selected, copied and pasted and rotated back to a vertical position if you wish or just blended out altogether.

So there you go folks…..that`s how it`s done
:cheers Gormo
"Anyone who claims to have never made a mistake, never made anything!!"
https://sites.google.com/site/greatchesterfordmodelrailway/home
https://sites.google.com/site/greatchesterfordmodelrailway/home
Posted
Inactive Member
Gormo got the wrong end of the stick in that last tutorial and blindly charged ahead. Trevor had actually expressed an interest in the Trapezoid / Perspective tool, not the Skew tool as I had assumed.
Well the bonus is that both these tools compliment each other and the results are similar, however I would suggest that the Trapezoid / Perspective tool is more controllable. At the end of the day, it doesn`t matter because now I will submit a short tutorial on the Trapezoid / Perspective tool.
The subject we are going to manipulate is one sent to me by Trevor…..a delightful little building. The angle does not quite suit the work I am doing with railway backgrounds and also the people will have to go, but that`s another story.

What we want to do here is raise the right hand side roof and lower the right hand side base of the building.
So we open the photograph into Photofiltre. Then at the top of the screen left click on Filter. A drop down menu will appear. Scroll down to Deform and then across to Trapezoid / Perspective. Left click on Trapezoid / Perspective.
The control box will open. Slide both sliders to 100%, if they are not already there, before moving any further into this manipulation, and then click on Preview. The picture should not change. Now you have a base point to work from.

Now we are dealing with the Vertical plane in this case, and like the previous tutorial, if you left click on the slider you will be able to control it with the left and right arrow keys, incrementing by 1% at a time if you so wish.
Increase Right distort by possibly 2% and then left click on Preview and check the results. Add more if you need to ,but keep a critical eye on how the image is distorting. With some images it may work better by decreasing the left hand side whilst increasing the right hand side. It`s a balancing act between perspective and distortion.
If the image needs correction in the Horizontal plane…..for example if the walls appear to taper in as they rise to the top of the building….just follow the same formula and use both sliders if necessary.
When you have Previewed any of your changes ,and you are happy to commit to the changes, left click on OK. Obviously you can cancel at any time or you can undo any changes by left clicking on the Undo key at the top of the screen.
I would also suggest ,as I`ve said before, use Save As when saving the file and save it with a different file name. This will ensure the original remains unchanged and you can redo the whole exercise if you wish.
So this is what can be done. This image still requires some work to remove people but the angle is far more suitable for my modelling purposes. To remove the man leaning on the right hand bay window, I copied and pasted the left hand bay window over the top of it. You can still see his shoe if you look carefully.
Well folks I hope that has been of some use.
:cheers Gormo
"Anyone who claims to have never made a mistake, never made anything!!"
https://sites.google.com/site/greatchesterfordmodelrailway/home
https://sites.google.com/site/greatchesterfordmodelrailway/home
Posted

Inactive Member
Ken
'It don't mean a thing if it ain't got that Swing'
Posted
Inactive Member
I`m glad you enjoyed it
:cheers Gormo
"Anyone who claims to have never made a mistake, never made anything!!"
https://sites.google.com/site/greatchesterfordmodelrailway/home
https://sites.google.com/site/greatchesterfordmodelrailway/home
Posted
Full Member
Thanks again for that! Between us both I think we have the market cornered!
Cheers
Trevor
Posted
Inactive Member
I don`t know about cornering any markets…….there`s a lot of talent out there???
:cheers Gormo
"Anyone who claims to have never made a mistake, never made anything!!"
https://sites.google.com/site/greatchesterfordmodelrailway/home
https://sites.google.com/site/greatchesterfordmodelrailway/home
Posted
Full Member
All I was meaning into is our skills between Paint and Photofiltre and I would hope no one would take offence - none was intended … now if someone could do a GIMP tutorial and we would all be covered with free software!
There is obviously a lot of talent in the group so if they can see fit to also give us tutorials, that can only help members of the Barchester church.
Cheers
Trevor
Posted
Inactive Member
I don`t think any one would take offence at that……surely not????
So yes please…….all you GIMP users out there……could one of you please do a tutorial????
I have tried using GIMP a few times now, over a couple of years, and quite frankly found it frustrating.
What am I doing wrong?????
:cheers Gormo
"Anyone who claims to have never made a mistake, never made anything!!"
https://sites.google.com/site/greatchesterfordmodelrailway/home
https://sites.google.com/site/greatchesterfordmodelrailway/home
Posted
Inactive Member
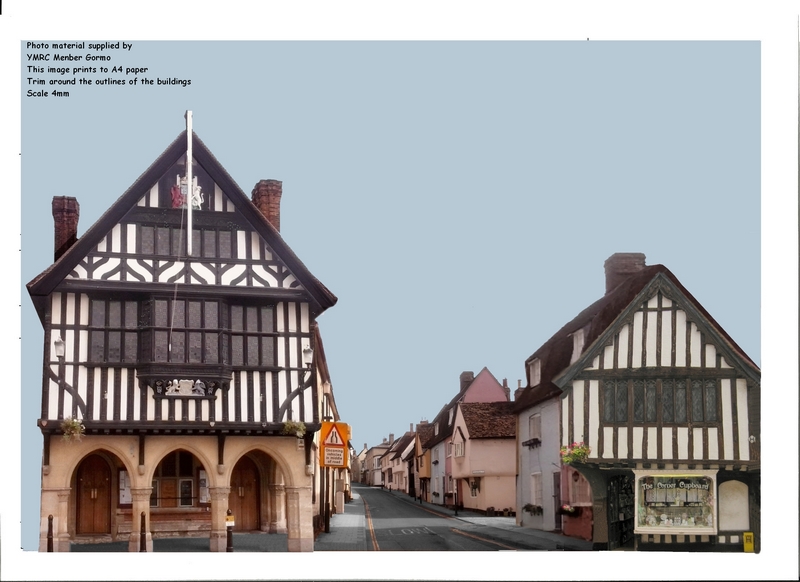
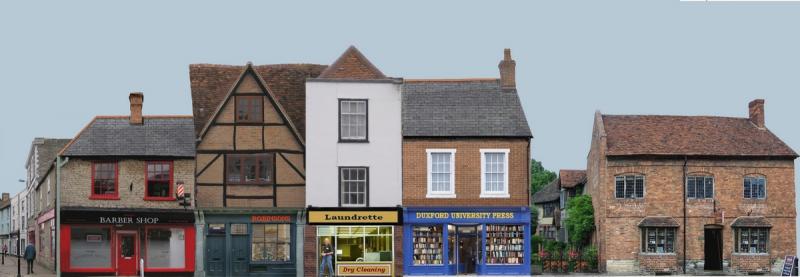
Here is the latest background. I have used Trevors building that was used as an example in the tutorial above, and some of my own pics and some free textures.
This latest example is in two parts and will require some careful cutting to match the two.
This is the complete scene
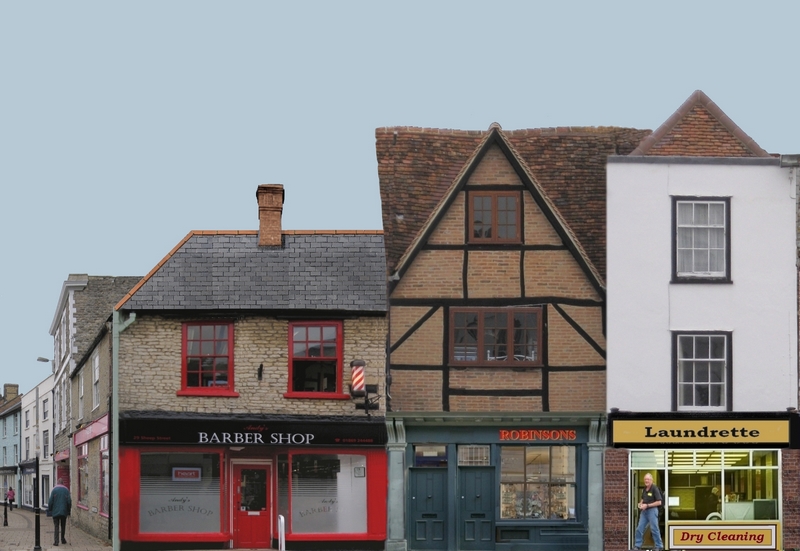
This is part A or left hand side
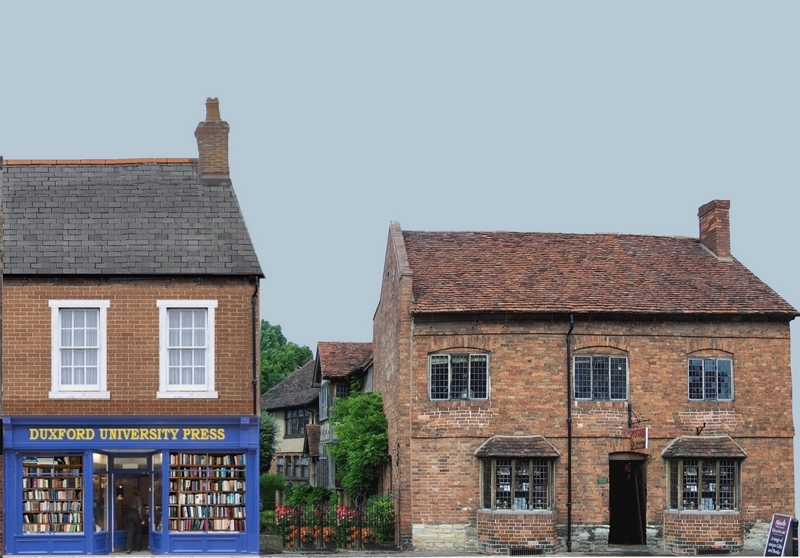
And this is part B or the right hand side
All of the above are available in full resolution at
https://www.dropbox.com/sh/0ohh19ydcgfg48m/AAAzzTKchsOlDKEwSjMDoR4Ja?dl=0
:cheers Gormo
"Anyone who claims to have never made a mistake, never made anything!!"
https://sites.google.com/site/greatchesterfordmodelrailway/home
https://sites.google.com/site/greatchesterfordmodelrailway/home
Posted
Guest user
 . I'll keep trying but it might need to wait till spring light next year when its good and bright that timer in the morning. Might make a trip into south Queensferry sometime as they have so many parking restrictions I might be able to get some afternoon shots . we shall see
 Cheers
Matt
Posted
Full Member
I very much like the putting together and the perspective curving away but is the shingle roof meant to be "curved" above the "Robinson's" building? I am not sure it is one I sent you! Is it a victim of the forced perspective?
Regards
Trevor
Posted
Inactive Member
HI Brian,
I very much like the putting together and the perspective curving away but is the shingle roof meant to be "curved" above the "Robinson's" building? I am not sure it is one I sent you! Is it a victim of the forced perspective?
Regards
Trevor
G`day Trevor,
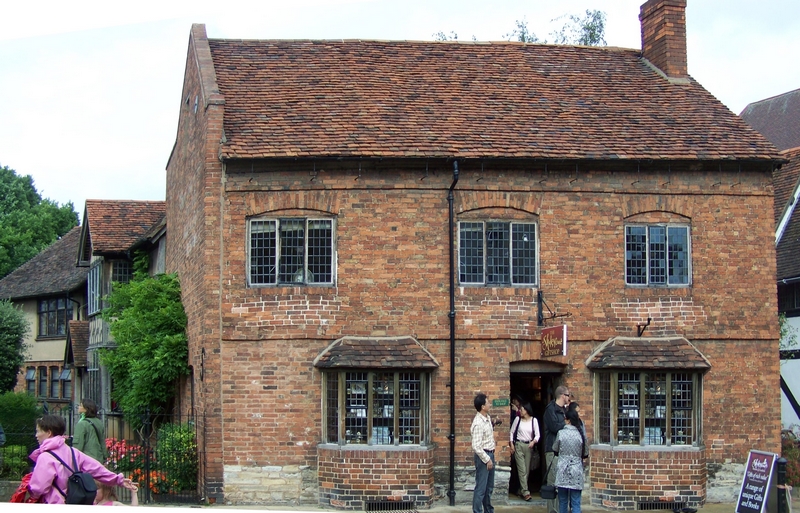
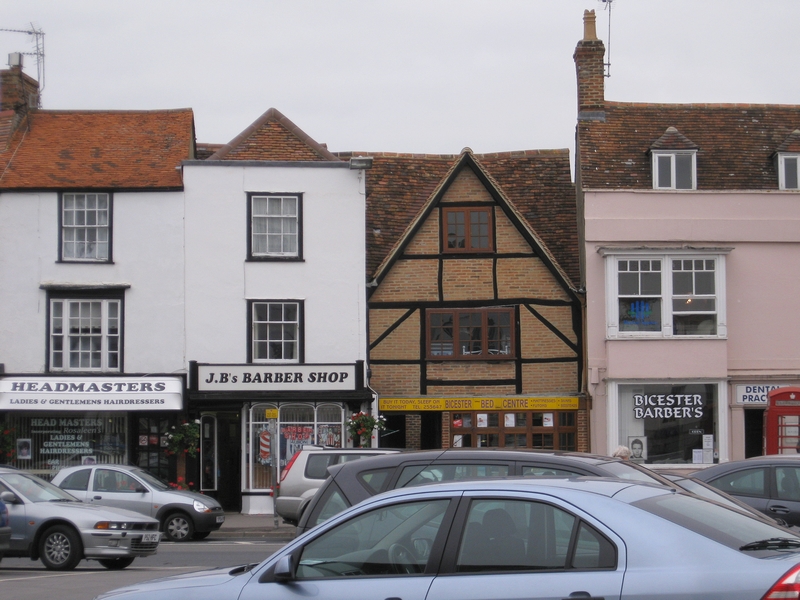
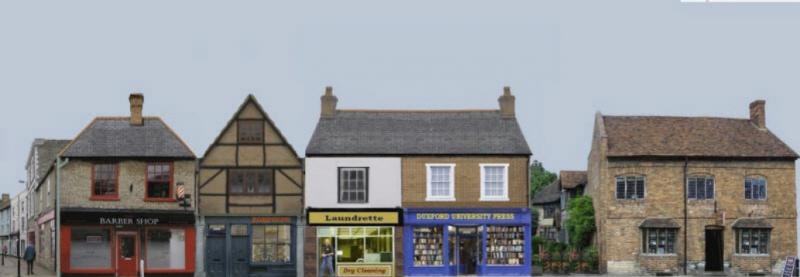
The building is one of my shots from Bicester in 2010 and the ridge of the roof is dodgey as you can see from the original pic below. The original pic is not doctored in any way. I have lifted it out of the original and used a bit of artistic licence on the left hand side. I have tried to imply that the roof on the left, is an eave overhanging a window, that may be looking across the roof tops on the left. The extension on the right hand side, again is a bit of licence to blend it in to it`s neighbour because the original seems to do that to it`s left hand neighbour.
If you think it looks a bit suspect, you must be right….so maybe I should make some adjustments. I don`t know???
I`m open to ideas on that one!!!
By the way….the only building of yours in the photo is the one on the extreme right in the panaorama….the one with the garden next to it.
Original Image
Compilation
Now Matt…..I don`t want you getting run over mate!!!……and also waiting for better light is probably a good idea as well. You can see from the original and the compilation above that there are ways of getting around cars being in the way. The upper part of the building can be used and a new and different lower part can be fudged into play. The white building on the right in the compilation has a laundrette under it whereas the real building, in the original, has a barber shop below it and it is also on the left of the Robinsons upper building. Actually there has been a lot of manipulation in my little scene.
So Matt….please don`t take any risks snapping photos….it`s not worth it and I don`t want you getting hurt. !!!
:cheers Gormo
"Anyone who claims to have never made a mistake, never made anything!!"
https://sites.google.com/site/greatchesterfordmodelrailway/home
https://sites.google.com/site/greatchesterfordmodelrailway/home
Posted
Full Member
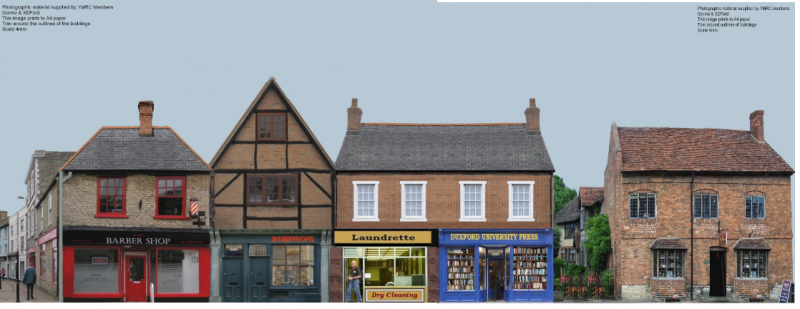
right hand end of barber shop roof copied, flipped and pasted over left end, similar treatment for Laundrette and Press roof, Laundrette window moved up, Robinsons upper stories reduced in height, (a bit too much!) ideally should have made the timber over the window level with eaves either side and roof hacked. Took about 25 minutes
On reflection, I probably should have converted to a TIFF file instead of JPG to work on it, repeated saves of JPGs tend to degrade the image. Also probably should have made the Laundrette upper storey match the Press. May redo later, time for some grub.
Last edit: by Dorsetmike
Cheers MIKE
I'm like my avatar - a local ruin!
I'm like my avatar - a local ruin!
Posted
Full Member
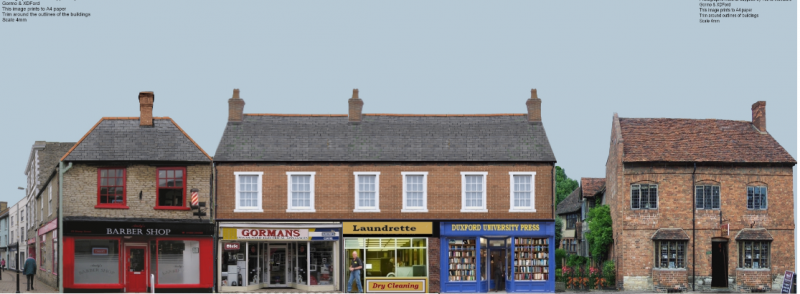
As it is it fits A4 sheet, so about N gauge, so for 00 will need splitting and resizing.
Further alternative
Last edit: by Dorsetmike
Cheers MIKE
I'm like my avatar - a local ruin!
I'm like my avatar - a local ruin!
Posted
Inactive Member
Well you can see what`s possible with images. They can be tailored to suit. Thanks for doing that and you may have given me some new ideas to play about with.???
:cheers Gormo
"Anyone who claims to have never made a mistake, never made anything!!"
https://sites.google.com/site/greatchesterfordmodelrailway/home
https://sites.google.com/site/greatchesterfordmodelrailway/home
Posted
Full Member
I'm rarely satisfied with anything "out of the box" add detail to and/or renumber locos, hack kits - stock or buildings.
Cheers MIKE
I'm like my avatar - a local ruin!
I'm like my avatar - a local ruin!
Posted
Full Member
I was half looking at our ABC last might at an episode of "Happy Valley" just as our daughter rang from interstate… and a full front view came up about the 33 minute mark of a typical front/pub/in/whatever that if it were screen dumped would translate well for our purposes. Aussie members may be able to access it on Iview, in which case you could pause it, press "alt and Prt Scrn keys together and paste into "Paint" then trim it and save it.
My internet at the moment is really slow so I cannot actually do it for you but that could change…
Enjoy it,
Trevor
1 guest and 0 members have just viewed this.