Painting a backscene
Posted
Guest user
How much time do you normally get before the first paint begins to dry to much to blend.
Or have i got this right if you wet the already dry paint it softens it enough to let you apply more paint and blend.
cheers Brian.W
Posted
Guest user
Just one thought, perhaps it would be possible to scan an image I wanted (say a particular building) making it a feint black & white copy, then stick it on and use the outline for the paint job??
Posted
Guest user
Posted
Guest user
I'm not confident in drawing any sort of image, so this "painting by outline" method would help me, if it's feasable.
Posted
Guest user
Good questions :smile:Mike you do all this blending while the first paint you apply is still wet.
How much time do you normally get before the first paint begins to dry to much to blend.
Or have i got this right if you wet the already dry paint it softens it enough to let you apply more paint and blend.
cheers Brian.W
It really relates back to how thickly you paint. I don't use thick masses of paint. Maybe you could say it's applied in heavy washes, with a fair dose of water added - not to the point of being runny, just a bit sloppy, so it spreads well and dries quite fast because it's not thick.
The blue-mauve applied low in the sky was done over dry paint. Had the underlying yellow been wet I would have ended up with a greenish tinge. When wet paint is washed over dry, strictly speaking it isn't blended because the underlying paint doesn't become workable again. I probably should have said the wash over the top is feathered away, if you like.
You get very little time to rework acrylics, depending on the weather. Obviously the thicker it is, the more time you have. By the way, one of the biggest mistakes you could make when painting is to paint too thickly too soon. It's vital to get a 'likeness' before beefing-up the paint.
Mike
Posted
Guest user
When I get around to painting some buildings I don't intend to draw anything at all - just make them with the brushes - cheap, squareish brushes from the bargain store. If you have sharp-edged brushes you can be amazingly precise, and acrylics will always let you paint over any mistakes.
Also if you don't bother about drawing the buildings, you don't have to worry about getting them the right size first time. They can grow or shrink as required. I found it impossible to draw my Swanhurst buildings with the backscene in place.
Mike
Posted
Guest user
I simply can not get an image down on paper that looks anything like it should.
Angles, perspective, shape, 3D appearance, they are all alien to me when it cames to recording what my eye sees on paper.
I reckon that's why I originally became a modeller and a photographer, I just couldn't draw or paint. I'm the artists equivalent to the musicians "tone deaf"!!! :roll::roll:
Posted
Guest user
As for perspective, I'll be making all prominent buildings "flat-on" so they will look better [in theory :smile: ] from more angles. More distant buildings, being less distinct, might have some 'angle' to them.
When I started my Swanhurst backscene I tried to create a close street whose buildings slanted away - they looked awful and had to go. Forced a major rethink.
Mike
Posted

Full Member
Nice Mike.

Posted
Guest user
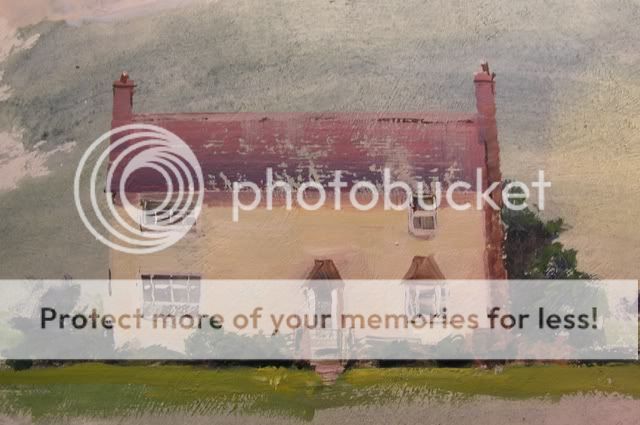
Assuming you have your sky, and maybe a nondescript green hill in front of it, you can easily - yes easily!! - paint a simple, flat-on-to-the-viewer house if you have the right brushes. A quick reminder of my brushes so you can see them on this page…..

For the house I've used the two flat [and very sharp-edged] that have the orangey-yellow bristles 5th and 6th down from the top [with clear plastic handles]
Take the bigger brush and make a rectangle of appropriate size - you might need to measure up beforehand, but I didn't bother. I think most if not all of us get a feel for building size simply by being hobbyists. I mixed up a creamy colour red yellow white + some blue. It's important your whites aren't too white, or else the house will be too prominent to be a backscene feature. If you're lucky you can leave spaces for windows. With these brushes you can be amazingly precise.

Clean the brush. Mix up some reddish browny grey for a roof [red, green, blue - a bit of this and a bit of that] and brush it across for a roof. Two or three long, continuous sweeps should do it. The paint skipped here and there and I liked it - looked mossy. My roof mix was VERY LOOSELY mixed, so here and there it's a bit blue etc. Don't overmix your paints when doing walls or roofs - the loose mix will aid authenticity no end!

Use the smaller of the two brushes to make chimneys.
Mix up some dark greeny bluey grey - blue, any old tube green plus some red - and add windows with the small brush, after you've washed that brush. Use some gingery roof colour for above the bay window and at the door. I've deliberately left those bits untidy for now, to show how easy it is to fix them up later.
Window frames can be gently scribed in with a brush handle if you like.
Warm, dull grey - a mixture of roofing colour and wall colour - was added with that smaller brush for a shadow under the eaves. Keep this shadow warm, not blue, because shadows on vertical surfaces, and especially enclosed shadows are warmer because the sky has less influence on them.

In the next pic I've added window frames in a not-too-vivid white, using the tiny rigger brush seen at the bottom of the row of brushes.

And here it is with the bay window and doorway tidied up by superimposing wall colour over the ragged edges. A few tiny dark accents were added to liven it up a bit without overdoing it. The building is deliberately "loose".

I might add some creepers at some stage. It's a piece of cake to add another similar house alongside.
More to come.
Miike
Posted
Guest user
Posted
Guest user
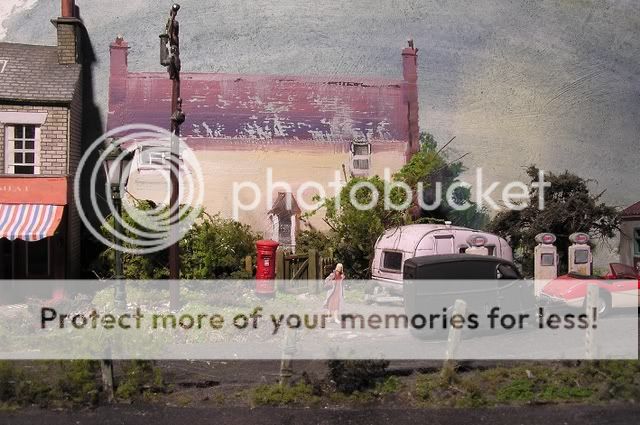
and how it could look on a layout…
If anyone has any questions I'll do my best to answer them. If anyone wants to see something specific painted, please ask. If you've seen enough, please say so. You won't stop me demonstarting a tree or two, though :twisted::twisted::D
Mike
Posted
Guest user
PS Bob, some ! & ? smileys a have gone.
Posted
Full Member
Wonderful stuff.
Keep it up.
Posted
Guest user
Posted

Inactive Member
people who watch Art teaching programmes on TV then rush out to buy the equipment - including the hat of course:roll: - and then find it doesn't work for them
Mike, upon seeing your picture in your avatar, I just had a horrible thought: when I made my (hopefully) funny remarks - part shown above - to your original posting, my reference to the Hat wasn't directed towards you of course! I was meaning the almost obligatory Beret which is often associated with artists! Oh boy, it sure is easy to put one's foot in it - in fact, I must be an expert!:oops::oops::oops:
Ken
'It don't mean a thing if it ain't got that Swing'
Posted
Guest user
Mike
Posted
Guest user
If I ever do it convincingly, it will be the first time I've evr used freehand art in my modelling!!!
Posted

Full Member
'Petermac
Posted
Full Member

1 guest and 0 members have just viewed this.