Callington Engine Shed
Posted
#168976
(In Topic #9603)

Banned
Styrene and corrugated card build.
Recently I had drawn up a set of top view and side view plans, for what I thought was accurate of the engine shed that stood at Callington (Kelly Bray). I have received some other pics of the shed, notably showing a reasonable amount of the inside stud work (frame). So, as usual with model railways, the first attempt is never correct and it was time to redraw the plan. Also, I didn't have the appropriate windows for this shed and I was to compromise with non-original looking windows. In the plan below (plan 1), you can quite clearly see that 8 pane (2x4) does not look all that good, far too narrow.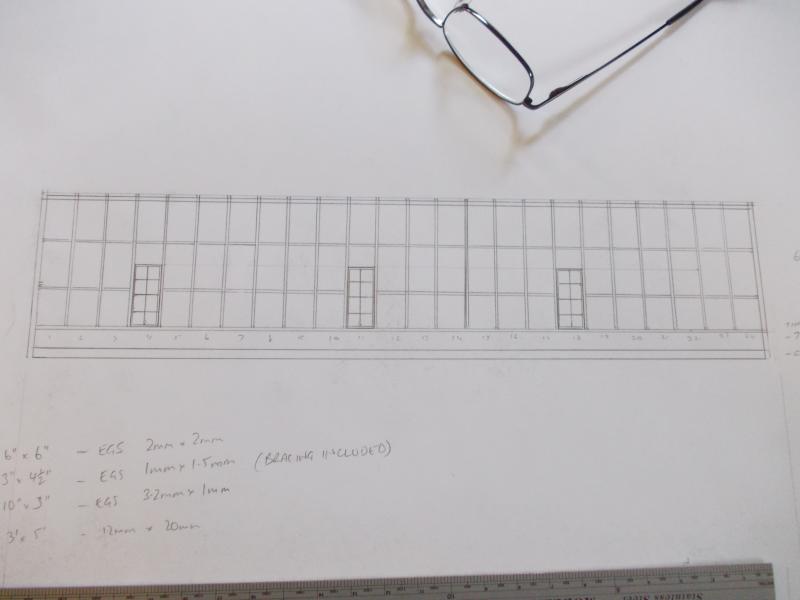
I used a HO scale plan of a NSWGR engine shed to help with the spacing of the posts and studs. These were individually spaced at 3', or 3'3" centres. Once I had received the new pic, I could quite clearly see that the studs were further apart. This information also led me to search for apprpriate windows. I checked out Brass Master, nope, Langley, nope and then recalled York Model Making. There was a link on YMR not long ago, but here it is again - http://yorkmodelmaking.co.uk/
I found what I was after, fantastic ! (window frame 106, 23.8 x 16.3mm). Although at £5.00 for 4 windows plus postage, that makes it nearly $25.00 Au for 8 windows… Not really cheap, but… Now all I have to do is redraw the plan using the partially internal pic of the shed and the window frame dimensions…
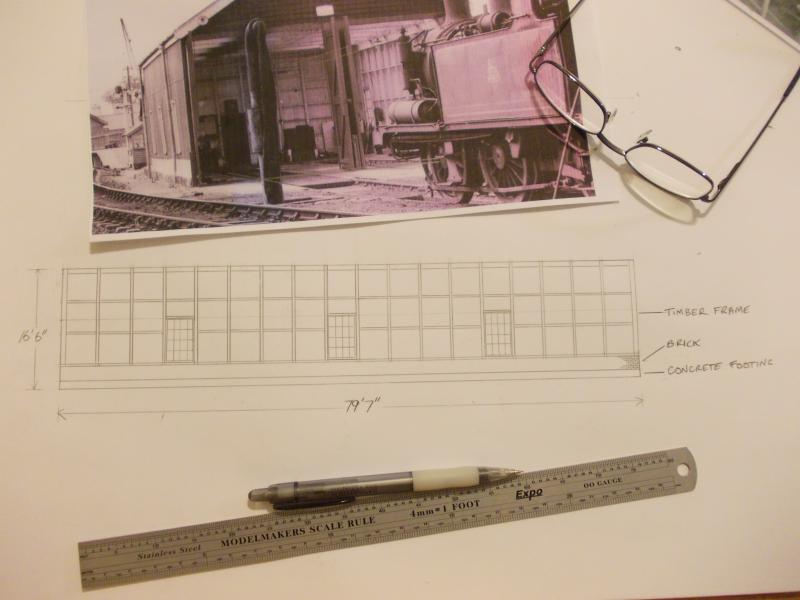
Now this actually looks more like it. Overall height of the side wall is 16'6" and the length of 79'7". Looking at the pic above, the three side windows don't look as if they are equally spaced with the furthest left window closer to the back wall. Loco entrance is from the right.
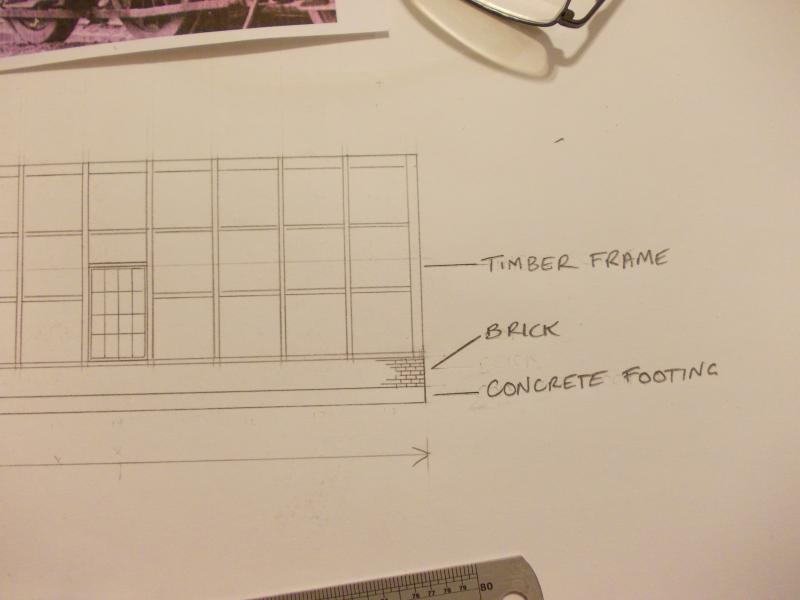
Here is a mock-up in card to give me an overall dimension/impression of what the shed possibly would have been, as I have no actual proof of the size. The shed size is estimated (guestimated) from several other pics I have and from various 2 road engine shed card kits available, ie Scalescenes, Metcalfe, Superquick.

Next step is to check my styrene stock and then copy the plan so that I can get started with overlaying the styrene strip.
Cheers, Gary.

Posted
Full Member
Terry
Posted
Guest user
Looks like another well researched build coming on. I'll look forward to seeing it progress. I don't know if there are any dimensions or details that could be taken from the Townstreet range of sheds but if you think they may help, let me know. I would be only to happy to post any info that may be of use.
Usual conditions apply, I only have weekend access to them.
Cheers for now
toto.
Posted
Inactive Member
You cannot beat a bit of research to get that special build.
Best of luck,
Derek.
Posted

Inactive Member
Posted
Guest user
Just a tad jealous of your skills.
Cheers
Toto
Posted
Banned
As Toto has stated above, "patience of a saint". Well that couldn't be further from the truth, as the last post here was over 10 months ago ! :shock: "Bless me father, as I have sinned…." :oops: I guess the patience was well waited upon. ;-)
As I have mentioned previously, maybe in the Linden Ford thread, I had been waiting on the engine shed windows to arrive from the UK before work could be started on this project. Well, they did arrive back in late Febuary/early March, but as you know, Linden Ford took centre stage for some time…. So, I'll kick off where I left off from earlier…
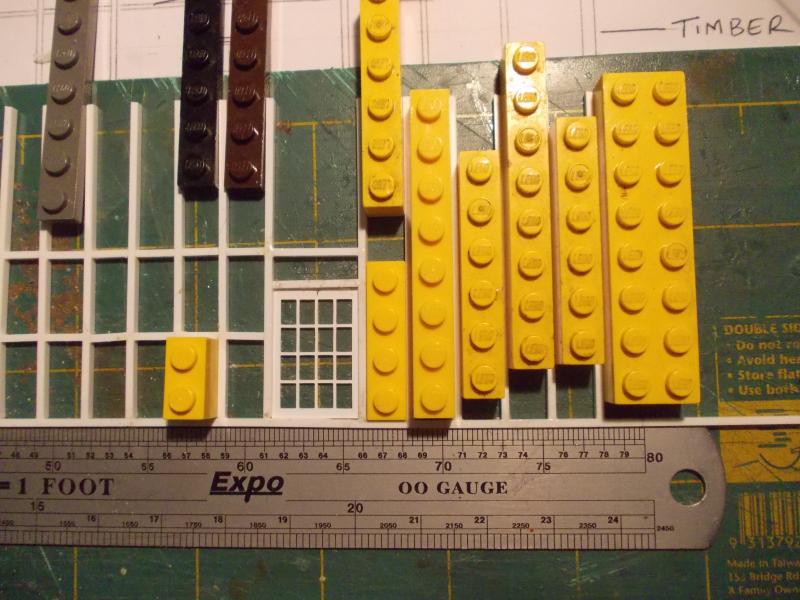
The model will be made from styrene (Evergreen Styrene), embossed brick plasticard (Slaters ?), windows (York Model Making)and corrugated card board (Broad Gauge Bodies). The best tool I have purchased recently is this :

This speeds up work like you cannot ever imagine. Why I never purchased one long ago, I don't know. Another tool that I use for gauging the widths of the posts is Lego. I had put up a thread some time ago regarding Lego and its individual brick sizes to make spacing easier. See here : http://yourmodelrailway.net/view_topic.php?id=12105&forum_id=11
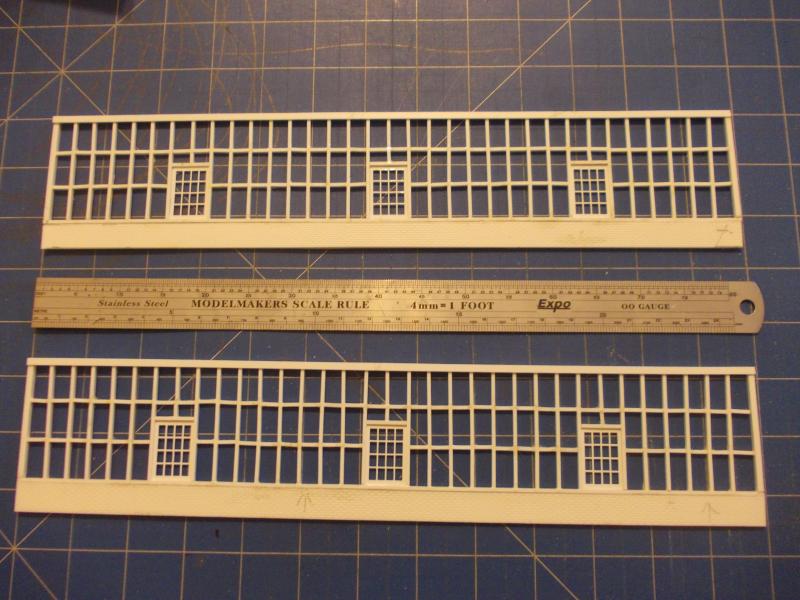
Below is the start of one of the engine shed walls, notably the framing.
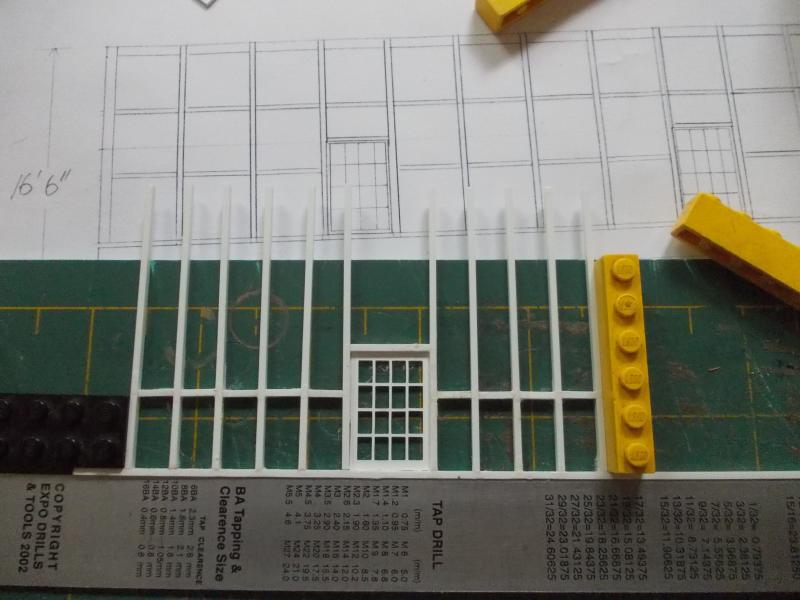
Having looked back over photos of the engine shed, my drawing shows the vertical posts at about 4'6" apart. I decided to space them 2' apart, not to the centres, but between each individual post.
Below, Using several pieces of Lego speeds the build up and keeps everything quite square.
By resizing the gaps between the posts that little bit, a few changes took place. In the drawing in the 2nd pic above, it shows the difference between the left hand end and right hand end of the walls. It shows a configuration from the left of : 3 x panels/window/4 x panels/window/4 x panels/window/4 x panels. In the pic below (the square end posts are missing), it shows, 6 x panels/window/8 x panels/window/8 x panels/window/6 x panels. Note these are not the 4'6" panels but are now 4' x 2' individual panels. The overall lenbth of the shed has gained only 1' of length from the original 79'7" t0 80'7" ! I'll live with that ! ;-)

The wall above is the right hand side of the shed, as if you were looking into the shed from the loco entrance.
I am aiming at a 'close enough' rendition of the engine shed as the photos I do have are from various angles, with very little to gain any significant measurements/figures from, in relation to the actual size of the shed.
Next up is the other wall, followed by the lower brick structure it sits upon.
Cheers, Gary.
ps. I love the chopper ! :mrgreen:
Posted
Inactive Member
That shed looks a serious project and by the way whats the name of that cutting tool ?.
Cheers,
Derek.
Posted

Inactive Member
Thank God for Lego…..where would we be without it???
Nice track plan too.
:cheers Gormo
"Anyone who claims to have never made a mistake, never made anything!!"
https://sites.google.com/site/greatchesterfordmodelrailway/home
https://sites.google.com/site/greatchesterfordmodelrailway/home
Posted
Banned
The engine shed is fairly straight foward compared to the station building/overall roof, but that was another story. See here : http://yourmodelrailway.net/view_topic.php?id=10835&forum_id=21&page=3#p199322
The chopper, or I should say 'Chop-it' is from Micro-Mark (no. 84046) I purchased it at an exhibition for about $45.00 Au, if I remember correctly. I can tell you, having this saves a lot of heart ache ! I did have a go at building my own chopper, following a thread by Doug (dooferdog) some time ago. The home made one doesn't even come close to this new chopper. The home made one was very wobbly and I could never get a true repetitive cut. Onwards and upwards as they say ! ;-)
Cheers, Gary.
ps. Thanks Gormo ! :thumbs
I think if children today haven't got Lego (or a train set…) they are living a deprived childhood… :shock:
 Last edit: by Gary
Posted
Banned
Two walls, well frames anyway. I have made up a brick base/plynth that the timber frame sits on from laminating two sheets of Slaters embosed brick styrene over a piece of 40 thou styrene.
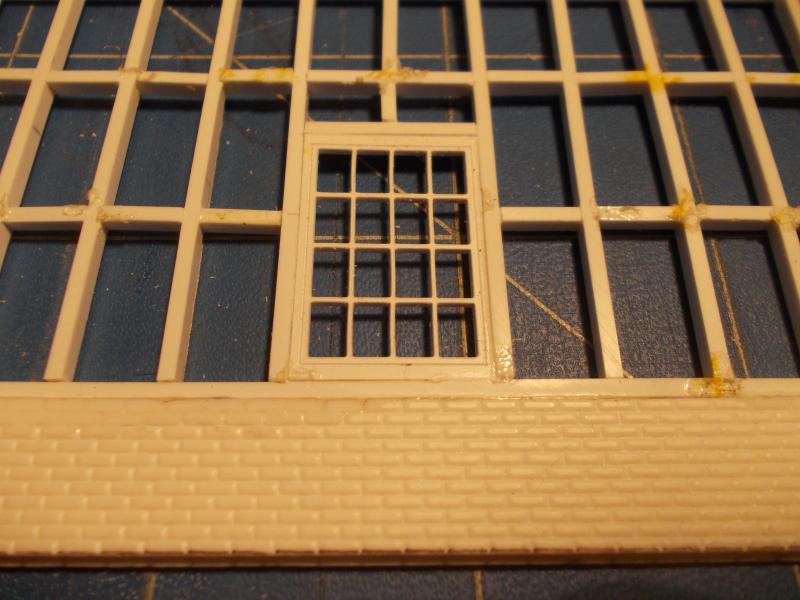
You can see in the above pic, a little over-run of glue in the top 2-3 courses of brick work, to the left of the window. Hopefully running a fine edged file through this will clear it up some what. :roll: Here's hopin' anyway… If not, I'm sure some strategically placed pallets could hide this…
Oh yes, for the keen eyed, there are a few studs that are not perpendicular, let alone the noggins being horizontal ! :oops:
I was hoping to get a lot more done over the last weekend, but with family engagements (SWMBO family christmas get together) taking precedence, I only got this far. All I can say is that I have completed more in the last short week than I have over the last twelve months !
Cheers, Gary.
Posted
Inactive Member
Posted

Full Member
Looks fantastic from here.
Cheers
Marty
Posted

Inactive Member
Max
Port Elderley
Port Elderley
Posted
Inactive Member
I am a great fan of all this internal framing from plastic in buildings as you know so I enjoy seeing how your buildings develop. I have also recently got a chopper to help with cutting the plastic and it does make for more accurate and consistent cuts.
Like you I still critique my own work but the overall effect always masks those small errors (which seem big to us) and they are never noticed by anyone else anyway.
Keep up the great work and for keeping the rest of us inspired.
I for one will look forward to picking up the knife again sometime next year encouraged by people such as yourself.
Thanks and all the best
Jim
My layout thread http://yourmodelrailway.net/view_topic.php?id=10930&forum_id=21
Buildings for Hemyock http://yourmodelrailway.net/view_topic.php?id=10931&forum_id=14
Buildings for Hemyock http://yourmodelrailway.net/view_topic.php?id=10931&forum_id=14
Posted
Guest user
Looking good , another quality build on the way I see.
Keep the pictures coming.
Cheers
Toto
Posted
Inactive Member
I think if children today haven't got Lego (or a train set…) they are living a deprived childhood… :shock:
Is that the Kids or the Dads. Thank Goodness for Lego, that's what I say.
Posted

Full Member
Still, I'm contented by the thought that another happy little boy's Daddy can have the pleasure of standing barefoot on one of the little pesky sharp pieces…
Doug
'You may share the labours of the great, but you will not share the spoil…' Aesop's Fables
"Beer is proof that God loves us and wants us to be happy" - Benjamin Franklin
In the land of the slap-dash and implausible, mediocrity is king
"Beer is proof that God loves us and wants us to be happy" - Benjamin Franklin
In the land of the slap-dash and implausible, mediocrity is king
Posted

Full Member
Lego Rules (no mater how old you are)
Regards
Stephen
Acording to a recent visit to a supermarket at check out time, I an not loosing my memory it has been downgraded which means i am not stupid afterall - Sorted! - What a relief
Posted
Banned
I can tell you this is a s-l-o-w build. For some reason there ain't enough hours in the day. :roll: Maybe working , picking the boys up from school, cooking dinner then doing the dishes doesn't help ! The again, family comes first… ;-) Hopefully I can progress along with the shed over this coming weekend.
Anyway, an update… Actually, it's only the rear wall frame…
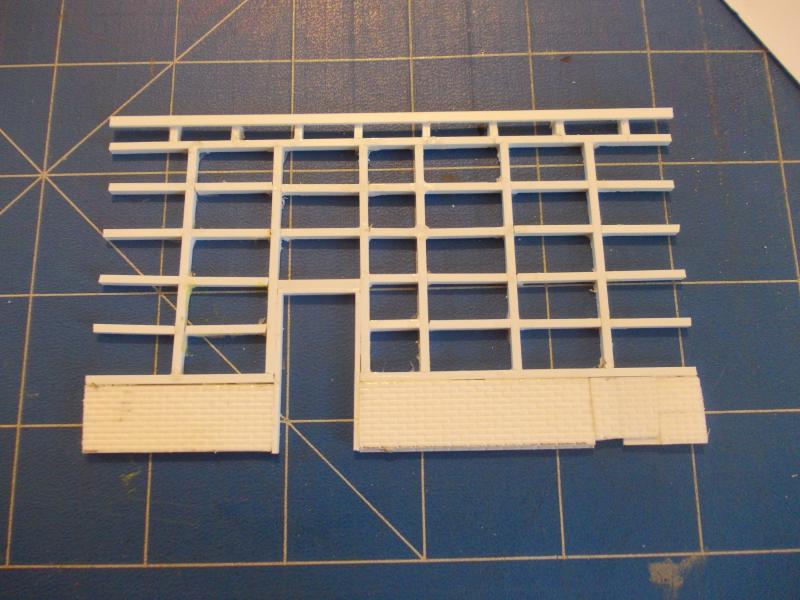
Not so much a 'another quality build' as Toto put it, as I was too lazy to re-cut a piece of embosed brick sheet for the right hand corner ! :oops: Oh well, I do know that there will be a tool cabinet/cupboard in this corner from looking at various photographs. Hopefully it will only be you guys that know this imperfection is there… ;-);-)
Cheers, Gary.
1 guest and 0 members have just viewed this.