Callington Engine Shed
Posted

Full Member
Styrene and corrugated card build.
Hello Gary,I'm amazed at what you've done so far I would have split more than actually made something, fair play to you :-)
Regards - Jim
My new micro https://ogaugemicro.blogspot.com/p/the-skarffe-lt-rly.html Just found the code for 'drop down' links. My YT channel https://www.youtube.com/channel/UC72f9_uXz558s8-tGW6t97g/videos

Posted

Banned
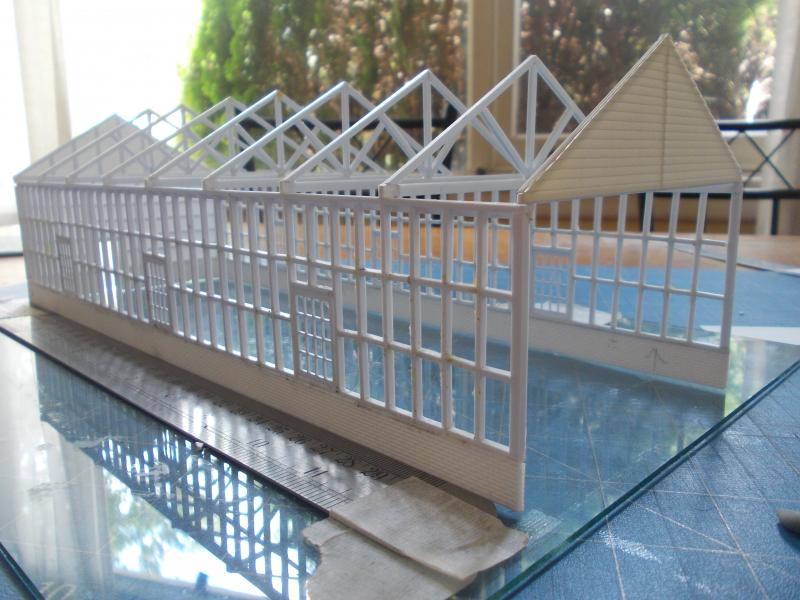
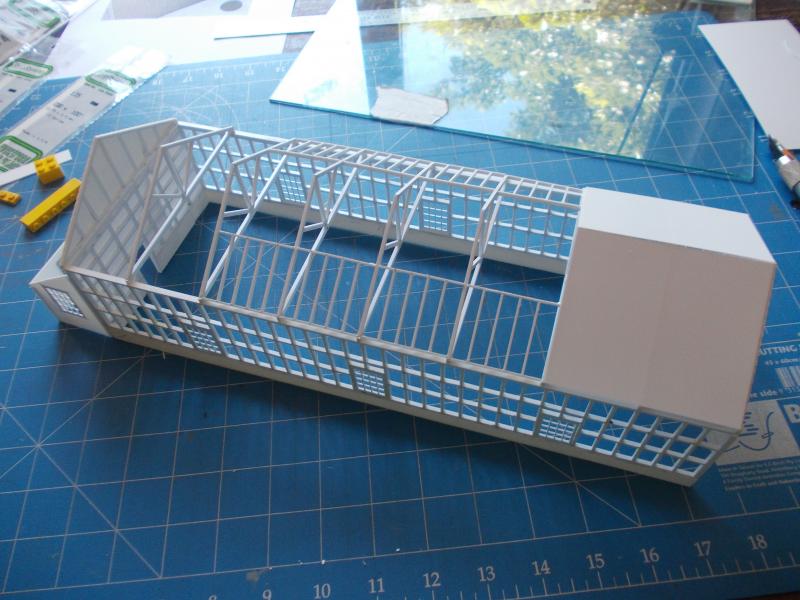
Today I managed to cut up and arrange/glue the roof trusses together. I didn't have a clear photo of the roof trusses within Callington engine shed, so I chose 'modeller's license' instead, and took a leaf out of John Wiffen's Scalescenes engine shed roof trusses.
The first frames were made up using a simple cardboard jig. The roof pitch is 30*. In reality, I'd say it's closer to 35* pitch. Again, modeller's license comes to the fore.
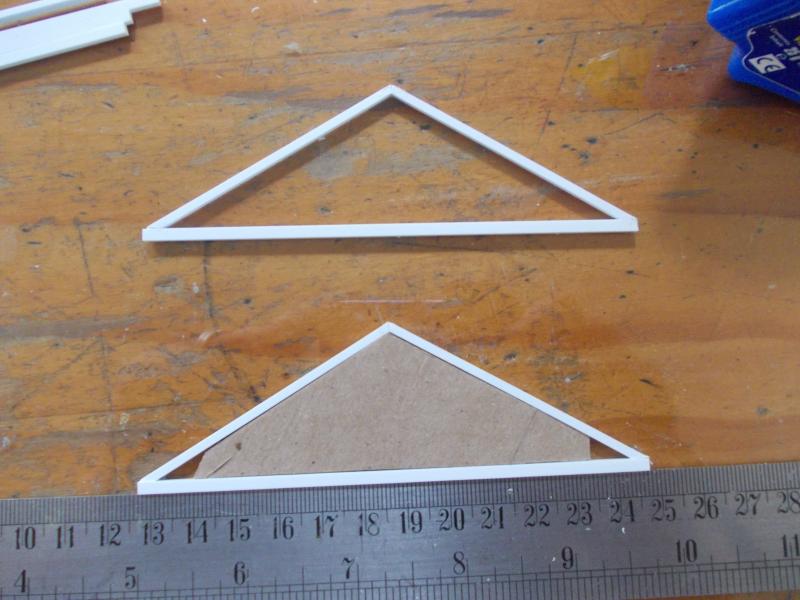
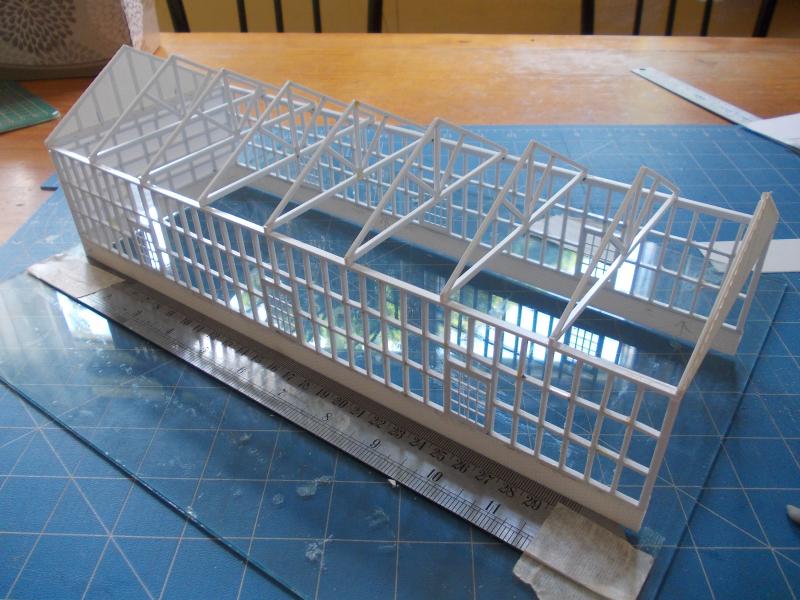
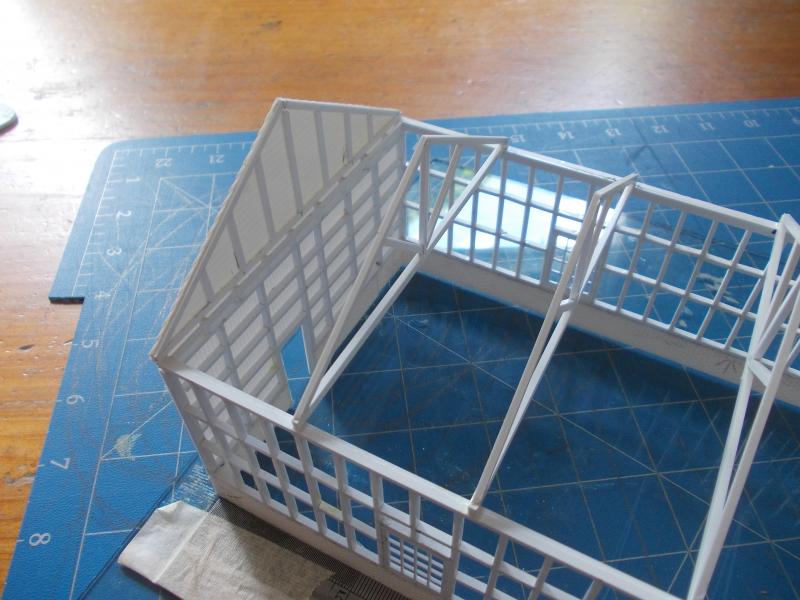
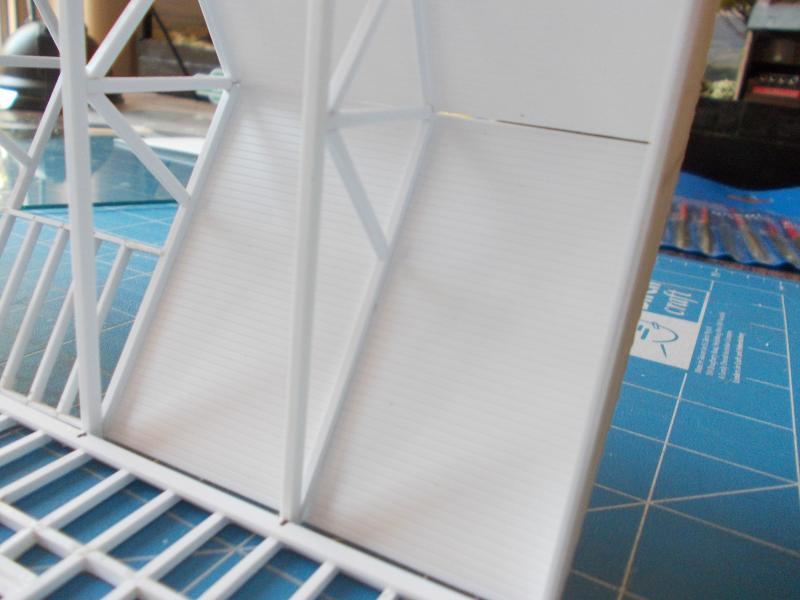
Below. The seven individual trusses with internal supports in place, plus the two gable ends.
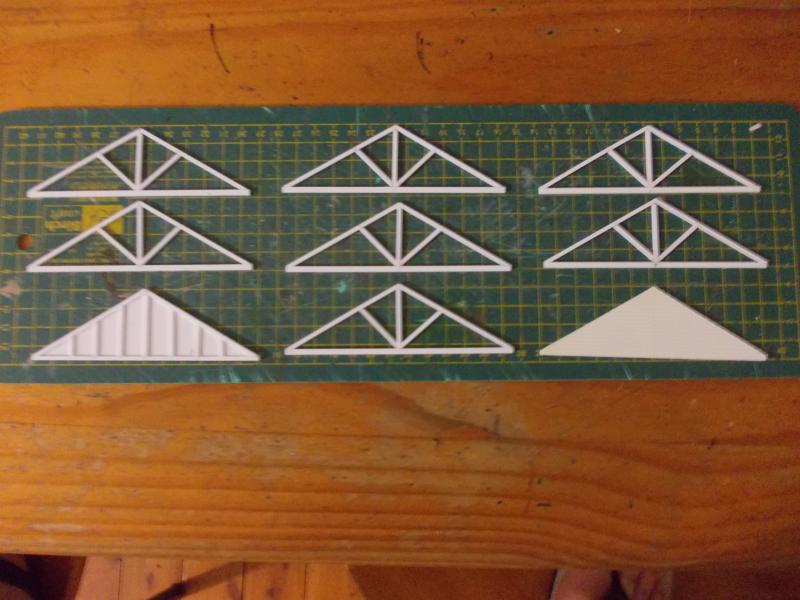
The 'gable end' on the left (above) shows the interior framing, whilst very hard to see, the 'gable end' on the right shows the weatherboard. The photo below shows the weatherboard a lot clearer.
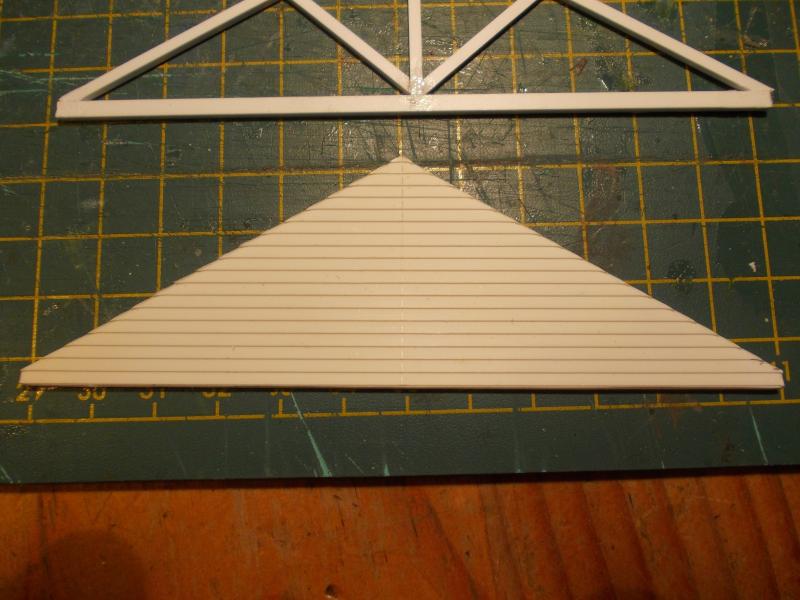
Once again, Evergreen Styrene has been used in the construction of all the individual sections.
Cheers, Gary.
Posted
Guest user
You've done a neat job of the trusses. It's all coming together.
Cheers
Toto
Posted

Full Member
Another thing to ponder is the use of basswood. It is fine grained and is ideal for use where wooden detail (like trussing and framing) might be visible. It can be stained and I use cyano to join it. I don't like balsa because it is too spongy for my taste.
John
John
Posted

Inactive Member
Modeller's Licence - I must renew mine.

Max
Port Elderley
Port Elderley
Posted
Banned
Yes, I do have a chopper, although not the North West Shore Line model, but very similar. I picked a chopper up at an exhibition earlier this year for approx. $45.00 Au. It doesn't have the 'self healing' mat on the cutting top, only MDF. It already has a few razor cuts/indentations forming, but once I complete this model, I might just fill the groove in with some automotive filler. See the 7th post of this thread for a pic.
The chopper is great, making all those 30*, 45*, 60* & 90* cuts simple and clean, without any extra trimming required. :thumbs
Cheers, Gary.
Posted
Banned
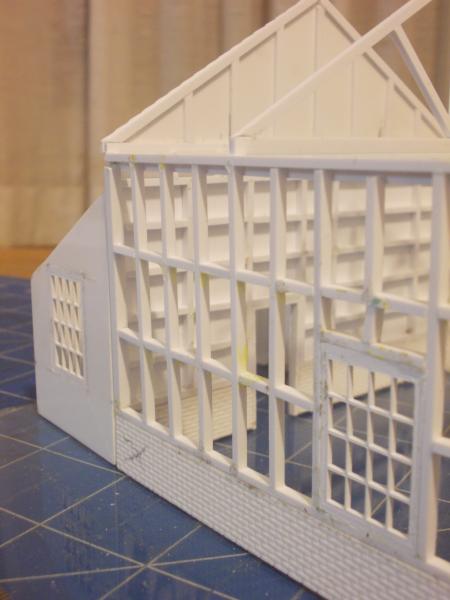
The doorway in the back wall leads to a 'lean to', as can be seen in this small portion of a photo of the engine shed. This photo is 1/16th of the original, which was sent to me from a chap in Kelly Bray.
 The lean to looks quite small. I have measured/guestimated it to be atleast 12' long. This is the next part to tackle.
Cheers, Gary.
 Last edit: by Gary
Posted
Guest user
Can't wait to see this complete. Really top drawer stuff.
Toto
Posted
Full Member
John
John
Posted

Full Member
It gets moved around and replaced, and gives a satisfying cleaness to the cut.
Hope this helps as an interim measure,
Doug
'You may share the labours of the great, but you will not share the spoil…' Aesop's Fables
"Beer is proof that God loves us and wants us to be happy" - Benjamin Franklin
In the land of the slap-dash and implausible, mediocrity is king
"Beer is proof that God loves us and wants us to be happy" - Benjamin Franklin
In the land of the slap-dash and implausible, mediocrity is king
Posted
Inactive Member
Not much more I can say really, great work once more and making my fingers itch to get started on my own work once more.
Please keep the updates coming.
Thanks
Jim
My layout thread http://yourmodelrailway.net/view_topic.php?id=10930&forum_id=21
Buildings for Hemyock http://yourmodelrailway.net/view_topic.php?id=10931&forum_id=14
Buildings for Hemyock http://yourmodelrailway.net/view_topic.php?id=10931&forum_id=14
Posted

Inactive Member
Posted
Banned
Mick, that's one photo I haven't seen, thankyou. I have quite a collection of pics now, but this one with the DMU is good. This is the era I'm modelling the Callington/Kelly Bray. As can be seen in the black & white pic I posted up earlier, there is a rather thick concrete plynth that runs along the base of the corrugated iron. The pic you provided shows what I'm modelling.
John and Toto, thankyou. I don't know about 'top drawer' Toto, I think it would get mixed up with my underwear…

Jim, thanks for the kind words. I too am looking foward with the continuation of Tiverton Junction & Hemyock. :thumbs
Ok, I did make a start on the lean to today. I assume the lean to was approximately 12' in length (not width), but with the model, I knocked it back to 10'. The reason for this was to do with the pitch of the skillion roof. I chose a 30* pitch here and with the proposed 12' length of the lean to, the skillion roof ran right upto the gable roof, very unlike the photos of the real engine shed.

^ A similar angle to the black & white pic posted in my previous post.
I have to purchase more Evergrenn Styrene V-Groove sheet for the interior roof lining. Hopefully pick up another sheet tomorrow after work.
Cheers, Gary.
Posted

Inactive Member
That`s one excellent build you`re doing there. That will be an exceptional model building and I look forward to the final product.
That chopper you`ve got there????….How would it go if you unscrewed the Aluminium parts and removed them from the board. Then glue a cutting mat trimmed, to size, onto the board and then refit the Aluminium. Possibly longer screws may be required????
:cheers Gormo
"Anyone who claims to have never made a mistake, never made anything!!"
https://sites.google.com/site/greatchesterfordmodelrailway/home
https://sites.google.com/site/greatchesterfordmodelrailway/home
Posted
Banned
Above, sky light frames being knocked up and below, installed into the roof trusses. The roof lining is also being glued in.
Below. The roof lining which probably won't be seen by any other eyes… (but I and you know it's there…;-)) The roof lining made the structure quite rigid.
Below. Completed roof lining.

After all this had dried, which didn't take too long today, the whole interior was painted with primer, prior to a coat of pale off white/cream colour. The painting had to happen prior to fixing the sky light glass. No pics of the painting… Once the paint had dried, the corrugated card was fixed all over the shed walls, but not the roof. The glass on the sky light frames needs to go in prior to cladding the roof in corrugated iron.
The whole interior was air brushed again with the off white/cream. Once this had dried, the windows, sky lights and entrance were masked over, allowing for a few coats of LSWR brown, or close to it.
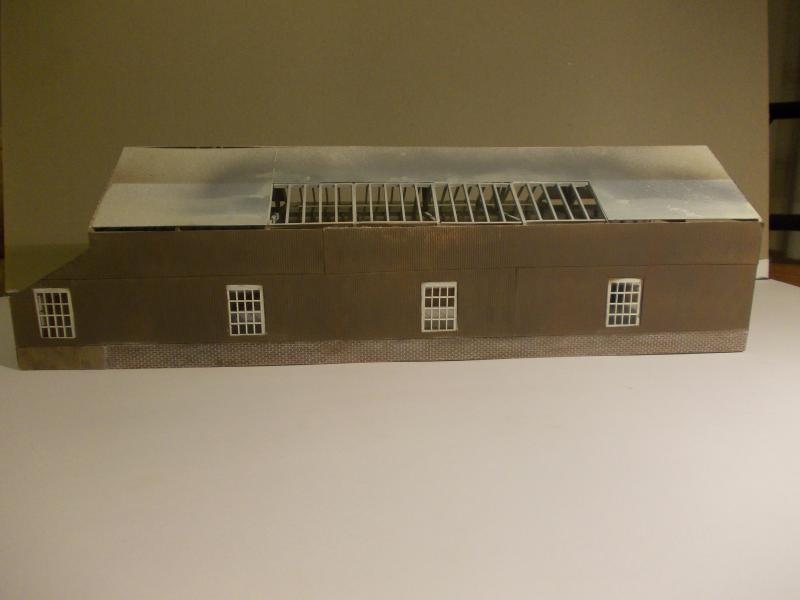
Above. The colour isn't totally true (indoor lighting) and the bricks do have more colour in them. Once the bricks were dry brushed, light grey weathering powders were brushed over to highlight the mortar. The roofing iron, sky light glass, gable trims and exterior window frames/surrounds will be completed tomorrow. May even get the guttering and down pipes done as well !
Cheers, Gary.
Posted
Inactive Member
Seems a shame to cover up all that framework though…..I was enjoying watching that go together…..well at least we know what`s gone into this build.
Well done.
 thumbsthumbs
:cheers Gormo
"Anyone who claims to have never made a mistake, never made anything!!"
https://sites.google.com/site/greatchesterfordmodelrailway/home
https://sites.google.com/site/greatchesterfordmodelrailway/home
Posted
Guest user
It appeared unused so I stayed long enough to look at it. You could see how it had been very delicately built with a superb structure. It was amazing to see. Frightening but amazing none the less. No real comparison but the detail in the construction is what I am referring to.
A master builder I believe. :hmm still have not received that mill Terry.
Great stuff Gary.
Toto
Posted

Site staff
thumbs:thumbsYou don't hang about either, takes me days just to put a Metcalf kit together :oops:
Ed
Posted
Inactive Member
Max
Port Elderley
Port Elderley
Posted
Legacy Member
thumbs:thumbs
reg
1 guest and 0 members have just viewed this.