Hornby RailRoad Class 31
Posted
#161360
(In Topic #9155)

Full Member
Improving RTR Locomotive
The project has started, I decided to make a thread about this in case anyone is interested and to keep a log of my own workings, This will be a simple improvement not requiring a lot of skill, to produce a better looking model, I aim to…- Back date the loco to Pre-TOPs
- Add flush Glazing
- Add hand rails to the both noses of the locomotive
- Adjust the headcode box to show a headcode
- Add etched windscreen wipers to the cab windows
- And then finally weather it.
The locomotive is all wheel pick up, including the middle wheels, the motor bogie has two traction tiers (I know this is a problem for some and not for others), It runs well on my insulated-frog point layout, but I believe it needs some more weight inside to give it a bit of traction over some of my dodgy track. It is DCC ready in case I ever decide to change over to DCC. so….
- Add addition weight to the locomotive
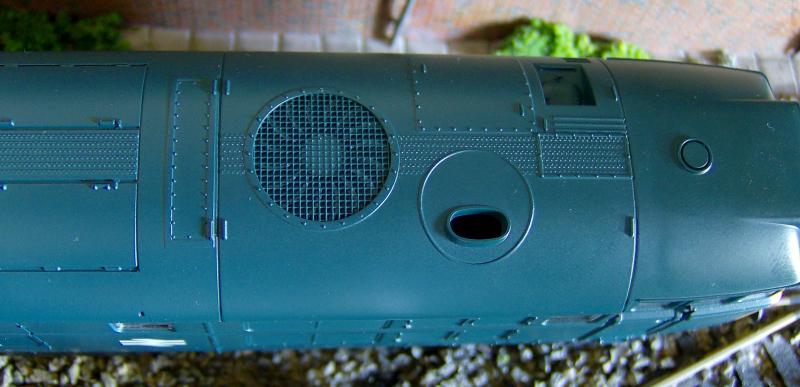
I believe the roof detail is really well done for the cost of the locomotive, the exhaust outlets go through the body and the air intake grill looks really effective to me. the roof of a loco is one area that I would never want to modify, so if I can get a model with decent roof, I am happy.
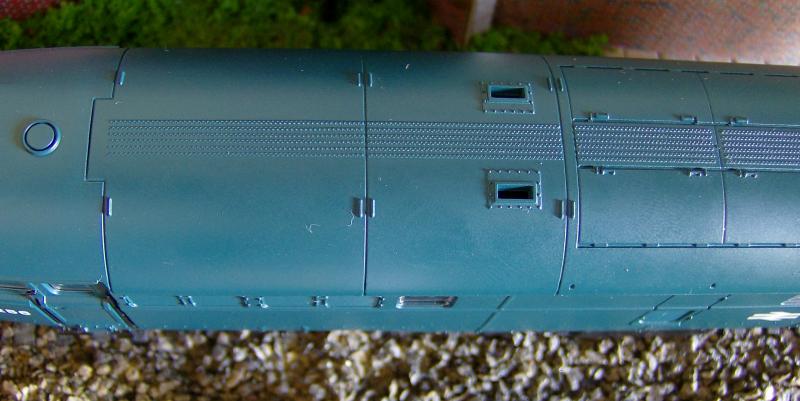
The other reason was that the door handrails are already fitted separately the bogies have enough detail and the body grills are deep enough for paint to stay (I will explain this during weathering). I will keep a running total of the cost of the modifying the loco (I could give it to you now but I think its better to revel as it goes then have the sum at the end)

Posted

Full Member
Mike.
Mike
Pig Hill Yard - a small Inglenook shunting layout for my boys, in 00.
Pig Hill Yard - a small Inglenook shunting layout for my boys, in 00.
Posted

Full Member
Bob
Posted
Full Member
Lights would be redundant on the model, as tail lights would not have been in use, a tail lamp would have been attached, and front lights are not necessary as I mostly run the layout in the day, but I will look improving the appearance of the lights on the nose, possibly drilling them out and then filling with something clear.This will be interesting. Do you plan to add some lights?
Bob
I have been looking at the cab and have decided that a cab bulkhead will need fitting to improve the look of the model.
Posted

Full Member
1: rear red lights would only be on if the loco was running light. If there was a train, the last wagon would have a red tail light.
2: depending on era, electric lights were not used. Instead oil lamps would have been used. I'm not sure when this changed, probably around the time of the blue/grey era.
Marker lights would have been used on the front of the loco until the 4 digit headcode was phased in, in 1960. By 1976, improvements in signalling and train control made the headcode redundant.
http://en.wikipedia.org/wiki/Train_reporting_number
John
 Last edit: by Brossard
John
Posted
Full Member
Jim S-W said "on-board tail lights were not allowed to be used until after all the westerns had gone", which would be around February 1977, but it seem on-broad lights were in use before this (http://www.railblue.com/pages/Class%2031/31417.LE.030874.htm) Weather it was regional specific I don't know, But begin the loco will be pre-TOPs 1970, It should be safe to assume that on-borad lights were not permitted for use…….2: depending on era, electric lights were not used. Instead oil lamps would have been used. I'm not sure when this changed, probably around the time of the blue/grey era……
Last edit: by new04db
Posted
Full Member
Always the first step I do, Usual through my normal channels,
- Wiki - http://en.wikipedia.org/wiki/British_Rail_Class_31
- Rail Blue - http://www.railblue.com/Class%20Headers%20v2.0/class_31V.2.htm
- And Rail Photo Print - http://railphotoprints.zenfolio.com/p714981355
Posted
Full Member
Tools and Equipment
- Super Glue
- Thinner
- BR Yellow Paint
- 0.45mm Brass Wire
- 0.45mm Drill Bit
- Tweezers
- Wire Cutters
- Pliers
- Tissue
- Pint Brush
- Cutting Knife

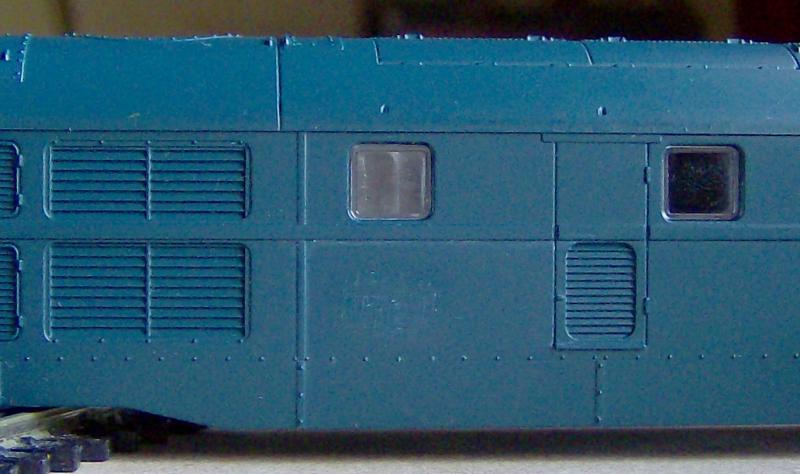
First I removed the body from the chassis, there were three plastic lugs on each side, so the body was simply unclipped from the chassis.

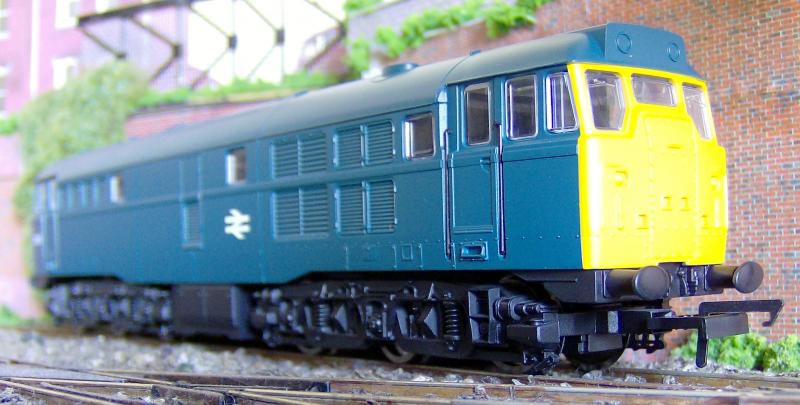
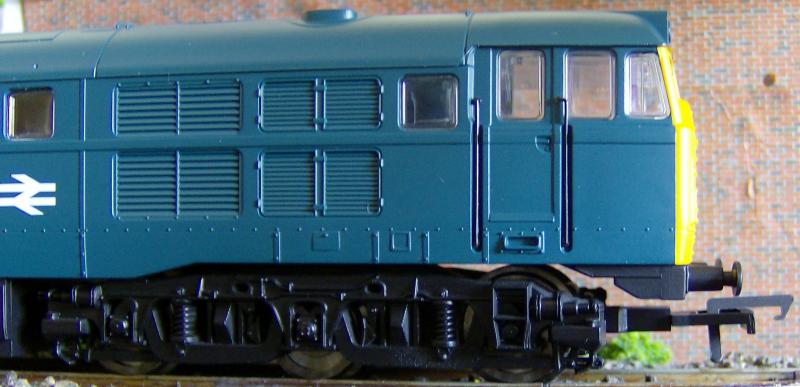
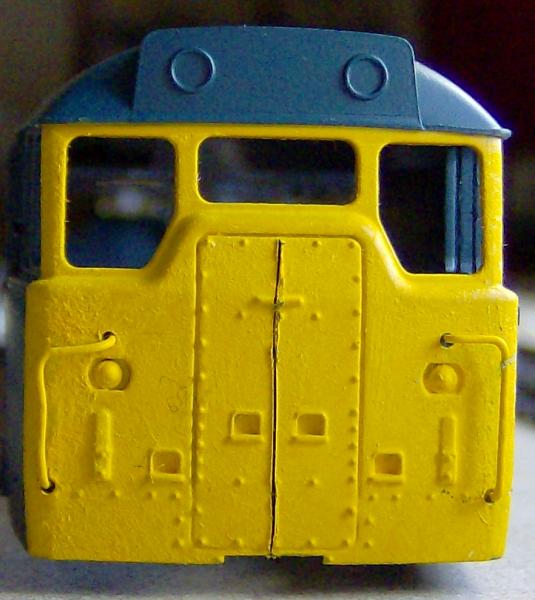
Below is a photo of the nose at the start. unaltered
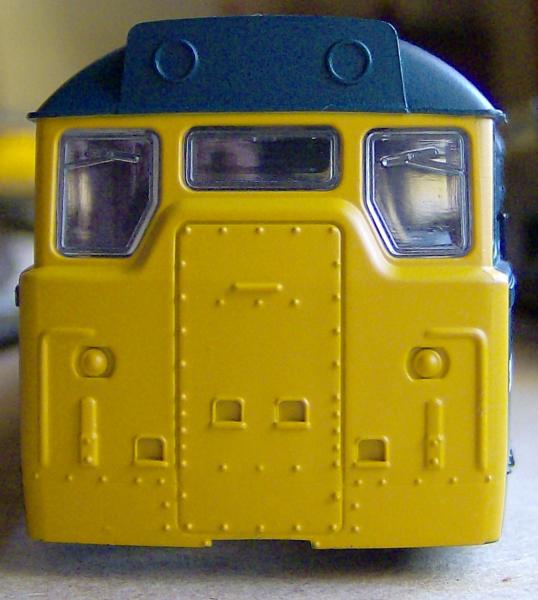
Next, using the drill bit, holes were drilled part way into the body at the ends of the hand rails.

Next the molded hand rails were removed using the knife, by gently scrapping them off and trying to keep the other detail, this was done until it was smooth with the rest of the nose to the touch of a finger.
unfortunately the body is molded from rail blue plastic, so the ends need repainting, so the glazing needed removing from the ends,

This is simply clipped in and can be teased out with a bit of force,

once this is done the end can be repainted, I used Phoenix Precision Paint as I brought a number of there paints many years ago, I painted the paint on, then removed it with a tissue, to remove brush strokes and to stop the paint from drowning the detail.

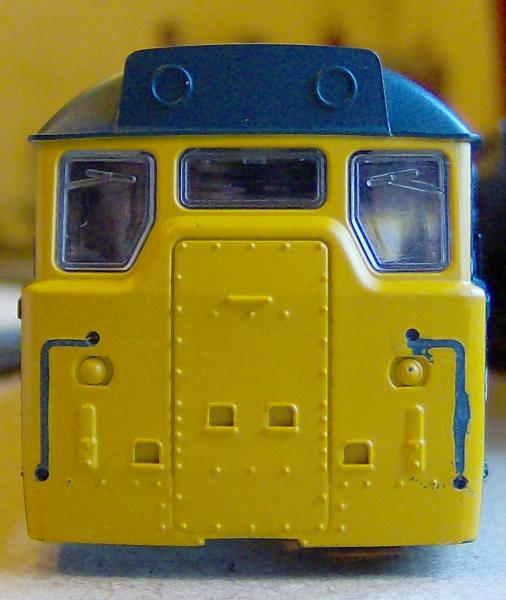
Then the brass wire was bent to shape using the pliers and cut with the cutters, this was incredible fiddly, it was difficult to get them the right shape and to be the right depth, but I got there in the end, I think
 , then they were placed by using a little super glue and tweezers
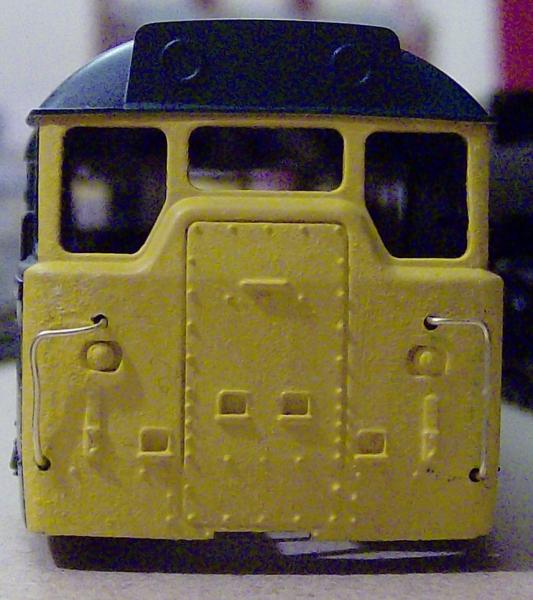
then a quick lick of paint and done

Ignore the tissue remains, they have been removed, overall I think its a vast improvement, Someone with more patients would be able to achieve a better result, But I am happy with my out come.
For this part of the project I only had to purchase the brass wire, so 3 meters of 0.45mm brass wire from Home Craft (http://www.homecrafts.co.uk/?gclid=CIrm88jat7kCFcjKtAodekEAkA) cost me £6.98 including Postage, Bring the Projects cost up to £54.98.
Last edit: by new04db
Posted

Full Member
:cool:
Jeff Lynn,
Amateur layabout, Professional Lurker, Thread hijacker extraordinaire
Amateur layabout, Professional Lurker, Thread hijacker extraordinaire
Posted
Full Member
Defiently intrested. Would it be possible for you to get a picture of this? Just so I could see what you mean by it……I painted some black around the edges of the window apertures…….
Posted
Full Member
I also paint the whole inside of the cab front with black to stop any show through of stray light - essential if you fit lighting but desirable even without as stray light from the side windows can show through the Lima plastic (and probably likewise for Hornby). You can see what I mean by looking at the edges of the folded (yellow) headcode discs on my model. They need more coats of yellow and really should have their inside faces painted too.
p.s. Note how much neater the coupling is on your Hornby version compared to my Lima one.
Last edit: by SRman
Jeff Lynn,
Amateur layabout, Professional Lurker, Thread hijacker extraordinaire
Amateur layabout, Professional Lurker, Thread hijacker extraordinaire
Posted

Full Member
Regards
stephen
Acording to a recent visit to a supermarket at check out time, I an not loosing my memory it has been downgraded which means i am not stupid afterall - Sorted! - What a relief
Posted
Full Member
.
And thanks everyone for the interest in this, I hope everyone will find something that they can take away from this modification :cheers
Posted
Full Member
Tools and Equipment, (Same as last time)
- Knife
- Tweezers
- Pliers
- 0.45mm brass wire
- 0.45mm drill bit
- Wire cutters
- BR Yellow paint
- Paint Brush
- Tissue
- Thinners (for cleaning brush)
Then the upper hand rail was added in much the same way as the other hand rails

Then it was all painted using the same method as before

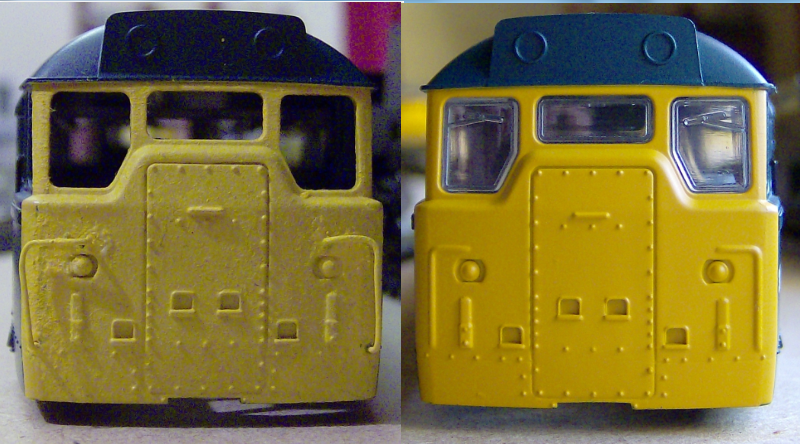
Once weathered it will all blend in, here is a quick comparison photo of the modified hornby class 31 and the triang class 31

Last edit: by new04db
Posted
Full Member
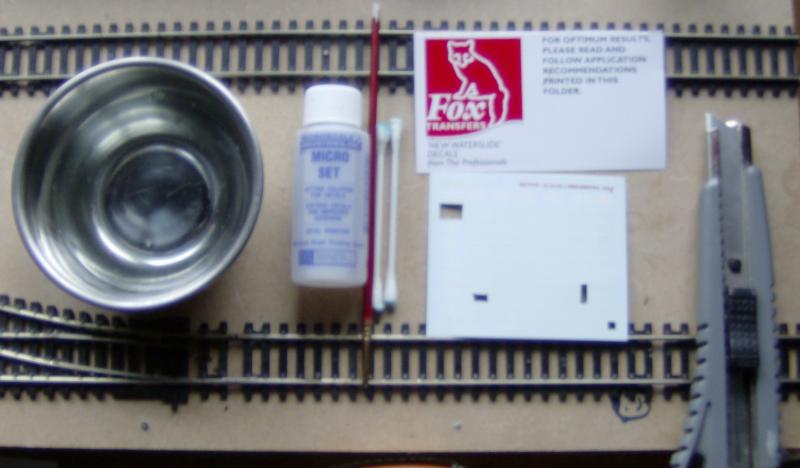
Tools and Equipment
- Bowl
- Warm water and washing up liquid
- brush
- cotton buds
- white sprit
- knife
- transfers (I used foxes Transfers)
- Micro set
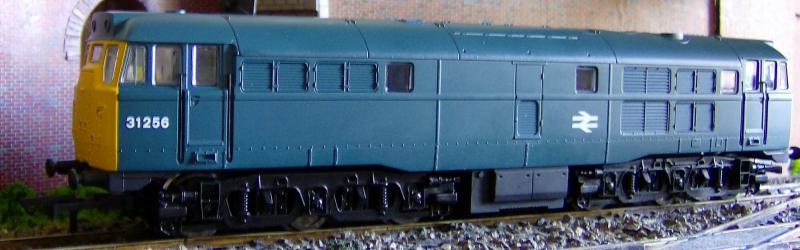
Here is the loco as it is
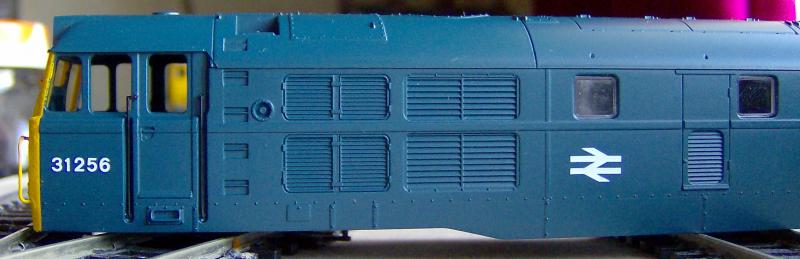
To remove the existing number and BR Logo, I found it best to scratch it with the tip of a knife, then to rub it with a cotton bud and thinner, it took some time and it difficult to remove them without removing some of the BR Blue paint.
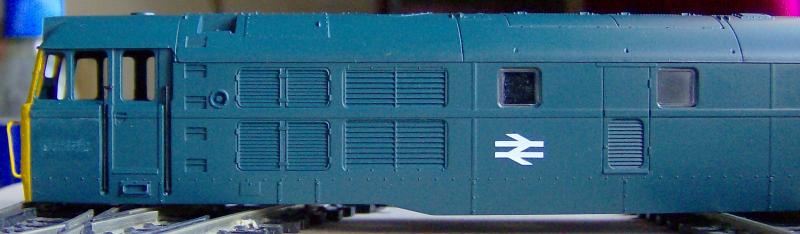
Number gone
and logo gone, next the transfers were applied, foxes transfers are water slide, but they advise a little washing up liquid in the water to help, I also apply micro-set to the transfer once in place to soften the transfer to help it attach. result below

That is one set done, just another three sets to do
, very tedious, but well worth it, Foxes transfers cost me £7 including postage from there website (http://www.fox-transfers.co.uk/index.cgi?redirect=done), they were the Pre-TOPS D prefixes, numbering 1-0 (in style as TOPS), BR double arrow symbols and early style traffic data panels, all in white. Enough for at least 3 locos. code F4310/10, bringing the total cost of the conversion up to £61.98
Last edit: by new04db
Posted
Full Member
I have a little more work for you, Aaron: for the backdating you may have to add the waist height moulding on the cab front back on to your example. Check photos of your chosen prototype first though. My 31 004 and your Triang one both have this in place but your newer model seems to represent a later modification where the strips were removed.
Don't kill me, please!!

An easier addition would be the little 'ears' where the windscreen washers are on the edges of the 'mound' where the door housing meets the angled part of the windscreens. Again, check photos because even though this was a later addition it may still have been a pre-TOPS fitment. My Railfreight grey 31 327 should have these … again, something I still have to fit. They would be easily made from some small rectangular cuts of plasticard (probably 40 or 60 thou thick, at a guess).
Last edit: by SRman
Jeff Lynn,
Amateur layabout, Professional Lurker, Thread hijacker extraordinaire
Amateur layabout, Professional Lurker, Thread hijacker extraordinaire
Posted
Full Member
Posted
Full Member
I don't know how many times in the past I have got impatient and stuck bits on, only to find I have to pull them off again to do something else!!
:thud

Jeff Lynn,
Amateur layabout, Professional Lurker, Thread hijacker extraordinaire
Amateur layabout, Professional Lurker, Thread hijacker extraordinaire
Posted
Guest user
Really worth while as it adds another dimension altogether.
You are also a brave man to tackle it in the first place.
Keep it up
Toto.
Posted
Full Member
Can I please suggest that when you get to the end of the project you give a list of everything you purchased and from where this would be very helpful to have it all in one space
regards
Stephen
Acording to a recent visit to a supermarket at check out time, I an not loosing my memory it has been downgraded which means i am not stupid afterall - Sorted! - What a relief
1 guest and 0 members have just viewed this.