Improving the Hornby Signal Box
Posted
#5211
(In Topic #647)

Full Member
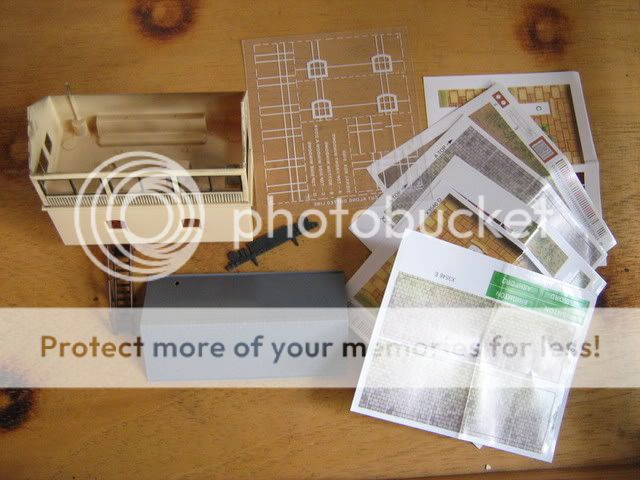
So a look at the raw material. The Hornby item is a plastic shell, with some basic interior detail. Colouring is achieved by attaching sticky paper covering, with the option of depicting either a brick or stone version. Similarly the interior detail, such as levers and instruments are also stick on paper items. Here is a picture of the basic model:

Next is a picture of the model with all the stickers and plastic components.
The first task will be to design and prepare the brick embossed 'cladding' which I intend to lay over the basic model. This I will show in my next installment.
Bob(K)

Posted
Guest user
I have a couple of 2nd hand Hornby signal boxes and have thought about refurbishing/improving them.
Can't wait to see the next instalment.
Bryan
Posted

Full Member
It's exactly the type of project needed for folk who aren't quite ready to start scratchbuilding.
Excellent. I'm looking forward to see how this progresses. I have a scratchbuilt signal box on my layout that is still waiting for the interior details to be built, :oops: so I'm hoping this will give me some pointers too. :?
Cheers,

Perry
Due to cutbacks, the light at the end of the tunnel has been switched off.
Posted

Full Member
I look forward to watching this with great interest.
Wayne
Posted

Full Member
Phill
Posted
Guest user
This is a project that we all can get something from. Look foward to seeing it take shape :!:
Posted

Inactive Member
Look forward to seeing your ideas and progress. Like Perry says it would be a great starter for me to build up some confidence before getting into some scratchbuilding.
Happy Modelling,
Mike
Mike
Posted
Full Member
http://www.signalbox.org/gallery.shtml
Unless any member can help by providing evidence of a prototype I believe the best that can be achieved is to make the Hornby model look better, rather than like a replica of a real box.
The second issue is what to do with the inside. My initial thoughts were to remove the rather crude moulded detail, install a new floor and add scratch built detail. I also noted that the Hornby model places the lever frame at the rear of the box, whereas most real boxes have the frame at the front, behind the main window. There are many examples of frames at the rear, but again I cannot find an example of a box like the Hornby one, with the frame at the rear.
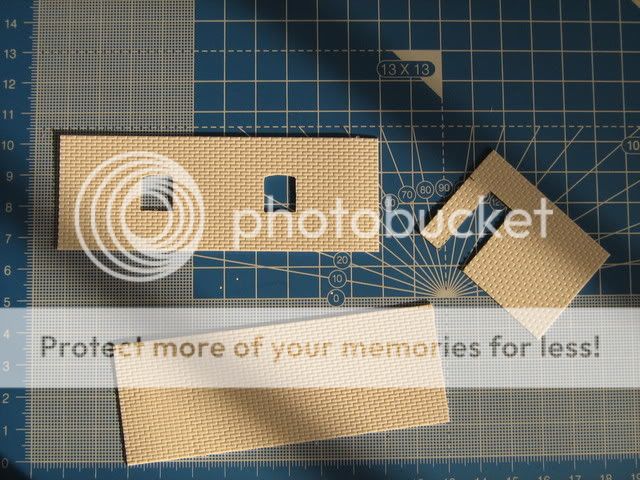
So where does this leave me. Well there are 2 options: 1. Major surgery, completely gut the box and rebuild, or 2. Make the model look better and accept it for what it is. Quite frankly with option 1, it would be simpler to scratch build from the start and so I am going for option 2. Hopefully I will end up with a signal box that looks ok, accepting that it does not represent accurately the real thing. With this in mind I set about measuring and cutting the embossed card cladding for the bottom half of the box:
Well what I thought was going to be an easy project has really got me thinking. Any views?
Bob(K)
Posted
Guest user
It is also, probably, of more use to the rest of us if you use the box as a generic one and demonstrate how you deal with it. This way other generic buildings (Hornby or others) can be tackled by those of us with no Plasticard experiance.
Posted
Full Member
Phill
Posted
Full Member
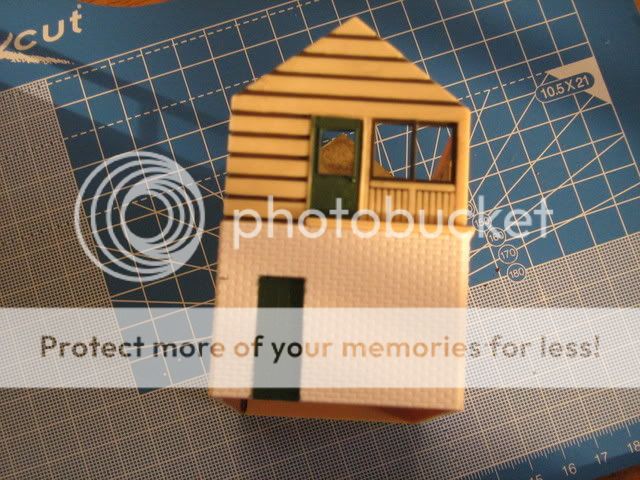
In order to make the building more interesting, I have decided to put edging around the corners and top and bottom to give a recessed panel effect to the brickwork - I hope it works:

Having done this I noticed that the windows are set in the wall in such a way that they do not sit in the centre of the recessed areas, which i think would would be likely in reality. Another lesson learned, but again I am going to live with it. I have added some Wills arches above the window, cut down to size.
Next I gave the wood panels above the brickwork a wash of cream paint and I have painted the internal floor of the box in a dark brown colour, whilst the walls are a lighter shade:

The next task will be to determine to what extent and how I will detail the interior.
Bob(K)
Posted

Full Member
I'm really enjoying this thread. Whilst few of us can aspire to the mighty works of the likes of Perry, I'm sure we can all dabble a bit in "improving" a kit. Your ideas will be well received I'm sure.
Petermac
p.s. does the paint behave any differently out there & a very Happy Christmas to you.
'Petermac
Posted
Full Member
Petermac said
Looking good Novice.
p.s. does the paint behave any differently out there & a very Happy Christmas to you.
Hi Petermac - seasons greetings to you too. Not sure the heat and humidity has that much effect on paint, however, I am trying something new. Up until now I have always used enamels, but for my time here in Liberia I packed a box of acrylics, largely because I did not want any hassle taking inflammable products on the flight. I am using a mix of Tamyia, Warhammer and Railmatch paints - all water based acrylic. So far I have been quite impressed with them, although the application is different and it is taking a while to get used to them.
Bob(K)
Posted
Full Member
Also what thickness did your use for the "cladding"?
Looks great so far, keep em coming!
Wayne :D
Posted
Full Member
Wayne Williams said
Novice, I went back and reread your post looking for the scale of this signal box, but either read too fast or it's not there. So what is the scale? OO?
Also what thickness did your use for the "cladding"?
Looks great so far, keep em coming!
Wayne :D
Wayne
Sorry, should have made it clear at the outset. The signal box is 00 scale. As for thickness I am afraid I don't know exactly. I would guess that the plastic sheet is around 0.5mm and with the embossed effect it adds about 1mm to the thickness of the walls. The material is vacuformed plastic/styrene sheet. I hope that helps.
Bob(K)
Posted
Full Member
Wayne
Posted
Full Member
Phill
Posted
Full Member
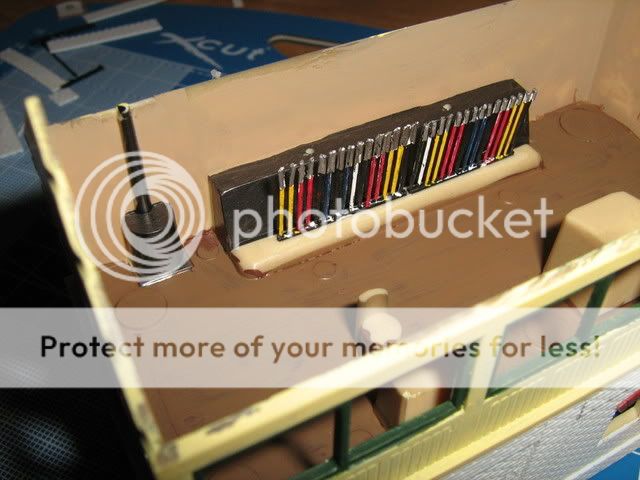
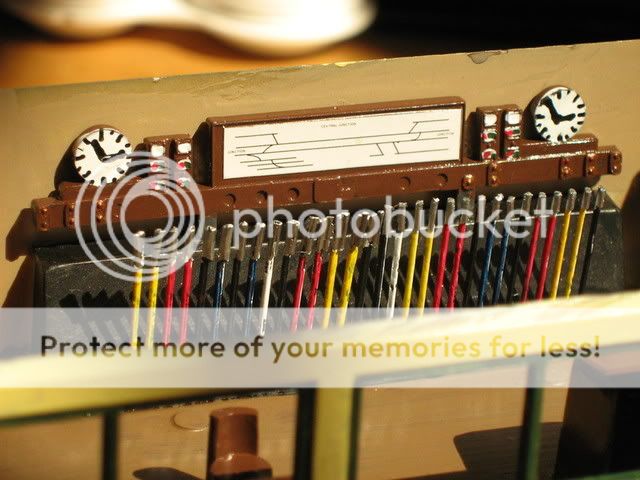
Once dry I then painted the frame base black. The model also includes a plastic item to represent the block instruments. This is not a bad representation of the real thing and so I painted this and added some detail. I also used the track plan sticker provided with the model. This was fixed in place and with the levers looks quite effective:
The next task was to put in the glazing. I decided to use that provided with the model. You will note that I have given the brickwork a wash of mortar colour too.
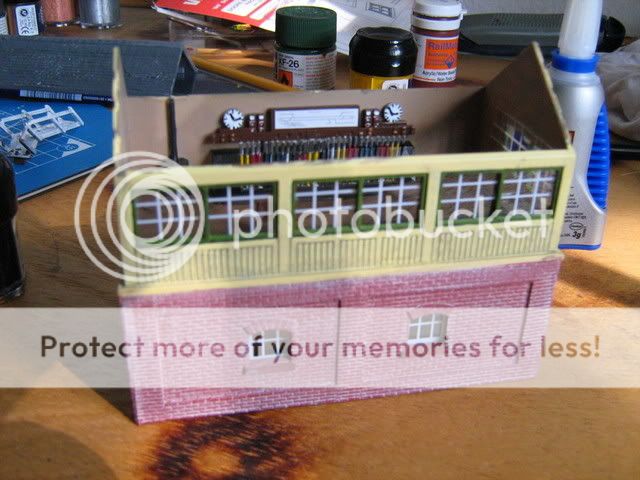
Once it was in place I realised that it looked a little odd with green outer window frames and white framing around each pane of glass. Methinks I will need to paint the green areas in white. Having glued the glazing in with super glue this will present me with a bit of a challenge - doh :oops:
So next task is to repaint the window frames - I will let you know how I get on in the next installment.
Bob(K)
Posted
Full Member
Wayne Williams said
Thanks Novice! Yes it really help me. I have not seen vacuformed styrene sheets. Are they more flimsy because of vacuforming? Do they cut easier or about the same as Pasticard?
Wayne
wayne
I have used both and there is little difference, in my view. Horizontal cutting is easy as the blade can run along one of the mortar lines. Vertical cuts need a bit more care, as it easy for the blade to jump into one of the mould lines.
Bob(K)
Posted
Full Member
Wayne
1 guest and 0 members have just viewed this.