Making points...work...
Posted
Full Member
The whole power routing/rectangle thing smacks of Triang grey track and Series 3 black stuff to me and was dispensed with when I was about 9 I think! I then had peco, which my Dad wired for me with Peco motors and switches, which he put on a control panel, none of which I understood for a moment. I'm afraid if I ain't interested, I can't learn it and lecktrickery comes under that heading, although as that was my Dad' later business I did once learn all the values of resistor colour bands and the gold and silver ones too, but now have no idea beyond a basic idea of what they do.
I shall just get busy with a multi meter to ensure there are no shorts in the basic construction. Actually making the point is no problem for me. When you've made as many brass masters of everything from 1/5th scale engines to 1/200th scale aircraft with missiles and everything in between, as I have (over 500), filing a few bits of rail holds no fears.
Cheers,
Martin
Manifestly it is better to use simple tools expertly than to possess a bewildering assortment of complicated gadgets and either neglect or use them incompetently. ( L.T.C.Rolt)

Posted

Full Member
Peco out of the box today is power routed. Insulfrog excepted. Nothing wrong with it except the gaps between the closure rails just before the frog and between the point blades and rail need to be sufficient to prevent shorts. The reason for showing that Shinohara was to illustrate that if you treat the points as a rectangle it's obvious why pins are not necessary. The trade-off is that the bar will move in a small arc. The length of which is dependent on the distance between the blade and rail. Give me a few minutes and I will take a photo of a modern turnout from ME with fixed tie bar.
I didn't get what you were saying about leaving spaces. You need to do that whether you use ballast or top it up with muck to the rail head. Point rails, the frog V, and the tie bar. And the check rail gaps.
One thing I have learned over the years in building my own points is that accuracy in key areas is paramount. Along with the correct tools.
Fast Tracks have some excellent online video tutorials, including pins.
EDIT: https://www.handlaidtrack.com/ Templates are downloadable and free. Useful for rough alignment of track. Rail spacer jigs/rollers should always be used. Their frog/blade jig comes in a range of frog numbers, and is very useful for making sure the frog is also at the correct angle when soldering up. You can cut the angle for a #6, soldering it up without a jig can give anything between a #5.5 and #6.5. A DITD issue. I also use Templot, but given your comments on computers this may not be appropriate. That said, it is great for understanding and getting the geometry of a turnout correct, especially for that #7.25 frog that you just need. I have nothing to do with Fast Tracks or Templot (http://www.templot.com/), just one satisfied user.
Nigel
EDIT: Some pictures of a modern turnout from Micro-Engineering. This is an On30 code 83 turnout, DCC ready to go out of the box, no power routing, same rails as their HO version, the sleepers/ties are O narrow gauge scale. Note the jumpers between running rail and closure rail.

Blade ends. Fixed in place (rail bottom has a tab embedded in the bar), no rotation or longitudinal movement. The bar described a barely discernible arc moving from one side to another.
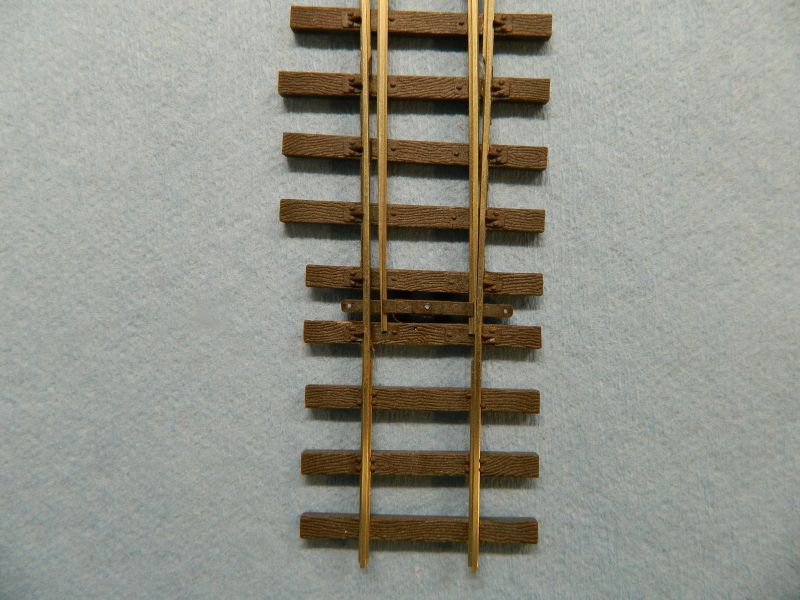
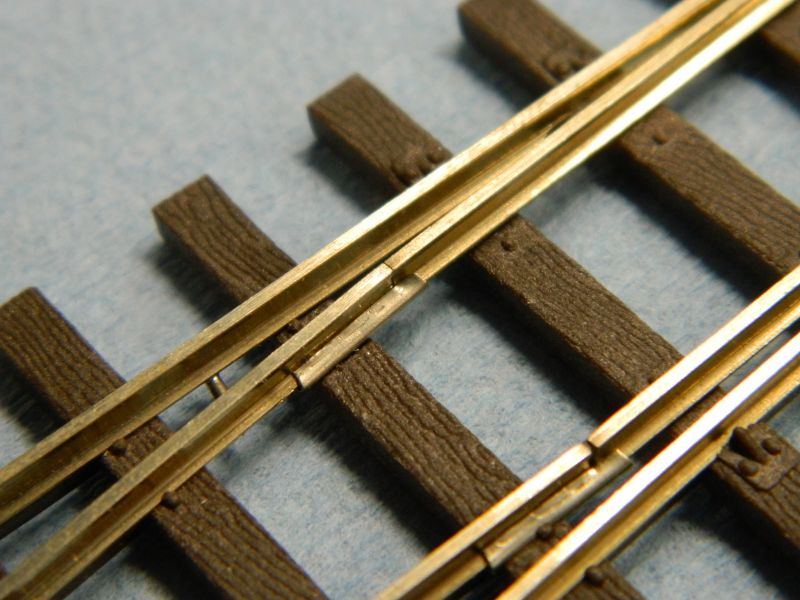
Closure rail end. Hinged using rail joiners. Closure ends fixed. This where all the movement takes place. Bit like a see-saw (teeter-totter for those of us in the US or Canada), all the movement is at the end away from the pivot. Rail jumper to the right of the upper hinge. Big enough for 15 amp!
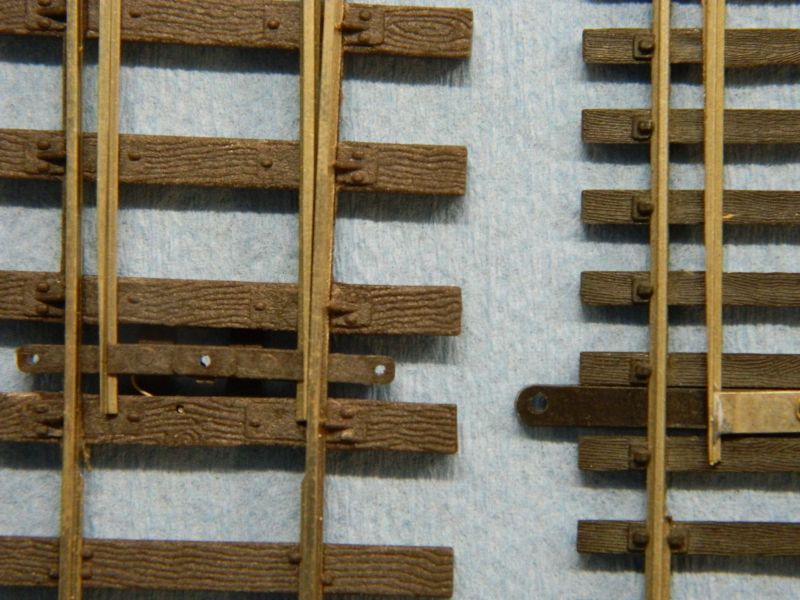
Comparison between the Shinohara and M-E turnout to show the difference in blade-rail distance. The gap is always a bit of a compromise, even without power routing, unless all the back-to-back distances of the stock are known. If you just want to take photographs then it can be scale prototype distance, as long as the wheel flanges fit. If you want to play trains that's a different story. And another DITD. Especially with OOn9, where some of those old N-scale chassis have over-flanged pizza-cutter wheels. Even the new ones are not much better (bin there, dun that).
And lastly the frog "insulation". Air gaps at either end. Not a plastic rail joiner in sight. In most cases (probably an 0-2-0 excepted) electrical continuity is maintained by the locomotive wheels. Option to wire the frog underneath of course. Note the narrowest distance between the closure rails is on the frog casting, minimal risk of shorting. Same for the other end.The frog point is always slightly rounded (even on the prototype) and reduced in height, otherwise interesting things start to happen. Closure rails are curved, frogs are normally straight, getting the two to meet without causing the locomotive wheels to jerk is another DITD. Transition curve calculation is another interesting topic, as you really want one that increases or decreases the curvature as a function of the length. Oozlum bird territory. The math is way beyond me. That's why most designs put the curve well before the frog, and where spacer jigs become essential, and having a radius meeting the frog can be avoided.

©Nigel C. Phillips
Posted
Full Member
Martin
 Last edit: by Mr.Tin
Manifestly it is better to use simple tools expertly than to possess a bewildering assortment of complicated gadgets and either neglect or use them incompetently. ( L.T.C.Rolt)
Posted
Full Member
With apologies to Katherine Dines:
De tie bar connected to de blade rail
De blade rail connected to re point rail
De point rail connected to de closure rail,
Now shake dem rusty rails
Dem rails, dem rails, dem rusty rails….*
It's all related when it comes to points.
Let us know how you get in with some pictures.
Nigel
*For the pc, that's how many of the locals speak here. And how I was taught this song as a round back in the 1950's in Oxfardsheer. By Miss "hit your knuckles with the ruler" Stratford. Who taught my mum. Revenge probably.
©Nigel C. Phillips
Posted
Full Member
these are two rough and ready canal wharf points, which I knocked up in an afternoon last weekend to finish the main unfinished bit of the board. As long as the N-Drive stuff doesn't actually fall off, I'm happy. It may be 7mm scale, but it sure ain't S7. I couldn't be doin' with that, but I DID make gauges on the lathe and I did make sure the alignment of the frog rails is smooth. #Numbers? No idea what all that is about, but the guys who banged this bit of 15" track down wouldn't have had a clue about that! This is industrial at its simplest. I'm beginning to be very glad I don't have space for a layout! Too tight to buy, too busy to make any more than these two!
Thanks for all the pictures and explanations, but you really shouldn't go further as you'll leave me way behind!
Cheers,
Martin
Manifestly it is better to use simple tools expertly than to possess a bewildering assortment of complicated gadgets and either neglect or use them incompetently. ( L.T.C.Rolt)
Posted
Full Member
Hold on a minute, is this On9 (or the 7mm 1:43 equivalent)? In which case anything goes, including the kitchen sink. 9mm track, N-Track mechanisms (had a few of those in the past). Here I was thinking N-scale. Sounds like my track crew, Blodgit (he can't spell), Fudgit and their new best mate Wingit.
I came across an interesting narrow gauge outfit who were clearing some timber stands in the south of Virginia in the 1900's. Hardwood timber rails taking small 6-10 ton locomotives . Probably had live frogs. You seem to be doing fine without all the technical stuff, let sleeping frogs alone. Although if you do any more you might want to have a quick gander to see what you've been missing. Then again…
Nigel
©Nigel C. Phillips
Posted
Full Member
So with so many bits done in O9, I thought it best to squeeze in a bit of 9mm track on the canal wharf to show off his stuff should he wish to borrow the set-piece for a show.
Cheers,
Martin
Manifestly it is better to use simple tools expertly than to possess a bewildering assortment of complicated gadgets and either neglect or use them incompetently. ( L.T.C.Rolt)
Posted
Full Member
Conventional over here to use n to denote narrow gauge. On30, On2, On2.5 for example. When I was doing UK narrow gauge 15 years ago OO was OO-9, O was O-16.5, etc. Peco still call it that. Blame eBay and tweeting/texting and the character limits for the habit of leaving the hyphen out. I still use a lot of 1:43 on the 1:48 build, adds a bit of mass. A Simplex turtle is on the list.
O16.5 and 016.5 look identical to most people. The hyphen or n make it clear which flavor of O is being referred to.
Nigel
©Nigel C. Phillips
Posted
Full Member
Martin
Manifestly it is better to use simple tools expertly than to possess a bewildering assortment of complicated gadgets and either neglect or use them incompetently. ( L.T.C.Rolt)
Posted
Full Member
Fair number of non-UK modelers in the club who use different terminologies.
Nigel
©Nigel C. Phillips
Posted
Full Member
Imagine explaining the scales and gauges to a Martian!
Martin
Manifestly it is better to use simple tools expertly than to possess a bewildering assortment of complicated gadgets and either neglect or use them incompetently. ( L.T.C.Rolt)
1 guest and 0 members have just viewed this.