Scratch building
Posted
#231289
(In Topic #12664)

Full Member
Wagon body
Hi All. I had an accident with my long wheelbase Brake van that I had installed my Lanarkshire Models track Cleaner in. I do have other brakevans but, they have too much detail underneath to fit the roller.My idea is a five plank wagon body to fit on the chassis, and I would like some advice on this “First Time Projectâ€with suitable materials for the bodywork planking. Best wishes. Kevin
 Last edit: by Passed Driver
Staying on the thread Kevin.

Posted

Full Member
The simplest would be scribed styrene.
Regards Rob
Posted
Full Member
Staying on the thread Kevin.
Posted

Full Member
1. Is the accidented body shell repairable? Most things are, stepping on it excepted.
2. Scribing styrene sheet. Do you have the tools? You need a sharp and hardened point such as a tungsten dart head. Plus very accurate cuts and some means of ensuring a 90 degree corner (Lego is good for this if you don't have a jig).
3. Consider styrene strip glued to a thin styrene sheet backer.
4. Go wood strip glued to a backer of thin ply.
5. Convert the van to a flat wagon with a one plank side, cover the mechanism with a tarp or a wooden shipping container. No need for those pesky doors you get on regular wagons.
6. Get a cheap van off eebygum.
7. Buy a new replacement and save hours of work and frustration.
Me? Number 5.
Nigel
©Nigel C. Phillips
Posted
Full Member
Kevin, you could make the wagon in card (1.5mm mounting board). Scribe with an ordinary scriber or empty ballpoint pen. Brush over with french polish (shellac) to harden and protect the card before painting.
Terry
Posted
Full Member
And a long wheelbase chassis is essential for the track cleaning roller. If I was to attempt to convert the van? The plastic may shatter with a saw? Best wishes. Kevin
Last edit: by Passed Driver
Staying on the thread Kevin.
Posted

Full Member
Bill
At 6'4'', Bill is a tall chap, then again, when horizontal he is rather long and people often used to trip over him! . . . and so a nickname was born :)
Posted
Full Member
Staying on the thread Kevin.
Posted
Full Member
Have fun and good luck Kevin.
Bill
At 6'4'', Bill is a tall chap, then again, when horizontal he is rather long and people often used to trip over him! . . . and so a nickname was born :)
Posted

Full Member
Collections - OLFA.com
It makes a groove and I find it very useful. Used it to make my brake van interiors among other things.
John
John
Posted
Full Member
Staying on the thread Kevin.
Posted
Full Member
Cheers,
Martin
Manifestly it is better to use simple tools expertly than to possess a bewildering assortment of complicated gadgets and either neglect or use them incompetently. ( L.T.C.Rolt)
Posted
Full Member
Staying on the thread Kevin.
Posted
Full Member
An alternative to your track cleaner is to design a plausible vehicle from scratch which looks like it might be part of a track maintenance train, paint it screamin' yella and nobody would know the difference.
Cheers,
Martin
Manifestly it is better to use simple tools expertly than to possess a bewildering assortment of complicated gadgets and either neglect or use them incompetently. ( L.T.C.Rolt)
Posted
Full Member
Staying on the thread Kevin.
Posted
Full Member
Real planks>V groove (unless you can get 4mm scaled it is HO scaled and meant for vertical planks)>scribed. If you scribe, you will need a stainless steel ruler with a smooth edge, otherwise the scribing blade/point will chatter on the indentations. You will need a 4 square needle file to get 45 degrees chamfer on the edges. The pointy end makes an effective scribe. Three square gives 60 degrees. Twelve inches to the foot had this as rain drips. Turning a sharp or even blunted cutting blade over to use the back pointy bit is effective but downright dangerous.
Styrene is funny stuff, you need several passes with a light touch to stop the material from moving away from the edge. It works best if you can clamp the sheet and the cutting edge, and use spacer blocks to set the width of the plank. Using the pointy end of a dart held at 45 degrees to the vertical gives pretty much the desired depth and chamfer. I'll post a picture in a bit.
Your post prompted me to look at Lanarkshire Models. No shipping to Canada or America? So I stopped looking after I checked out the brake van.
Nigel
©Nigel C. Phillips
Posted
Full Member
Using a strip of masking tape on the back of the steel rule will do as much as possible to stop it slipping. Clamp and use spacer blocks if you still want to be doing it this time next year!
Part of doing it yourself is the implied assurance to yourself that this time next year you'll far more confident and twice as quick. I have developed methods that get the job done, because the sooner I did stuff, The sooner I could invoice for it and get n with the next job. Whilst you may not be doing it for money as I used to, you should still want, surely, to get as much done in as short a time as possible, in order to do more.
Despite being a professional for years I am not a patient man. There's always more to do. I do recommend, however, that you mark your plank spacing with a knife from a steel rule. Rub a grubby finger over the marks and they'll show up as very fine lines. If you use a square file to make the plank lines you run the risk of the gaps being too wide, especially in the smaller scales. Tat's why I use a 3 square (triangular) file, which I also grind at the end at an angle, which helps guide it in to the knife scratched line and is also a useful graver, which, having just lost mine of many years, I find is £28 to replace! Ergo, make one for nothing.
Cheers,
Martin
Manifestly it is better to use simple tools expertly than to possess a bewildering assortment of complicated gadgets and either neglect or use them incompetently. ( L.T.C.Rolt)
Posted
Full Member
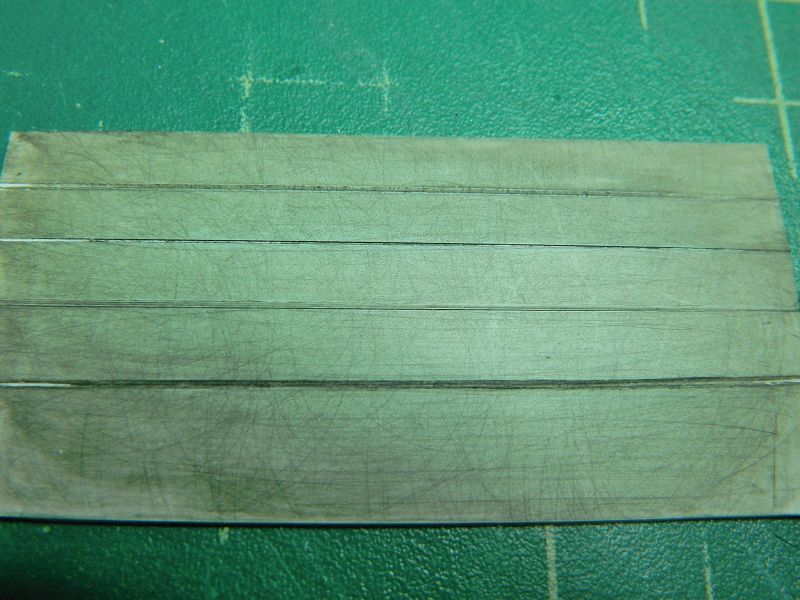
See below for a quick sample using a dart tip, a cutting knife (the back of the tip) and a 4-square needle file (much abused, now relegated to simple tasks such as this). Four cuts top to bottom - the dart, the back of the blade tip, the 4-square file, and the 4-square file after 2 passes to make a chamfer. To my eyes all look good except the 4-square with the chamfer - way too big a gap for HO/OO scale, better suited to S or O.
Couple of tips here. Gently go over the styrene with 400 grit to roughen up the surface, that will stop things moving around (go in the long direction - it will give a hint of grain). Gently go over the styrene surface after making the grooves, as the cutting action will raise small lips either side of the cut. And use thick sheet, if you use thin it will curve immediately. You should be able to do the four sides in about 10 minutes.
Nigel

©Nigel C. Phillips
Posted
Full Member
Martin
Manifestly it is better to use simple tools expertly than to possess a bewildering assortment of complicated gadgets and either neglect or use them incompetently. ( L.T.C.Rolt)
Posted
Full Member
One method you mentioned above for grooving was to use the tip of a scalpel blade upside down. Ouch! Scalpel blades are designed to easily cut through flesh (their intended purpose), and need to be treated with respect, especially as they are being used next to the hand holding down the styrene in question. If anybody is contemplating this method, please do what I do and only expose a mm or so of the blade of a box cutter or similar. Health and Safety commonsense applies in the hobby room as much as anywhere else. Spending an evening at the local emergency room having a deep cut sutured/packed with coagulating film after spilling claret everywhere is not my idea of scratch modeling.
The pointy end of a dart or the tapered end of a 3 or 4 sided needle file is much preferable, and a lot less dangerous. Or get a commercial cutter/scriber where the blade is protected. Some things you shouldn't do with a scalpel, this definitely is one of them. One more thing is to wear those safety glasses when using scalpel blades, they don't like lateral forces, and will shatter quite easily. There was a recall quite recently of bad scalpel blades that were doing exactly this.
Bottom line - use the appropriate tools for the job and use them properly. Those new to scratch building please take note, scalpels (and other blades) are for cutting, not scribing.
Nigel
©Nigel C. Phillips
1 guest and 0 members have just viewed this.